The lull before the storm – ice dyeing in preparation

1 01 2017

2016 has not been my favourite year.  Don’t get me wrong, there have been some amazing highlights and I cherish those, but the negative has far outweighed the positive and in true Murphy’s style: if it could go wrong, it did; if it could break, it did; if someone had the power to let you down or worse, they did; but I am not going to dwell on what is past and what can not be changed.

I have never chosen a word for the year before, but for 2017, I am focussing on consolidation.  I want to bed down all the half finished from 2016 and build the platform for the next few years.  As such I have spent the time between Christmas and New Year building a plan.  I have even taken the unprecedented step of getting some help.  I don’t generally do New Years resolutions and this year is no different, but I am going to work with the resources of The Business Bakery and work in three lots of 100 day goals for this year.  I am telling you this because it is supposed to help keep me accountable if I tell people what I am doing.  So, here I go.  If you want to find out more about the structure, go here:

100 Day Goal

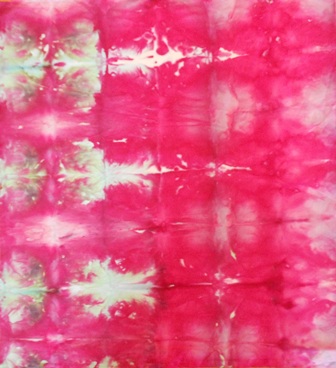
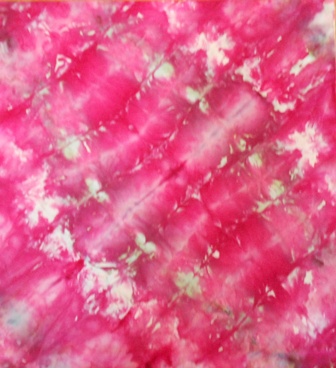
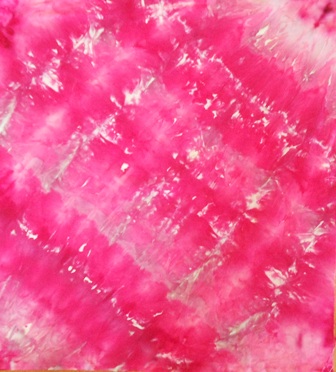
I have a lot of work to do to get everything back on an even keel, but I am nothing if not resilient.  I am not going to share the content of the goals until they are close to realised, but I can share the steps along the way.  To keep me sane this week amongst all the admin and as one of the micro actions I need to take, I have ice dyed some fabric.

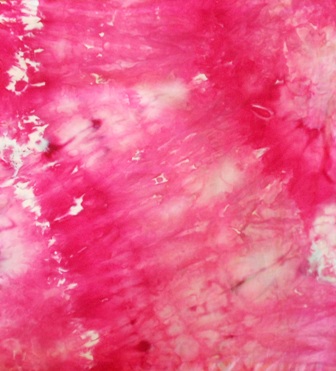
Ice dyeing in Australia in 30+ degree heat produces very different results to when it is done in the middle of winter or in snow.  This is because of the chemistry of the dyes and mordants.  So, the traditional outputs of ice or snow dyeing is usually soft, gentle colours.  In this heat, despite the dye being carried through the fabric by the melting ice, the dye has high temperatures to ‘batch’ in, so the colour is still strong and vibrant.  (If you want to understand this and learn how to dye, check out my Almost Alchemy dyeing class:  http://www.uniquestitching.com.au/p/9122334/online-class—almost-alchemy—dyeing-for-the-traditional-and-art-quilter—2017.html).

So, in some ways ice dyeing in heat does not give you very different results to other dyeing techniques due to the hot batching.  What you do get though is unpredictable randomness and I am a big fan of unpredictable randomness.  I have folded some of these pieces, shibori style, and others I have just scrunched, but the random effect is perfect as the first layer of fabric for a couple of projects I will work on this month.  Here are the six fabrics.  They are all fat quarter cotton homespun (muslin in US terms).

ice-6

ice-1

ice-2

ice-3

ice-4

ice-5

I will try to share what I do with these as I go.


12 Days of Christmas 2015 – Day 7 – Focus on Surface Design

12 12 2015

Todays special is a simple one.  I have taken $45 off the Jacquard Screen Printing Kits – they are now only $60, while stock lasts.  Here is the link:  http://www.uniquestitching.com.au/p/9074603/jacquard-screen-printing-kit.html

screen 1 screen 2

I also want let you know that I have opened up bookings on our first online class for a long time. I have upgraded all the technology so it will be full of video, forum, and feedback. You can join at any time, but if you join before 31st December 2015, there is some added bonuses.

Image 5 foiled fabric sml

Dragonfly fabric small

This is your opportunity to do some of the classes I teach in Houston and Birmingham without having to leave your home.  You can click on the flyer to find out more details.  This will be a comprehensive coverage of a broad range of surface design techniques and once you have access to the material it is your forever.  You can keep going back to it at any time.

Stunning Surfaces Art Cloth Online Class 2016

SANYO DIGITAL CAMERA


12 Days of Christmas 2015 – Day 5 – Gelatos are not always Ice Cream

10 12 2015

Well, actually they are never “Ice cream” but we don’t need to split hairs here.  One of my most favourite mixed media products are the full range of Design Memory Craft brand:  Gelatos, Big Brush Pens, Wax Crayons and all the associated supporting products.  Faber Castell have developed the Design Memory Craft brand to seperate out their pure ‘artist’ products from the mixed media range.  The Design Memory Craft stable is fantastic and growing.  Keep an eye out for it.  For the next two days, I have 30% off the full range of products in stock.  Use 12Day5  as your discount code at the checkout.  Here is the link to all the products: http://www.uniquestitching.com.au/c/4536033/1/design-memory-craft-by-faber-castell.html.

When I first started seeing Gelatos used overseas, I knew I wanted to get my hands on some to have a play. This was about two and half, three years ago.  I rang around about 20 different art and craft stores and almost universally I got the response:  “you know we are not an ice cream store, right?”  Yes I knew that.  Anyway, I ordered my first set online and fell in love with them.  Now they are everywhere, but I still love them and most people are not demonstrating them very comprehensively so you don’t get to see the full potential of this collection of goodies.  I try to always have the full range available on my website under the Mixed Media category.

I use the gelatos as my principle love and all the others as the support network.  I use them on every surface I can lay my hands on from paper and card to leather and all things inbetween.  I really love them on canvas, fabric and other slightly absorbent surfaces.  Gelatos are a water soluble wax crayons.  So you can use them as a wax, as a water colour, added to anything water based to change the colour such as gel medium or gesso, and dilute with water directly or indirectly such as into a mister.  Once set, they don’t shift so you can paint or embellish over the top of the first layer.  If you are using Gelatos on fabric and think it will need to be washable, you need to use some Textile medium in the mix somewhere.

There are a huge number of video tutorials available for all of these products.  I will share a couple.

This one is super basic, but covers a lot of introductory techniques:

Faber Castell has a page of tutorial videos here:  http://www.fabercastell.com/design-memory-craft-us/video-gallery

I particularly like the ones done by Donna Downey, so check some of those out.  They are all short and sharp and full of content.  Here is one to get started with.

Briefly on the other products in the range, my second favourite are the Big Brush Pens.  They are India Ink and are permanent on pretty much anything.  They are great to stamp with or draw or colour and then use a gelato wash or spray over the top.  The wax crayons are really cool too.  I use them as an encaustic more than anything else.  You all know how much I like to melt things.  This wax is great for melting as an encaustic or a resist.  The mediums are okay too, but the Texture Luxe and Texture Gems are awesome.  Check them out.  I am sure you will enjoy using them all.


12 Days of Christmas 2015 – Day 1 – Gelli Printing

6 12 2015

I love Monoprinting. I really do. It is one of THE simplest and most effective ways to get paint onto a surface in an original, unique way. You can print onto any surface that is flat (ish) and will hold paint: from fabric to card and paper; leather, ceramics, cork, wood, canvas, glass, you name it.

I discovered the Gelli Plates when they were first released and have been bringing them into Australia since that time, over four years now. Although I have been monoprinting on home made gelatin beds, glass and acrylic for over twenty years, I think the Gelli plates are the best tool. Once you have one, you never need to replace it and as long as you store it flat and keep it moderately clean, it will last a life time. I have made countless fabrics, either as feature fabrics that I chop up or as backgrounds with the Gelli plate as well as hundreds of sheets of paper and card plus too many canvasses to count.

gelli prints sml

The technique is really three simple steps: apply paint to the plate and roll it out; create a texture in the painted surface; and press your printable item onto the paint.

Here is a video produced by Gelli Arts when the plates were first released. It still shows the process really well.

http://www.gelliarts.com have a great range of technique based videos that you can check out for ideas and projects.

Some time ago, circular Gelli Plates were introduced and I was not sure why we would need them. Then, I got one and of course then needed all three sizes. Here is a large canvas I made with the 6inch circle.
round Gelli canvas

and here is a video, again, by Gelli Arts:

and a video by Gelli Arts using Catalyst Tools:

For this first day of my 12 Days of Christmas, I have a package of two Gelli Plates and three Catalyst tools, reduced by 30%. Click this link to purchase: http://www.uniquestitching.com.au/p/9096299/12-days-gelli-plate-package.html

12 day Gelli

All 12 Days of Christmas specials will be available for approximately 48 hours then they will be gone.


art quilts in the making – it all starts with the backgrounds

5 12 2015

I seldomly have time to take photos when I am teaching. I don’t sit with my IPad or Phone at the ready and often get so absorbed in what I am doing that I get to the end of the day without taking any at all. When I do, I often don’t then do much with them. So I am going to try to rectify that. This post is about a three day class I did in New Zealand at One Tree Point with Kerry from Tulis Textiles.

The venue is fabulous. There is loads of space, inside and out; lots of tables and chairs; a full blown commercial kitchen and an enormous fire place – all of which we used.

The class was a three day class where we explored a huge range of surface design techniques with paint, foils, photo transfers, paper lamination, and so much more. We also looked at a range of what I call meltables: tyvek, lutradur, angelina, kunin felt etc. It was a lovely three days with the nicest people. I had a great time and ate way too much. I only seem to have taken photos on one day, but here are some photos of that days work.  You can click on them to make them bigger.

one tree 7  one tree 6  one tree 5  one tree 4

one tree 3  one tree 2  one tree 1  one tree 8


Alter Fabric with Transparent Paints

18 01 2015

Creating or altering fabric with paint allows you to tailor your feature fabrics or backgrounds to exactly what you want for your project. It is also incredibly quick, easy and fun.

Paints come in many forms. Different brands will be described and marketed in different ways and it can be confusing to know which product is optimal for which technique. The reality is that most of them are interchangeable and there is no single product that has a single use. What can be the greatest separation between types of paints is viscosity and transparency. Some paints, like Lumiere, Golden and Liquitex are thick and generally opaque. Some paints like Dye Na Flow and Pebeo Seteo Transparent are very liquid or runny and generally more transparent. It is these more liquid paints I want to show you this week.

I use Dye Na Flow.  Of all the fabric paints and inks I have used, I find this paint effects the hand of the fabric the least.  It is the closest surface to a dye I have found in a paint.  Paint does not become part of the fibre like dye does, so will always sit on the surface in some way.  Fabric paint is generally a form of acrylic paint, made up of the pigment (colour) and a bonding agent/carrier.  Dye Na Flow are very saturated in pigment and can easily be diluted with water to make softer colours and a softer hand.

Transparent Paints will go on any surface, but are best on fabrics. As they have a light hand, these paints are terrific on silks and other sheer fabrics as well as all natural and most synthetic fabrics.

Transparent paints can be painted, sponged and stenciled directly onto the fabric like any paint.  However transparent paints make fabulous watercolour, washed backgrounds, can be altered with salt or alcohol solution and can sun print.  Because these paints are transparent, they can be seen through so you can use the paint to change the colour of something but keep the pattern or detail.

Here is an example.

?????????? plus paint ?????????? gives you ??????????

Any transparent paint can be used for sun printing.  When you use paint like Dye Na Flow, it is richly saturated but very fluid.  To sun print with these paints, you dilute them with water, paint the diluted paint onto a wet surface and then lay items on the wet paint to create patterns.  The faster the paint can dry, the crisper the image will be, so this works best on a hot sunny day, but the truth is sun printing can occur on rainy overcast days too.  The piece photographed below was made with Dye Na Flow paint, salt and a plastic mask in the shape of a tree.

????????????????????

Here are instructions on this technique and a colour wash effect:  sun salt and screens

Dye Na Flow comes in 30 colours, all of which are able to be mixed to make new colours.

dye na flow colour chart

you can find them on my website here:  http://www.uniquestitching.com.au/c/195292/1/dye-na-flow.html

Here is an example of a project where I painted the background with Dye Na Flow.

from this                      bird on the wire 1

to this                           bird on the wire 3

Give these paints a go.  They are exceptionally versatile and easy to use.


Painted Fabric transformed?

6 10 2014

In a couple of weeks, while I am teaching in Houston, I am have been invited to take part in the Open Studios programme.  I am doing two, two hour sessions.  One is on developing dimension, depth, movement etc with painted fabric backgrounds and the second is about creating and using monoprinted fabric in your projects.  I decided that I need some new samples.  I started with the first session, so have painted up half a dozen fat quarters of homespun with Dye Na Flow paint.  Now I am working into turning them into something.  The focus is, of course, the painted backgrounds, but it is about how they set a great framework for art quilts and other projects.

Here is the fabric I started with:

bird on the wire 1

I then auditioned some fabrics to go with it.  I started with a black fabric that I had gelli printed with golds and copper Lumiere Paint, added some rich, rust, hand dyed velvet and slate silk georgette.

bird on the wire 2

I stitched the power poles onto the background surface, put some gold/orange novelty yarn into the bobbin to ‘couch’ the electrical wires, created a focal point bird silhouette on the ground and three, ephemeral, transparent birds flying in the top right corner.  Basic quilting carries the eye along the line of the power poles.

bird on the wire 3

I am tempted to put two more silk georgette birds in the top left, but am resisting that for now.


Incorporating Gelli Printing into Quilts

31 08 2013

I love creating my own fabric, whether that is by painting or dyeing and it is great to be able to use one off fabrics in projects.  That way you know no one will ever have anything like what you do.  Sometimes I meet in the middle of the unique one off and the commercial by incorporating elements of both.  Today I have taken some fabrics I monoprinted with the Gelli Plate and then stencilled the fore ground and incorporated them into some very basic patchwork using batiks and hand dyes.  The stencils are both commercially available.  The feather is from The Crafter’s Workshop and the ballerina is a Stencil Girl stencil.  Both will be very recogniseable in a range of different projects.  The batiks are Tulis Textile fabrics and the hand dyes, all my own.

??????????

This first one is monprinted and stenciled then stitched together with Tulis Textile Batiks.  Here is some detail of the priniting:

??????????

This second one is long and skinny.  I see it as a great growth chart or to decorate a narrow and long space.  Not that it will be either of those things, but it will be lovely as a simple demonstration for the Show stand or the Pop Up Classes.

??????????

And here is some detail:

??????????

I love this stencil.  One more sample to put together with Gelli printed backgrounds and then I can move onto something else.  What do you think?


Unique Fabric Art in Perth

22 04 2012

The Perth Quilt and Craft Fair is only about four weeks away.  Running from 23 to 27 May in the Perth Convention Centre.  We will be there with the usual array of dyes, paints, fibres, felts, fabrics, magazines, books, silks and more.  This year I will have my new fabrics – hand dyed cotton Sateens and the some of the gorgeous 50%cotton, 50% silk Radiance as well as lengths of silk georgette and cotton scrim.

As part of my stand, I will have the Unique Stitching Studio.  The studio will have five textile art classes running each day of the show:  2 dyeing – one with Procion dyes and one with Indigo dye; 2 mixed media – one using Angelina and Lutradur, the other using TAP, Angelina, Lutradur and Kunin felt (shown); and one doing mono-printing with the fabulous new Gelli Plates.

You can pre book the classes on my website now at www.uniquestitching.com.au or you can book on the day.

For the fuller descriptions go to the website or you can find them here: Perth Studio Classes

If you join me, we will have a lot of fun and probably learn a heap too.


12 Days of Christmas Project 10 – Covered Canvas Fabric Art

17 12 2011

Oh well another better late than never effort here, but hopefully the adaptiveness of this project will make up for my tardiness.  We have had some unexpected visitors in the last two days and when you have not seen people for twenty plus years it seems a bit rude to say, ‘love to chat but I need to blog – 2000+ people are waiting for today’s entry’ – rude and pretentious.

Now, I am going to show you one option for creating fabric wall art, but I hope that you will take the ideas and adapt them because the sky is the limit really once we break down the steps.  I recommend three basic parts, each which can be varied:  a surface designed background, padding or bulk in the middle, which can be quilted if you like; and a focal point.  I have used the silver leaves because it works with my theme but you could use applique, collage, photos, anything.

So for the first step, I used a fat quarter of black hand dyed sateen and two deColourant Mists – one clear and one dusty rose.  I also used some leaves from the garden.  Ferns work really well for this technique, but we don’t have any, so use any leaves you like the size and shape of.  The more interesting the better.

lay your leaves on your fabric, push down to keep fairly flat.  Lightly spray the surface with the uncoloured deColourant mist.  Spray from the top down rather than from an angle to ensure you are not getting under the leaves.

Remove the leaves and let the fabric dry.

The pattern will start to show up once it is ironed but you can start to see the complexity of the pattern already.  Steam iron with a hot iron.

Once ironed, replace your fabric and lay the leaves on at a different set of angles.  Spray, allow to dry and then steam iron again.  Spray your fabric for a third time, but this time use the deColourant Plus.  This has colour added to it.

Both the deColourant gel and mist come in deColourant Plus versions.  These not only remove colour but also leave a new colour in its place.  I love these on dark fabrics like the black and the blue I am using in this project. anyone notice the blue photos turned black?  Seamless aren’t I?

So, for the third spray, use the deColourant plus.  In the photo below you can see the colour on the leaves.  Spray fairly heavily to get an even coverage.

Again allow to dry and steam iron.  Your background fabric is now ready for the next stage.

You can do anything for your background.  You can use prepared commercial fabric, you can paint instead of discharge, you can use stencils or masks.  A mask is just something that prevents the colour getting to the background by masking or resisting.  The leaves I have used are a mask.  There are a heap of fabulous commercial ones available or you can use items from around the house.

For the second stage, you need to prepare the frame or canvas that you are going to mount your piece into or onto.  I am using an artist canvas which is readily available and cheap.  I have cut some wadding to the same size as the canvas and glued it to the surface.

Next, I am going to wrap my fabric over the wadded surface around the sides and, tucking in the corners, staple the fabric to the canvas to hold it in place, keeping it taut.  You can glue, stitch, thread or staple at this stage.  You might choose to take the glass out of a cheap frame and wrap the fabric around the backing card.  In that case you may not need nor want the bulk of the wadding.

If your focus point is applique or something you need to stitch through, don’t attach the fabric until you have completed that – obviously it will make it hard to applique if the fabric is already stappled to a frame.

This photo is a bit light, but you get the idea.

The third element is your focal point.  For that you can do anything.  Choose a theme that suits the decor of the person receiving the piece and tie it in with your colour selection and surface design patterns.  I continued the leaf theme.

While I was discharging the fabric, I was dehydrating some of the leaves off the tree that I took my mask leaves off.  For information on how to dehydrate flowers and leaves, this website is very comprehensive – http://tipnut.com/how-to-dry-flowers-a-collection-of-tips/

These will be fragile, so I have painted them gently and sealed the back to give some reinforcement and strength.  The first lot I painted silver and tried against the black and the blue backgrounds.

I also painted some rust and teal ink over the leaves, but did not like that so much, though it was getting there.  It is worth experimenting to get the look you are after.

In the end, I aged some painted dried leaves with distress ink and embossing powder, but I will show you the final version after Christmas as the recipient is watching my sites hoping to see her gift.

Anyway, this suits my friend.  I hope that you can take the concepts and the techniques and tailor it to gifts for people you know.