Ice Dyeing with Procion Dyes

14 03 2016

I love dyeing fabric.  I do, I just love it.  I could easily spend all my waking time making things colourful with dye and yet, I have resisted the growing trend of ice dyeing until quite recently.  Why have I avoided it? Why have I ice dyed lately? Let me explain.

What is it?

My observation is that ice dyeing morphed out of snow dyeing.  Snow dyeing became a thing when the dyers in the Northern hemisphere started experimenting on how they could feed their dyeing addiction in the middle of great drifts of snow.   Snow or ice dyeing gives a very different effect than the traditional Procion dyeing techniques.  The chemistry is a bit ‘wrong’ and on one level, does not make a huge amount of sense.  As a result, ice dyeing gives softer, more drifty colours.  Also, the dye powder is dispersed by the melting ice, the colour distribution can be very loose and ad hoc; organic almost.  It is an interesting technique to play with.

Why I avoided it.

There are a number of reasons for this:

  • it does not feel safe – measuring out large amounts of dry dye powder and leaving it on top of the ice until it melts means that lots of loose dye particles can become airborne;
  • it is not very efficient – you use more dye to get a less vibrant effect than all the more common techniques;
  • it can be costly – both in dye and ice.  Unless you have a large ice making capacity and don’t have access to lots of snow, you will go through a lot of ice and it can add up.

Why I gave it a go.

I have seen the results others were getting and they can be very beautiful.  Ice dyeing has become very popular in the tie dyeing community.  I am not a fan of the full on, 1970s tie dyed mandalas, etc, but I do like a slightly modified, less planed version of ‘tie dyeing’.  (And I don’t actually tie unless I am doing shibori as this creates work)

This post is not going to be a comprehensive tutorial on the technique, but I do want to show you the results I got.

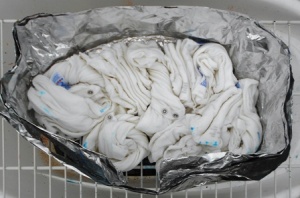
Fold, scrunch, pleat or bundle your fabric or items to be dyed.  Place on a rack of some sort with a vessel underneath to catch melting dye.

ice dye process 1

If you want to, create a cuff either with your bucket/vessel or with foil.

ice dye process 2

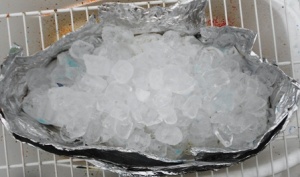
Cover in ice.

ice dye process 3

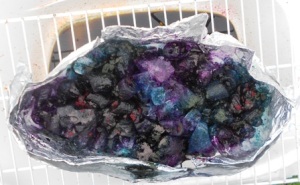
Cover with dye.

ice dye process 4

Walk away and leave it alone until all the ice has melted and the dye distributed.  I left each batch over night and rinsed out the next morning.

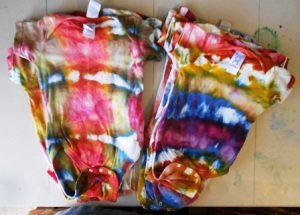
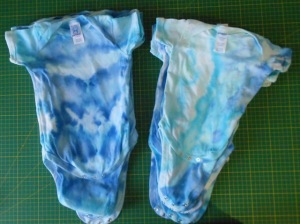
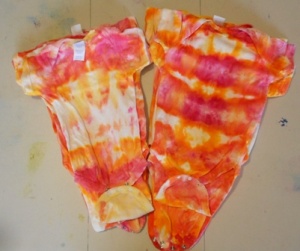
Here are some of my results.

ice dye romper 3

blue rompers

ice dye romper 4

If you would like to learn a lot more about dyeing fabric, check out my very comprehensive Almost Alchemy online dyeing class.  We start with Ice Dyeing.  Details can be found here:
http://www.uniquestitching.com.au/p/9122334/online-class—almost-alchemy—dyeing-for-the-traditional-and-art-quilter.html


20 Minute Christmas Wreath

23 12 2013

Rustic Christmas Wreath

I originally made this in 2005 and it is still looking exactly the same.  It is so quick and easy to make.

What you need:

  • One vine wreath (I  used an 8 inch one)
  • Four sprigs of Christmas Berries
  • One large rusty bell (I used a 7 cm one)
  • Scraps of fabric or Ribbon.

How to Make it:

  1. Rip your fabric into five strips, approximately 4 cms by 50 cms
  2. Feed the end of the Berry Sprigs into the centre of the wreath, spreading them evenly around the wreath. You can use a hot glue gun to secure these if you want to.
  3. Tie the strips in a tight bow at the point where the berry sprig has entered the wreath.
  4. Thread the fifth strip of fabric through the loop of the bell.
  5. Tie the bell securely around the top of the wreath.  Allow it to sit slightly into the centre of the wreath.
  6. Use the remainder of the ribbon to make a hanging loop.


Felted Flower

28 11 2012

Creating one off, exotic flowers out of felt is both quick and easy.  Here is how.

You need some offcuts of prefelts, some wool fibre or top, scraps of scrim, lace and interesting yarns.  Choose some that have some contrast in colour and texture.


The next few photos show the layers.

Make a circle with the scrim or fabric.

Build your layers, adding wool as you go.

Once you have made all of your layers, mix some soap (I use dishwashing liquid) in hot tap water.  Wet the layers through with the hot, soapy water.

Place between two layers of bubble wrap and rub together between your hands.  Keep rubbing and agitating the layers until they start to bond together.  Re wet the felt as you need to and rub areas over the areas that are slower to felt together.  Keep rubbing until the layers are bonded together and the prefelt and wool are firm.

Once you are happy with it, rinse the felt in warm water to remove the soap.  Let it dry.  This is what mine looks like once dry.

Scrunch the back of the ‘flower’ gathering the centre together.  Try different layouts to see which way you like it to sit.  Stitch the back together to hold the shape.

Add some embroidery or beading to the centre of you flower.

You can now stitch this onto a bag, garment, quilt or jewelry finding.

Now you will need to make more.


dyeing scrim – one of many ways to do so

8 07 2012

This post will show you how easy it is to dye a range of colours.  This is a very simple process but worth revisiting from time to time.

From this:

To this:

I cut the scrim into five metre lengths.  There will be some shrinkage so I should get at least 4.5mtrs of useable fabric.  Each colourway has five colours, so 25 mtrs in total per colourway.  Obviously that is not a rule and you can work on a larger or smaller scale.

I pre-soak my fabrics in a soda ash solution.  Soda ash, or sodium carbonate is the mordant for the reactive dyes.  In this process, I am doing 15 colourways of 25 mtrs each, so I put about three cups of soda ash into about 30 litres of water and that will last me through the whole process plus some.  I soak the fabric for at least half an hour and wring it out, reserving the soda ash solution.  Then, each 5 mtr length goes into its own bucket.

I have a fabulous outdoor area that is covered in where I do all my dyeing and other wet processes.

My starting point for my dyes is a teaspoon per litre of water.  While your fabric is soaking in the mordant, mix your dyes.  The Procion MX dyes are a cold water dye, but I tend to use hot tap water to speed up the dissolving, especially when it is the middle of a Canberra winter and struggled to get into double figures temperature wise.

Give the dyes a good stir to make sure the dye powder is fully dissolved.  Then pour the dye over each piece of fabric – one colour per bucket.

This is my Winter colourway.  It is soft and frosty.  Leave the dye on the fabric for at least three to four hours and then rinse until the water runs clear.

Ready to use.


Exploring Lutradur and Evolon – what are they?

7 11 2011

I love melting and heating stuff. Heat distressing fabrics create fabulous, textural surfaces that you can then include in your projects.  All man made fabrics can be distressed and texturised with heat.  A heat gun and soldering iron are the best tools to use to do this.

Before I go any further, I need to remind you of some basic safety when heating meltables.  First always do this in a well ventilated space.  Man made fabrics create fumes when they are heated so be careful and stop if the smell is causing distress.  Secondly when you are heating man made fabrics, they may scald, smolder and eventually burn.  Ideally don’t get to this point, but if the charred look is part of what you are after (and it often is) then be prepared with some water nearby.  I bowl or bucket is fine.  When heating or distressing the fabrics, I place them on an old baking tray and use a bamboo skewer to hold them in place so I don’t burn my fingers.

Scared you off??  I hope not.

Lutradur and Evolon….  These are some of my favourite fabrics and I am currently incorporating them into lots of different projects. So what are they and how do you use them?

Lutradur is spunbound polyester fibres.  The fabric is not woven or knitted – it is spun like fairy floss.  It comes in a number of different weights, colours and even textures.  I have taken a photo of each of the different weights in white on a cutting mat so that you can see the difference.  Here they are:

Light

Medium

Heavy

the light weight lutradur also comes in “Crash”.  Personally I think this is some sort of translation error and it should be called “Crush” as it is the light weight lutradur with a scrunched up textured surface.  I really like using this because it keeps the texture, even after it has been ironed a few times.  These next two images are Crash.

one layer of crash

four layers of crash

Evolon is similar in some ways, but very different in others.  Evolon is a mix of polyester and polyamide polymers.  It is also spun.  I carry the Evolon Soft, which has been washed making it soft, drapable and suede like finish.
Evolon can be dyed with Acid dyes.  This photo shows some dyed:

dyed evolon - you can see the texture better when coloured.

 So what can you do with it????  Well anything you would use a fabric for.
Both Lutradur and Evolon melt at high heat (200+ celsius for Lutradur and 230 + celsius for Evolon).  This means that the heat of an iron is not hot enough to melt it allowing you to use double sided webs, iron on hot fix angelina and of course, foils with double sided web.
Both fabrics can be coloured with paints, inks, spritzers, shiva stiks, transfer dyes and printing through your printer.  So you can add colour or many layers of colour.
Then, with a heat gun or a soldering iron, you can heat distress, solder, sculpt and create cut outs or lace work.
I have blogged a number of different processes with Lutradur, so if you go to the category cloud on my blog home page and click on Lutradur, it will pull up 12 entries.  If you want to have a big play with these fabrics, there are two books I recommend (both on my website of course)

Lutradur and the New Fibers by Wendy Cotterill

Fabulous Fabric Art with Lutradur by Lesley Riley

I will load pictures of some of the projects I have used the Lutradur in later.  I have only just brought in the Evolon, so you can expect to see more done with this from here on.


Nuno Felted Scarf

1 11 2011

Hi there I made this yesterday (and a little bit today ’cause I needed to pace the felting – how bad is that).

this was made with one of my new Nuno Felting kits in Purple Passion.

Here is a quick tutorial on how.

The kit has hand dyed silk georgette and some Ashford Silk/Merino blend.  You need to add some bubble wrap, hot water and soap and a lot of energy.

Lay your bubble wrap down on the table and spread the fabric over the top.

Spread your fibre out in a pattern or an even coverage.  The fibre will lock into the fabric so you don’t need to create layers like you would with conventional wet felting.

Mix soap into a bucket of hot water.  I just use dishwashing liquid but you might choose to use something nicer.  Wet the whole area thoroughly ensuring that the wool fibre is wet through.

Roll the whole wet bundle up into the bubble wrap.  I also wrap the bundle with an old towel to get some friction.  Rub the bundle backwards and forwards, placing pressure on different places as you go.  Rub like crazy checking the felting process as you go.

Unroll and then re-roll the bundle a couple of times to change the point of pressure.

When you are close to finished, you will see that all of the wool is bonded and the fabric will be gathering as the wool shrinks.  Once finished, rinse in warm water with a dash of vinegar to clean and freshen the fibre.

Here is some detail of my finished piece.  See how the fabric has puffed and gathered between the grid of wool.

The Nuno Felting packs have more comprehensive instructions and some layout options for you to play with.


Painting Lutradur

11 10 2011

In the US, they do not have access to the amazing coloured Lutradur we have, so many of the techniques you read about in books and magazines requires you to paint your white lutradur first.  This is something that gives you the flexibility to create whatever colours you want for your projects.  You can paint the coloured Lutradur too.  In both cases, it is very very easy.

The next few photos show me painting about a metre of the heavy weight.

I like to use Dye Na Flow to add colour.  Dye Na Flow is a semi transparent paint, so you can still see the texture of the fibre behind it, you get blends of your different colours in a watercolour, washed sort of finish and the paint does not act as a significant resist to heat sculpting or distorting.

I dilute the paint with water to make it thinner and lighter.  Experiment to get the intensity of hue you are after.  Remember paints go on every surface.   You don’t need to target specific paints to a particular fibre.  Dye Na Flow is a fabric paint, which means that it has a bonding agent of sorts that will lock onto the fibre (not in like dyes) and be colourfast once dry and cured.  Heat setting with an iron or heat gun will escalate the curing process.

Then it really is a matter of slapping the paint on to saturate through the Lutradur.   I always add three colours to pretty much everything I do.  In this case I have used Turquoise, Teal and Purple.  When they blend in you get all sorts of blues with hints of green and violet.  Every piece is different.

Slap on one colour

fill the gaps with the other paints, painting over air bubbles – unless you want a more organic look – then leave the air bubbles alone.  Lutradur is not woven, so it has layers and there are lots of places the air can get trapped in the heavier weight fabrics.  I usually flip it over to check the coverage.

Then hang it on the line or leave it flat to dry.  If you have read this far, I probably should have mentioned at the beginning that it is best to line your table with news paper or plastic and to paint out on the grass.  Paint will dry on your floors or concrete and be permanent – yes even fabric paint.  And that sun thing – it escalates the drying process so take care of how far you a ‘slapping’ the paint and rinse down any spills before they dry.

This painted Lutradur is for my “I Dream of the Sea” classes at the Brisbane Show.  It is the backdrop of the four elements in the sample, one of which is below.  I have shown you this photo before, so forgive the repetition if you have seen it.

 Also in this sample is plain light weight Lutrdur with Transfer Artist Paper transfers and Light weight light Blue Lutradur with Angelina ironed to it and terribly distressed with the heat gun.  This last one is my favourite finish.  The heavy painted Lutradur does not distress with out a lot of heat. Putting paint over it also builds up the layers and acts as a resist.  The thicker the paint the greater the resist.  It takes a bit of persistence to distort this, and maybe you don’t want to.  Fire works but can be a bit dramatic.  A very hot heat gun will also work.  An iron will just sort out creases.

As always, experiment and play.


Dye your own ribbon, yarn or threads – Here is how

18 09 2011

This weekend I have been dyeing ric rac and I thought that I would share how.  It is really very easy.

I bought a large amount of Ric Rac in different sizes and have dyed it in 20 different colorways (more on that later).  You don’t need to want to dye much to follow the instructions below.  Just adjust your process to match the volume you are dying.

You can use these instructions for any cellulose fibre (fibres which come from plants like cotton, rayon, linen, hemp, bark etc) and silk or blends of these fibres.

If you are dying threads or other items which are likely to get into a big knot, you should skein them up first.  Create a skein – size will vary depending on how much you are dyeing and how thick it is – and tie the skein loosely in about four places to hold it in shape and prevent knotting.  Don’t tie this tightly or the dye wont penetrate where the ties are.

I always, or nearly always, presoak my fabric in soda ash solution when I dye with Procion Dyes.  Mix about a tablespoon (Aus measure – 25mls) of soda ash in two to four litres of tap water and dissolve.  Then submerge your fabric etc and leave it to soak.

While the soda ash is soaking in prepare your dyes.  As a general rule, my starting point for colour is about a teaspoon (5mls) per litre of water.  More dye for dark colour, less for pastels.  Adjust your measurements to the volume of dye you need.  You might only need a quarter of a teaspoon in a cup if you are dying small amounts.

Generally, I will coordinate three colours into everything I dye.  This example has chocolate, olive and rust orange and I want it to be light, so I have used less than a teaspoon of each colour.

I am doing variegated or space dyeing on this, so lay out the ribbon, yarn or thread like I have with the ric rac.  I want it in an even spread so that the dye is evenly distributed.

The enemy of this type of dyeing is to have surplus dye in or around the fibre being dyed.  To avoid this, I use a rack and tray system.  The alternative is to put something down to absorb the excess dye such as fabric.  I often make what are known as mud fabrics by using them to absorb the excess dye.  In a mud fabric you let it take all the dyes and because they have some soda ash in them, they take in the fabric differently and you never quite know what you are going to get.

Pour the first colour across your fibre.  You need to go slow and have control.  If you prefer, you can use bottles with nozzles.  I just use plastic cups and go slowly.  Prod the fibre to make sure the colour is all the way through.  You can space your variegations as widely as you want, but try to be a bit even (or not if you prefer).  Keep a little bit of each dye aside to fill gaps and touch up.

Add the second colour next to and slightly overlapping the first.  The overlap creates some blending and ensures that there is no undyed areas.  Of course, you might want some white left in there and that is fine too.

Add your last colour and again overlap, prod and massage to fill gaps.

I then flip it all over.  You may not need to do this, but I always dye large quantities so flip it all over to double check.  Use the extra dye that you have held back to reinforce your colour and fill gaps.  Set aside and allow to batch for a few hours.  I find it useful to wrap this in cling wrap so that the dyes don’t dry out while I batch.  That way if you don’t get back to it for a while the dye remains moist.  It also means that the colours don’t cross infect each other by accidental contact while reacting.

Once you are happy with the colours and have left them for a few hours, rinse out the excess dye and soak in hot water until the colour stops running and your water runs clear.  Hang to dry.

Here is my finished sample.  I will have photos of other colourways on facebook and they will all be loaded on the web in good time.  What do you think?


Free Art Quilt workshop now available

19 07 2011

Want to make this?  Some of you already have.  For the rest of you I have made this free for you to play with.  Simply go to http://artquiltclass.wordpress.com and there are six simple steps to making this.

Enjoy, share, have fun with it.


Indigo Dyeing that anyone can master!

2 07 2011
Indigo dyeing is an ancient and traditional art but it has not been for the faint hearted. In the past, Indigo dyeing was a difficult and time consuming process. Indigo in its natural form is non soluble, so involved a significant process to get it into liquid form. Originally sourced from plants, somewhere in the late 1700s, a synthetic version was created, yet the process was still difficult to liquify and ‘reduce’ the dye. These days, a pre reduced version is available and this is easily dissolved without turning to caustic chemicals and weeks of preparation. I have been playing with the pre reduced Indigo and it is not only very very easy, but a blast to use.

Linen Shirt with Indigo Shibori

The process is very easy.  You use about 20 grams of Pre Reduced Indigo, 100 grams of Soda Ash and 150 grams of Thiox in about 20 litres of water.  Mix the dye and then the chemicals in stirring gently.  You then leave the dye bath to sit.
Once it has sat for a while, the indigo dye becomes light green and transparent.  A slimy looking skim appears on the surface.  When this occurs, as surprising as it seems, you are ready to go.

Indigo vat is greenish and transparent

The skim on the top - otherwise known as the "flower"

To use, you skim off the flower and save it.

save the flower for later.

You then submerge your fabric, yarns, garments etc.  Today I dyed a pair of cotton socks and a linen shirt.  The shirt I tied with rubber bands.  The socks I just threw in.  They were “cotton rich” – in other words, not 100% cotton.  I wanted to see how the nylon and elastic took the dye.

White cotton socks in the Indigo bath. See how green they are!

Leave your items in the bath for a while.  If you want to intensify the colour, you are better to bring them out for a while and putting them back in rather than leaving for a longer period as the oxidisation is what creates the colour.  More on that shortly.
When you think you have had enough, take the items out of the indigo vat and squeeze the excess dye out.

Remove the items from the dye vat. They will be green.

Hang the dyed items out, take any ties or bands off, unfold any pleating etc.  As the air hits the indigo dye, it oxydises, turning it blue and locking the dye molecules into the fibre.  This is WAY COOL to watch.  Rotate the items if you need to.  Thicker layers such as hems or facings will take longer to go blue than others.

Partially oxydised socks

Once you have taken everything out of the dye vat, replace the flower and stir gently.  The indigo vat will last several weeks before burning out.
Here are the finished socks.  The nylon and elastin has taken the indigo beautifully.  Who knew?