Cocoons – they are multiplying – I am sure

14 09 2016

I have been dyeing various silk products for over ten years now and never cease to be amazed at how well the colour is absorbed by the silk fibre.  Each different silk ‘bit’ has different dye absorption – more or less dye sites for the dye to lock onto and each, therefore, is a little bit different, even when dyed in the same dye bath.

Silk fibre is an animal or protein fibre, so generally would be dyed most effectively with acid dyes.  These dyes need to be boiled or steamed to create the reaction and to set the dye.  That does not work with the cocoons very well as a cocoon still contains the sericin – the protein that makes the cocoon hard and strong.  When cocoons are processed into silk fibre, they are boiled or at least softened in very hot water to break down the sericin and release the fibre, ready to be spun.  If the hard cocoons are boiled or heated extensively in the dyeing process, there is a strong likelihood that the cocoon will loose the sericin and thereby damaged.  For this reason, I use Procion dyes which are generally optimal for cellulose or plant based fibres, but work well on silk too.  Procion dyes are a cold water process so the risk of breaking down the sericin is almost non existent.  You may often read that you need to use an acidic mordant with the Procion dyes on silk, but I still use soda ash – an alkaline and it works fabulously.  Here are some photos and a brief description of my process.

cocoons-1

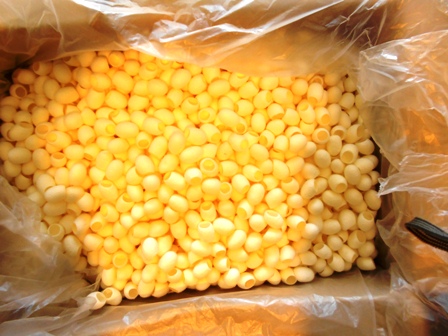
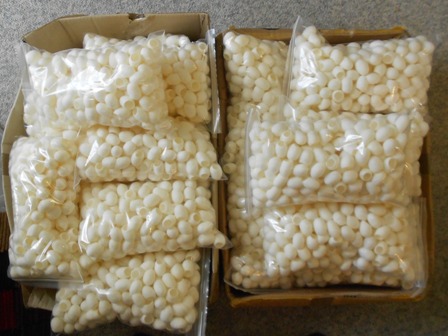
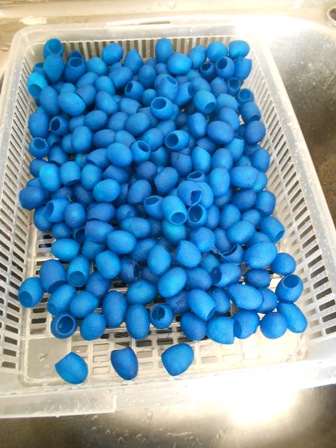
I get these in big boxes, by the kilogram.  They are not yellow, this was a product of the flash on the camera. The cocoons come cut.  This means that the original occupant is no longer in situ, which is a good thing.  Cut cocoons clear customs much faster than uncut ones and are generally cleaner, though you pay more for them due to the processing.  Once I have these, I work out how many colourways I need to dye and how much, weight wise, required to dye each colourway.  I then take the cocoons and weigh them into bags:  one bag per colour needed.  My cocoons are sold in mixed packs of three colours, so what ever I do needs to be divisible by 3.  In the case of this dye run, I needed to do ten colour ways, so 30 different colours in total, so 30 different bags of cocoons.

cocoons-2

I mix my dyes and pour them into each bag, sealing the bags as I go.  Each bag gets about a litre of dye and I move it around to try to give all the cocoons a fairly even coverage.  Consistency in colour and coverage is not essential to me in this process, but I do like them all to be well coloured and the colour saturated.

After the dyeing and batching is completed, I rinse them in warm water until the water runs clear.  When the rinse water is clear, it indicates that all of the dye molecules are either permanently locked into the silk fibre cells or flushed out in the rinse water.  Here are some of my colours soaking.

cocoons-3

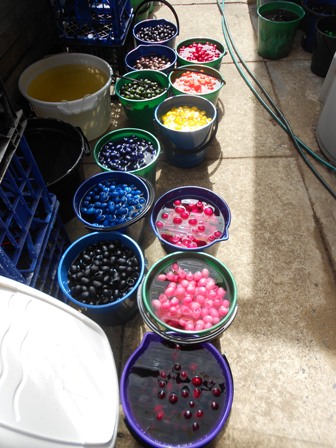
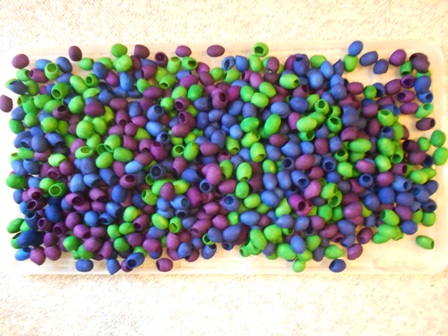
If you look closely, you can see that they are in sets of three as I try to keep my colourways together.

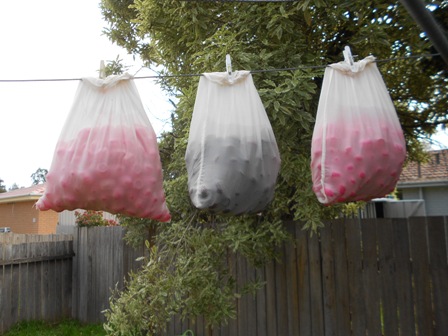
I dry these one of two ways, sometimes in a combination of both.  Firstly, if the weather is good, I put them in fabric bags and hang them on the line, again keeping the sets of three together as best I can.

cocoons-4

If weather and space allows, depending on how much I have dyed, I spread the cocoons out in baskets, on netting and even on old screen doors to dry.  This takes up a lot of space if I do all the colourways and will only work on warm, dry days.  It is not uncommon for every horizontal space in the house to be covered with trays of drying cocoons when the weather won’t play nicely with me.

cocoons-5

Once completely dry, I combine the three colourways in a big tub, remove knotted or loose silk fibre and give them a big mix.

cocoons-6

cocoons-7

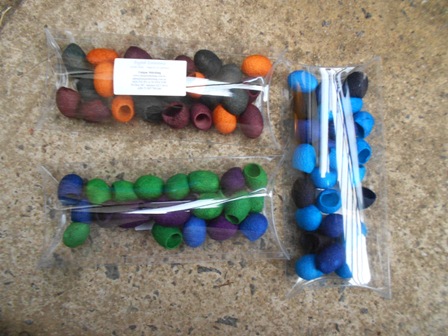
This is the “Cools” colourway.  From there, they are weighed very carefully into 10 gram lots and packaged into either cellophane bags or clear pillow packs.  Every pack is a little bit different.  They are not easy to photograph in the pillow packs, but they look terrific like this.

cocoons-8

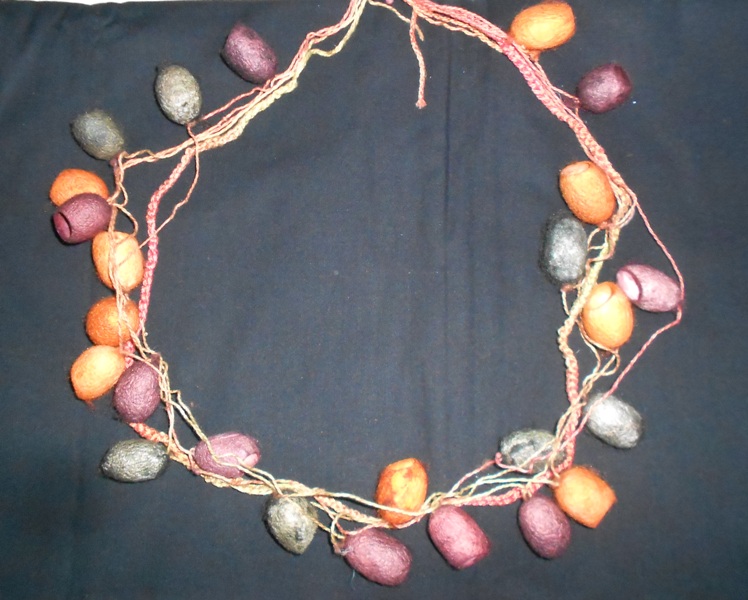
I get asked constantly what to do with them.  Well, the short answer is anything your feel like.  You can stitch onto and through them, so they can be embellished and sewn to anything, strung up or added to pretty much any project that you think would benefit from three dimensional elements.  Try embroidering or beading into them, adding them to embroidery or felt projects, turning them into flower buds, snails, fairy skirts, and so much more.  Add them to collage or sculptures, or like the example below, make jewellery.  There is no limit to how you can use them; only a lack of ideas.  Here is a very simple necklace I made.

cecile-whatman-qe-3-cocoon-necklace

I have fifteen different colourways, all of which are on my website – http://www.uniquestitching.com.au.  Search for cocoons if you want to have a look.


Today we dye Cocoons

3 08 2013

??????????

I love taking raw materials and turning them into something extra ordinary.  What colours shall I dye these today?  I am thinking pinks and purples and blues.  Why?  Because I can.  Also because I am ready for a taste of spring.  The wattle has started blooming and yesterday, on my walk, I passed a bank of Jonquils that had popped open over night.


Not all silks are created equal

24 06 2012

I get a lot of questions on what the different types of silk products are that I dye, so this blog post is to explain, very briefly the different types I use and where they come from in the silk making process.  Many are bi-products or part of the silk spinning process.  Others are not.

Firstly lets look at the two types of silk fibre.

There are two, quite different, silk fibres – Mulberry or Tussah.  I did a blog post on these in the past which you can find here:  https://uniquestitching.wordpress.com/category/silks/.  In both cases, the silk worms eat different leaves.  Mulberry, which is sometimes refered to as Bombyx fibre, comes from the worm eating the leaves of the mulberry plant.  Tussah silk is made when the worm eats oak leaves.

The Tussah is matte, honey coloured and a bit coarser.

The Mulberry silk is fine, cream in colour and very lustrous.

Both dye up beautifully, but put in the same dye bath, will have a different finish.  This is the Rose Petal colour way.  Both bits of silk below are 25grams.  The one on the left is Tussah, the one on the right is Mulberry.  They were dyed at exactly the same time in the same dye bath.

Silk fibre or silk top, whether Tussah or Mulberry can be teased out, spun, made into silk paper, couched down, trapped behind net, felted into wet felt with wool, needlefelted and so much more.  Silk top is made by boiling down the cocoons to break down the protein that makes them hard (sericin).  Once boiled down, the individual strands are pulled out and run through machines or by hand to collect the fibre.

Swapping colourways to my Pretty in Pink colourway now, I am going to show you some of the more interesting bits of silk.

One of my favourites is the Throwsters Waste.  It is a crinkly, textural fibre.  Basically it comes from cocoons that are flawed so that the fibre is not straight and can’t be woven into fabric.  It keeps its interesting texture when you felt, needlefelt or bond it.  Throwsters adds terrific texture to silk paper or when stitched onto a surface.

Still in the ‘soft’ fibres are two that are similar – hankies or caps.  Now neither of these are clothing items.  They are sometimes called mawata silk caps or mawata silk hankies.   Mawata is a Japanese term describing this material.  The Caps and Hankies are made by taking cocoons that have been boiled to remove the sericin like the fibre or tops.  However instead of lifting the individual strands of silk and pulling it out, the cocoon is taken and stretched across a frame.  In the case of the hankies, it is a square frame about 20 to 30 cms square.  With the caps, the cocoons are stretched over a arch type of frame.  In both cases, the silk stretches out and builds into layers which can be used as a solid, lightly bonded silk fabric or can be pulled apart into individual cocoon amounts of silk, like cob webs.

one silk cap


a bundle of silk hankies

I can never determine what ‘one silk hankie’ is, so I sell them in 10gram bundles.  Here is some of the hankie, seperated out.  You can see the white paper behind the silk.  This is the weight that the spinners bring these to and then ‘draft’ the hankie or pull it out to a long piece of stretched fibre that they then spin.

I use hankies and caps as backgrounds to embellish or stitch into, as pieces of fabric to stitch onto things, to needle felt or, when pulled apart silk paper or very fine fabric to gather, scrunch and add as texture.

The next three products are ‘hard’ silks.  That is, they have not had the sericin boiled off and therefor they are still solid and firm.  They can be couched down, stitched into, pulled apart to make them easier to handle, boiled off to make soft.  The three products are cocoons, rods and sericin fibre.  All three are often used in three dimensional works such as embroidery, mixed media, collage, sculptures, jewellry etc.

Cocoons are easy and obvious.  They are the little houses that the silk worm creates so it can metamorphise into a moth.  The worm produces a saliva which contains proteins (one of which is sericin) and spins around and around and around until fully surrounded by the silk cocoon.  This sets on contact with the air and the worm is safely inside.  Unfortunately the worm is usually killed before he makes it to moth as if he breaks out of the cocoon, the fibre is all broken and can not be spun.  The picture below shows cocoons that have been cut to remove the remains of the worm after it has died.  If you have a whole cocoon, then the original occupant is still in there and if you are squimey about this, you might get someone to cut them open before you handle them.

Rods are created in the fibre spinning process.  The spinning machines have many levels of mechanisms where the fibre is carried across rods to keep it straight and untangled.  Over time, the rods in the machine build up layers of silk dust and sericin.  When this happens, the build up is cut off and discarded.  That is the rods.  They are more formally called carrier rods.  When you peel apart the layers, you can stretch the silk out to a consistency similar to a run in a stocking or you can use them as is.  They are very easy to stitch through and make great texture in pretty much anything.

The last product I am showing you today is Sericin fibre or silk string.  It is basically the glue that holds the cocoon together.  When the cocoons are boiled off, the sericin seperates from the silk.  It is like a string of glue which, when air comes in contact with it, it resets.  It is coarse and rough and undisciplined.  I love it but it takes the most creativity to incorporate into your work.  I like it for dimension and body and generally couch over it with a zigzag stitch to attach it to art quilts or mixed media work.  It can be pulled apart which softens it, but it is also great in sculptural pieces or anything that you are shaping.

So they are the main silk products I dye and use.  There are others which I will make the subject of a further blog post at a later date.  I dye these in 30 colourways.


12 Days of Christmas – Day 3 – Hand Painted Scarves

8 12 2011

Today’s project is literally an ‘oh my goodness, I have an hour to go to the Christmas party and no gift’ gift.  Very quick and easy and can also be adapted to many items other than scarves.

This project uses paints to alter the colour of and/or embellish a scarf.  In the pictures below, I have used Dye Na Flow paint in the first example and Lumiere paint in the second, but use what ever fabric paints you have.  Fabric paint is great in that it does not need to be ‘fixed’ and can go on any fabric, whether natural or man made, light and flimsy or solid like denims and cords.

Dye Na Flow is a semi transparent paint, so it blends and creates layers like a dye can.  Lumiere is an opaque, metallic or opalescent paint.  You can’t see through it to the background so it is sensational for covering patterns or colours you don’t like.  Now, I am not encouraging you to ‘regift’ per se, but if you have a fabric item that you don’t like the colour of or you want to change the look of it in other ways, fabric paints are your answer.  Or if you pick up bargains at the second hand shops, fabric paint can be a great way to modernise or refresh an item.  I am barely scratching the surface with these two examples.  A little imagination and a few tubs of paint and you could have a whole new wardrobe in a matter of hours without leaving the house.

Anyway, to the projects.  In this first one, I have used a raw silk scarf as the base, but you can use anything.  Don’t forget, synthetics, cottons, silks, blends.  Paint will stick to it all.

I sought a blended finish, so worked on a wet scarf scrunched in a bowl.  If you want colour to stay seperate, work on a dry scarf, have the scarf open and laid out and control the amount of colour you add.

So, I wet the scarf thoroughly and wrung it out so that it was wet but not drippey and popped it in a small bowl.

I then selected three colours of Dye Na Flow paint; orange, yellow and purple.  I was after a rust orange, with a hint of brown/purple through it.

Pour a small amount of the first colour over the scrunched scarf.

Pour some of the second colour over the top.  You will get blending starting to happen straight away.

Finally add the third.  Remember this is not how this is going to end up as the colours are going to blend into each other because it is so wet.  If I wanted this look, I needed to use a different method.  Poke and prod it a bit to make sure there is colour everywhere then hang it somewhere to dry.  Hang it outside on grass ideally, paint will stain concrete, carpet, tiles, your feet and everything else it comes in contact with.

Once it is dry, give it an iron to heat set it. Here is my finished piece.  You can use this as a base and put more paint on, embellish, needle felt, bead etc or you can use it as is.

I lost a lot more of the purple than I was expecting so I will probably go over and add a bit more.


The second project started as a hand dyed scarf which I just wanted to add a bit of zing to.  I used the Lumiere paints and a wet sea sponge to add splotches of textural colour and shine all over the scarf.  Again, you can do this on any fabric.  Put some news paper, plastic or other similar thing down to protect your table surface.

You only need a tiny bit of paint to get started.  Wet your sea sponge and wring it out.  If you work with a dry sponge, all your paint will end up in the centre of the sponge, not on the surface where you want it to sit.

Now, just ignore the change of paint colour from this photo to the next.  I could put it down to lighting, but I don’t think you would believe me.

Lightly dab the sponge in the paint and with a light hand, dab this across your scarf.  Do a couple of practice dabs on the edge of the bowl or a piece of fabric or paper.

Sponge randomly over the whole surface.  You will see the texture of the sponge transfering with the paint.  Also because you have a bit of water now being added, you will get a slight splitting of the paint which in itself creates an interesting texture.  Keep going until you are happy with the surface coverage.

Hang this out to dry.  It won’t be as runny as the first one, so you are less likely to get paint everywhere but still think about where you hang it.  Don’t hang a painted item on the line next to your good work gear (or worse, your partners good work gear) on a windy day.  Paint will spread while it is wet.

Once dry, iron again to heat set and you are ready to go.  Again this can just be the first stage of a more embellished piece but it will look pretty smart at that Christmas party secret santa as is.

This was a way easy project.  The next few will be a bit more complex than the first three.  We are moving into the weekend and I figure you will have more time on your hands or at least that is my story and I am sticking to it.  Also, I am building a bit in the complexity so you can choose the effort you want to put in as we go.  I hope you are enjoying this series.

Cecile


Nuno Felted Scarf

1 11 2011

Hi there I made this yesterday (and a little bit today ’cause I needed to pace the felting – how bad is that).

this was made with one of my new Nuno Felting kits in Purple Passion.

Here is a quick tutorial on how.

The kit has hand dyed silk georgette and some Ashford Silk/Merino blend.  You need to add some bubble wrap, hot water and soap and a lot of energy.

Lay your bubble wrap down on the table and spread the fabric over the top.

Spread your fibre out in a pattern or an even coverage.  The fibre will lock into the fabric so you don’t need to create layers like you would with conventional wet felting.

Mix soap into a bucket of hot water.  I just use dishwashing liquid but you might choose to use something nicer.  Wet the whole area thoroughly ensuring that the wool fibre is wet through.

Roll the whole wet bundle up into the bubble wrap.  I also wrap the bundle with an old towel to get some friction.  Rub the bundle backwards and forwards, placing pressure on different places as you go.  Rub like crazy checking the felting process as you go.

Unroll and then re-roll the bundle a couple of times to change the point of pressure.

When you are close to finished, you will see that all of the wool is bonded and the fabric will be gathering as the wool shrinks.  Once finished, rinse in warm water with a dash of vinegar to clean and freshen the fibre.

Here is some detail of my finished piece.  See how the fabric has puffed and gathered between the grid of wool.

The Nuno Felting packs have more comprehensive instructions and some layout options for you to play with.


Tussah vrs Mulberry Silk Top – what is the difference

1 04 2011

I have been housebound this week feeling like death warmed up and have been pottering with the silks that have been dyed and are begging to be packed.  While I was away last week, Glenn dyed the remaining silk colourways plus the Tussah silk.  He did a great job and here are some of the Tussah silks waiting to be packed (and still waiting).

One of the key things I explain when I am running classes or workshops using silk is that there are two different types of silk fibre – Tussah and Mulberry.  To over simplifiy, there are two different types of silk worm, they eat different things, come from slightly different environments and therefore create a different silk. 

Mulberry silk is often referred to as Bombyx.  These terms are interchangeable.  It is a higher quality silk than the Tussah.  Mulberry starts life as a cream colour; Tussah is honey coloured.  Mulberry is much finer than the Tussah and the individual strands are longer.  Mulberry is always more vibrant and lustrous.  Tussah is flatter and more matte in appearance.   If they were wool, the Mulberry would be the equivalent to super fine merino and the Tussah would be equivalent to Corriedale or another coarser, higher micron fibre.

Because they start their lives differently, they take the dye and other processing differently.

This photo shows Tussah on the left and Mulberry on the right.  They were dyed in the same dye bath at the same time.  Both pieces weight 25 grams.  The difference is noticeable isn’t it?

Tussah and Mulberry dyed in my 'Rose Petals' colourway

You should always pay less for Tussah than Mulberry.  There is a significant difference in price per kilo.  I charge $8 for 25 grams of hand dyed Tussah and $10 for 25 grams of hand dyed Mulberry.  I have seen Tussah labelled and sold as Mulberry, so hopefully this will help you differentiate.  Price itself is not the issue, if you want the clean crisp lustre of Mulberry you will never get it from Tussah.  However having said that, there is room for both and I love both.  Both are glorious and I often use them in combination to give a broad mix of texture to a piece.


Rosellas in the figs

22 01 2011

Some time ago, I showed you some fabric I made with Lutradur bonded to sheer fabrics and heated.  I have now finised the piece that this was intended for.  Here are some photos.

here is some detail. The bird was made with silks – velvets and jacquards as well as some Textiva and felt.

The figs are Lutradur with a bit of Shiva stik for colour and beads.  The leaves are lightly heated tyvek.

I have never considered myself as capable  of  ‘realism’ but am determined to do different things this year.  There are a couple of things I would do differently next time, but it is all fun.  What do you think?


Wet, Wild and Windy day

15 10 2010

I feel like I have spent the entire day under water.  I have been dyeing and rinsing all day, which is always wet work, but the weather has been so wild that even in the shelter of our under cover area, I have been wet.  I hung some velvet in our usual place, but the wind was blowing the rain in almost horizontally and I got wet hanging it up, so that was the end of that idea.  Finally giving up on waiting for the weather to clear, I went to the post office and the bank, changed in to dry clothes, but had to get petrol, so two minutes after being dry, I was again soaked.  I hope everyone else out there is keeping dry and warm and most particularly safe.  The radio has been reporting accidents all over the place and trees down to boot.

Well, my velvets are all dyed, but they have no chance of getting dry today.  22 colourways dyed with an average of about 3 metres in each.  The photo below shows 20 of the 22 colours soaking and setting. 

20 of the 22 colourways

What a day.  Tomorrow is supposed to be a bit better.


Getting ready for a show

20 06 2009
We have just had three HUGE shows one on top of each other – 3 in about 5 weeks and it nearly killed me.  Most people don’t realise it, but Unique Stitching is just me with a bit (or really a lot)  of help from the three boys.  Over the period leading up to the shows we finally got rain which was great, but not so great for drying 30 or 40 kilos of dyed silk.  Even though we are quite well set up for this, we had to come up with creative ways to dry the bigger bits of silk and the wools.  I am going to load some pictures I took getting ready for Perth and the Textiles show.  The first shows me set up and ready to dye.  Wool and silk soaking in the buckets, dyes ready to mix.

Ready to dye

Below, I have one of the many sets of silk caps hanging inside to ‘warm up’ so we could determine whether they were in fact dry enough to pack.

Silk caps waiting

Finally, here are some of the hankies ready to pack.  Packing and labelling is usually done by the boys in front of the television.  They are amazing and I could not do this without them.

IMG_0051

Tomorrow, we start again.