The lull before the storm – ice dyeing in preparation

1 01 2017

2016 has not been my favourite year.  Don’t get me wrong, there have been some amazing highlights and I cherish those, but the negative has far outweighed the positive and in true Murphy’s style: if it could go wrong, it did; if it could break, it did; if someone had the power to let you down or worse, they did; but I am not going to dwell on what is past and what can not be changed.

I have never chosen a word for the year before, but for 2017, I am focussing on consolidation.  I want to bed down all the half finished from 2016 and build the platform for the next few years.  As such I have spent the time between Christmas and New Year building a plan.  I have even taken the unprecedented step of getting some help.  I don’t generally do New Years resolutions and this year is no different, but I am going to work with the resources of The Business Bakery and work in three lots of 100 day goals for this year.  I am telling you this because it is supposed to help keep me accountable if I tell people what I am doing.  So, here I go.  If you want to find out more about the structure, go here:

100 Day Goal

I have a lot of work to do to get everything back on an even keel, but I am nothing if not resilient.  I am not going to share the content of the goals until they are close to realised, but I can share the steps along the way.  To keep me sane this week amongst all the admin and as one of the micro actions I need to take, I have ice dyed some fabric.

Ice dyeing in Australia in 30+ degree heat produces very different results to when it is done in the middle of winter or in snow.  This is because of the chemistry of the dyes and mordants.  So, the traditional outputs of ice or snow dyeing is usually soft, gentle colours.  In this heat, despite the dye being carried through the fabric by the melting ice, the dye has high temperatures to ‘batch’ in, so the colour is still strong and vibrant.  (If you want to understand this and learn how to dye, check out my Almost Alchemy dyeing class:  http://www.uniquestitching.com.au/p/9122334/online-class—almost-alchemy—dyeing-for-the-traditional-and-art-quilter—2017.html).

So, in some ways ice dyeing in heat does not give you very different results to other dyeing techniques due to the hot batching.  What you do get though is unpredictable randomness and I am a big fan of unpredictable randomness.  I have folded some of these pieces, shibori style, and others I have just scrunched, but the random effect is perfect as the first layer of fabric for a couple of projects I will work on this month.  Here are the six fabrics.  They are all fat quarter cotton homespun (muslin in US terms).

ice-6

ice-1

ice-2

ice-3

ice-4

ice-5

I will try to share what I do with these as I go.


Cocoons – they are multiplying – I am sure

14 09 2016

I have been dyeing various silk products for over ten years now and never cease to be amazed at how well the colour is absorbed by the silk fibre.  Each different silk ‘bit’ has different dye absorption – more or less dye sites for the dye to lock onto and each, therefore, is a little bit different, even when dyed in the same dye bath.

Silk fibre is an animal or protein fibre, so generally would be dyed most effectively with acid dyes.  These dyes need to be boiled or steamed to create the reaction and to set the dye.  That does not work with the cocoons very well as a cocoon still contains the sericin – the protein that makes the cocoon hard and strong.  When cocoons are processed into silk fibre, they are boiled or at least softened in very hot water to break down the sericin and release the fibre, ready to be spun.  If the hard cocoons are boiled or heated extensively in the dyeing process, there is a strong likelihood that the cocoon will loose the sericin and thereby damaged.  For this reason, I use Procion dyes which are generally optimal for cellulose or plant based fibres, but work well on silk too.  Procion dyes are a cold water process so the risk of breaking down the sericin is almost non existent.  You may often read that you need to use an acidic mordant with the Procion dyes on silk, but I still use soda ash – an alkaline and it works fabulously.  Here are some photos and a brief description of my process.

cocoons-1

I get these in big boxes, by the kilogram.  They are not yellow, this was a product of the flash on the camera. The cocoons come cut.  This means that the original occupant is no longer in situ, which is a good thing.  Cut cocoons clear customs much faster than uncut ones and are generally cleaner, though you pay more for them due to the processing.  Once I have these, I work out how many colourways I need to dye and how much, weight wise, required to dye each colourway.  I then take the cocoons and weigh them into bags:  one bag per colour needed.  My cocoons are sold in mixed packs of three colours, so what ever I do needs to be divisible by 3.  In the case of this dye run, I needed to do ten colour ways, so 30 different colours in total, so 30 different bags of cocoons.

cocoons-2

I mix my dyes and pour them into each bag, sealing the bags as I go.  Each bag gets about a litre of dye and I move it around to try to give all the cocoons a fairly even coverage.  Consistency in colour and coverage is not essential to me in this process, but I do like them all to be well coloured and the colour saturated.

After the dyeing and batching is completed, I rinse them in warm water until the water runs clear.  When the rinse water is clear, it indicates that all of the dye molecules are either permanently locked into the silk fibre cells or flushed out in the rinse water.  Here are some of my colours soaking.

cocoons-3

If you look closely, you can see that they are in sets of three as I try to keep my colourways together.

I dry these one of two ways, sometimes in a combination of both.  Firstly, if the weather is good, I put them in fabric bags and hang them on the line, again keeping the sets of three together as best I can.

cocoons-4

If weather and space allows, depending on how much I have dyed, I spread the cocoons out in baskets, on netting and even on old screen doors to dry.  This takes up a lot of space if I do all the colourways and will only work on warm, dry days.  It is not uncommon for every horizontal space in the house to be covered with trays of drying cocoons when the weather won’t play nicely with me.

cocoons-5

Once completely dry, I combine the three colourways in a big tub, remove knotted or loose silk fibre and give them a big mix.

cocoons-6

cocoons-7

This is the “Cools” colourway.  From there, they are weighed very carefully into 10 gram lots and packaged into either cellophane bags or clear pillow packs.  Every pack is a little bit different.  They are not easy to photograph in the pillow packs, but they look terrific like this.

cocoons-8

I get asked constantly what to do with them.  Well, the short answer is anything your feel like.  You can stitch onto and through them, so they can be embellished and sewn to anything, strung up or added to pretty much any project that you think would benefit from three dimensional elements.  Try embroidering or beading into them, adding them to embroidery or felt projects, turning them into flower buds, snails, fairy skirts, and so much more.  Add them to collage or sculptures, or like the example below, make jewellery.  There is no limit to how you can use them; only a lack of ideas.  Here is a very simple necklace I made.

cecile-whatman-qe-3-cocoon-necklace

I have fifteen different colourways, all of which are on my website – http://www.uniquestitching.com.au.  Search for cocoons if you want to have a look.


Ice Dyeing with Procion Dyes

14 03 2016

I love dyeing fabric.  I do, I just love it.  I could easily spend all my waking time making things colourful with dye and yet, I have resisted the growing trend of ice dyeing until quite recently.  Why have I avoided it? Why have I ice dyed lately? Let me explain.

What is it?

My observation is that ice dyeing morphed out of snow dyeing.  Snow dyeing became a thing when the dyers in the Northern hemisphere started experimenting on how they could feed their dyeing addiction in the middle of great drifts of snow.   Snow or ice dyeing gives a very different effect than the traditional Procion dyeing techniques.  The chemistry is a bit ‘wrong’ and on one level, does not make a huge amount of sense.  As a result, ice dyeing gives softer, more drifty colours.  Also, the dye powder is dispersed by the melting ice, the colour distribution can be very loose and ad hoc; organic almost.  It is an interesting technique to play with.

Why I avoided it.

There are a number of reasons for this:

  • it does not feel safe – measuring out large amounts of dry dye powder and leaving it on top of the ice until it melts means that lots of loose dye particles can become airborne;
  • it is not very efficient – you use more dye to get a less vibrant effect than all the more common techniques;
  • it can be costly – both in dye and ice.  Unless you have a large ice making capacity and don’t have access to lots of snow, you will go through a lot of ice and it can add up.

Why I gave it a go.

I have seen the results others were getting and they can be very beautiful.  Ice dyeing has become very popular in the tie dyeing community.  I am not a fan of the full on, 1970s tie dyed mandalas, etc, but I do like a slightly modified, less planed version of ‘tie dyeing’.  (And I don’t actually tie unless I am doing shibori as this creates work)

This post is not going to be a comprehensive tutorial on the technique, but I do want to show you the results I got.

Fold, scrunch, pleat or bundle your fabric or items to be dyed.  Place on a rack of some sort with a vessel underneath to catch melting dye.

ice dye process 1

If you want to, create a cuff either with your bucket/vessel or with foil.

ice dye process 2

Cover in ice.

ice dye process 3

Cover with dye.

ice dye process 4

Walk away and leave it alone until all the ice has melted and the dye distributed.  I left each batch over night and rinsed out the next morning.

Here are some of my results.

ice dye romper 3

blue rompers

ice dye romper 4

If you would like to learn a lot more about dyeing fabric, check out my very comprehensive Almost Alchemy online dyeing class.  We start with Ice Dyeing.  Details can be found here:

http://www.uniquestitching.com.au/p/9122334/online-class—almost-alchemy—dyeing-for-the-traditional-and-art-quilter.html


Today we dye Cocoons

3 08 2013

??????????

I love taking raw materials and turning them into something extra ordinary.  What colours shall I dye these today?  I am thinking pinks and purples and blues.  Why?  Because I can.  Also because I am ready for a taste of spring.  The wattle has started blooming and yesterday, on my walk, I passed a bank of Jonquils that had popped open over night.


Dyeing with Compliments

21 11 2012

Through out 2012, I have been running workshops on creating a run of colour or a rainbow of colour, taking three colours and turning them into six or any larger multiple of three.  It has been fun and a lot of people have walked away with a much stronger understanding of both dyeing and colour theory.  One of the things I have always mentioned in these classes is that you can take any three colours and blend them to make more, but when ever you use colours on the opposite side of the colour wheel, you will get a brown or neutral colour.  This is never bad, just you need to know that is what is going to happen.  Today’s blog post is about that colour theory and how you can make really cool neutrals or browns simply by using the complementary colour.

So, I started with three colours: – Lemon, Turquoise and Magenta

From these, I created 12, blending the three to create secondary and tertiary colours.

From there, I matched the two colours on the opposite sides of the colour wheel and then blended them.  This resulted in six runs of some very interesting blends.  Here are some photos

Run A – Blending an Orange/Yellow with a Blue/Violet.  I did not start in the most logical of places, but have a look at a colour wheel and it will make more sense.

Run B – Orange to Blue.  This one has the straight Turquoise and the a secondary colour – orange.  I love the teal to brown this creates.

Run C – Red/Orange through to Blue Green – two tertiary colours blended.

Run D – Red to Green – again a primary and a secondary colour.  There are some reds here I could get very excited about.  It is amazing that they are made with green!

Run E – Violet Red to Yellow Green – two more tertiaries, but I like this run a lot.

Run F – Yellow to Violet – the final primary secondary run.  This is my favourite with all those glorious rust oranges.  Weird as I would not have though of yellow and orange being ‘MY’ colours.

If you want to have a play with this technique, it is part of my all day dyeing classes or you can attend the Dyeing with Complements workshops at the Quilt and Craft or Stitches and Craft Shows throughout 2013, starting with the new show in Palmerston North, New Zealand February 14 to 17 2013.

We also just got a new delivery of Colour Wheel Posters which are awesome.  If you want one, you will find them here: http://www.uniquestitching.com.au/p/4974716/studio-color-wheel-by-joen-wolfrom—poster.html

Cecile


dyeing scrim – one of many ways to do so

8 07 2012

This post will show you how easy it is to dye a range of colours.  This is a very simple process but worth revisiting from time to time.

From this:

To this:

I cut the scrim into five metre lengths.  There will be some shrinkage so I should get at least 4.5mtrs of useable fabric.  Each colourway has five colours, so 25 mtrs in total per colourway.  Obviously that is not a rule and you can work on a larger or smaller scale.

I pre-soak my fabrics in a soda ash solution.  Soda ash, or sodium carbonate is the mordant for the reactive dyes.  In this process, I am doing 15 colourways of 25 mtrs each, so I put about three cups of soda ash into about 30 litres of water and that will last me through the whole process plus some.  I soak the fabric for at least half an hour and wring it out, reserving the soda ash solution.  Then, each 5 mtr length goes into its own bucket.

I have a fabulous outdoor area that is covered in where I do all my dyeing and other wet processes.

My starting point for my dyes is a teaspoon per litre of water.  While your fabric is soaking in the mordant, mix your dyes.  The Procion MX dyes are a cold water dye, but I tend to use hot tap water to speed up the dissolving, especially when it is the middle of a Canberra winter and struggled to get into double figures temperature wise.

Give the dyes a good stir to make sure the dye powder is fully dissolved.  Then pour the dye over each piece of fabric – one colour per bucket.

This is my Winter colourway.  It is soft and frosty.  Leave the dye on the fabric for at least three to four hours and then rinse until the water runs clear.

Ready to use.


Not all silks are created equal

24 06 2012

I get a lot of questions on what the different types of silk products are that I dye, so this blog post is to explain, very briefly the different types I use and where they come from in the silk making process.  Many are bi-products or part of the silk spinning process.  Others are not.

Firstly lets look at the two types of silk fibre.

There are two, quite different, silk fibres – Mulberry or Tussah.  I did a blog post on these in the past which you can find here:  https://uniquestitching.wordpress.com/category/silks/.  In both cases, the silk worms eat different leaves.  Mulberry, which is sometimes refered to as Bombyx fibre, comes from the worm eating the leaves of the mulberry plant.  Tussah silk is made when the worm eats oak leaves.

The Tussah is matte, honey coloured and a bit coarser.

The Mulberry silk is fine, cream in colour and very lustrous.

Both dye up beautifully, but put in the same dye bath, will have a different finish.  This is the Rose Petal colour way.  Both bits of silk below are 25grams.  The one on the left is Tussah, the one on the right is Mulberry.  They were dyed at exactly the same time in the same dye bath.

Silk fibre or silk top, whether Tussah or Mulberry can be teased out, spun, made into silk paper, couched down, trapped behind net, felted into wet felt with wool, needlefelted and so much more.  Silk top is made by boiling down the cocoons to break down the protein that makes them hard (sericin).  Once boiled down, the individual strands are pulled out and run through machines or by hand to collect the fibre.

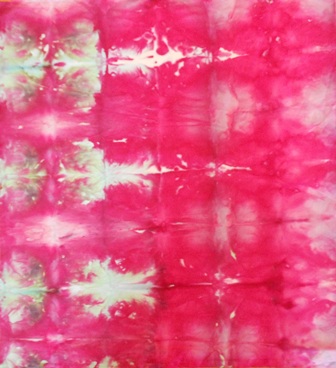
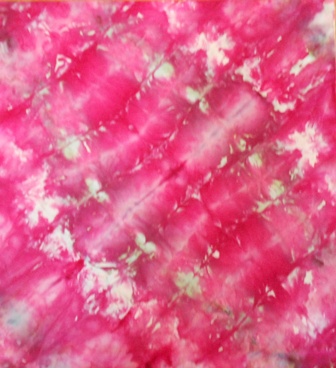
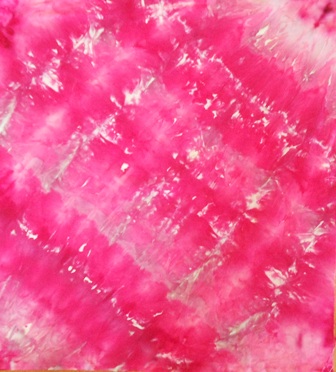
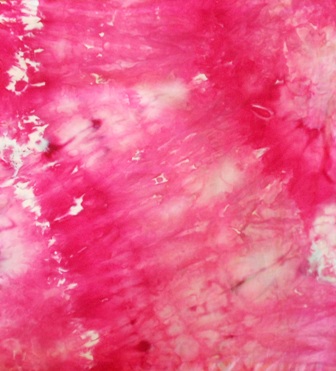
Swapping colourways to my Pretty in Pink colourway now, I am going to show you some of the more interesting bits of silk.

One of my favourites is the Throwsters Waste.  It is a crinkly, textural fibre.  Basically it comes from cocoons that are flawed so that the fibre is not straight and can’t be woven into fabric.  It keeps its interesting texture when you felt, needlefelt or bond it.  Throwsters adds terrific texture to silk paper or when stitched onto a surface.

Still in the ‘soft’ fibres are two that are similar – hankies or caps.  Now neither of these are clothing items.  They are sometimes called mawata silk caps or mawata silk hankies.   Mawata is a Japanese term describing this material.  The Caps and Hankies are made by taking cocoons that have been boiled to remove the sericin like the fibre or tops.  However instead of lifting the individual strands of silk and pulling it out, the cocoon is taken and stretched across a frame.  In the case of the hankies, it is a square frame about 20 to 30 cms square.  With the caps, the cocoons are stretched over a arch type of frame.  In both cases, the silk stretches out and builds into layers which can be used as a solid, lightly bonded silk fabric or can be pulled apart into individual cocoon amounts of silk, like cob webs.

one silk cap


a bundle of silk hankies

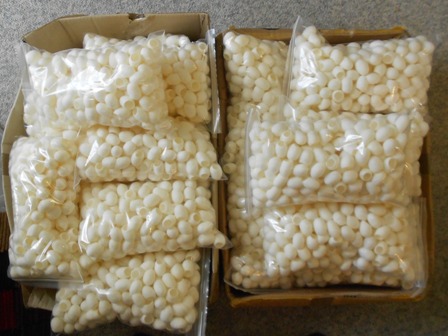
I can never determine what ‘one silk hankie’ is, so I sell them in 10gram bundles.  Here is some of the hankie, seperated out.  You can see the white paper behind the silk.  This is the weight that the spinners bring these to and then ‘draft’ the hankie or pull it out to a long piece of stretched fibre that they then spin.

I use hankies and caps as backgrounds to embellish or stitch into, as pieces of fabric to stitch onto things, to needle felt or, when pulled apart silk paper or very fine fabric to gather, scrunch and add as texture.

The next three products are ‘hard’ silks.  That is, they have not had the sericin boiled off and therefor they are still solid and firm.  They can be couched down, stitched into, pulled apart to make them easier to handle, boiled off to make soft.  The three products are cocoons, rods and sericin fibre.  All three are often used in three dimensional works such as embroidery, mixed media, collage, sculptures, jewellry etc.

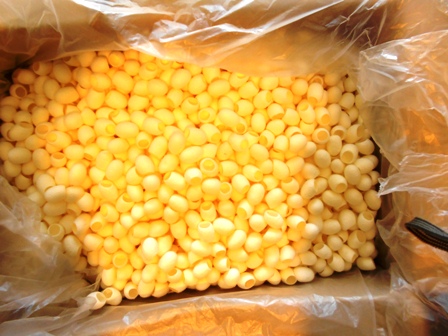
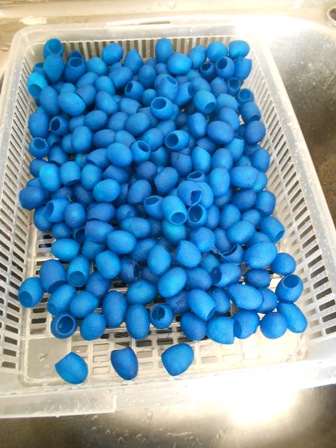
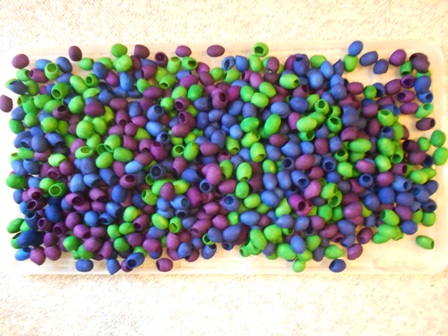
Cocoons are easy and obvious.  They are the little houses that the silk worm creates so it can metamorphise into a moth.  The worm produces a saliva which contains proteins (one of which is sericin) and spins around and around and around until fully surrounded by the silk cocoon.  This sets on contact with the air and the worm is safely inside.  Unfortunately the worm is usually killed before he makes it to moth as if he breaks out of the cocoon, the fibre is all broken and can not be spun.  The picture below shows cocoons that have been cut to remove the remains of the worm after it has died.  If you have a whole cocoon, then the original occupant is still in there and if you are squimey about this, you might get someone to cut them open before you handle them.

Rods are created in the fibre spinning process.  The spinning machines have many levels of mechanisms where the fibre is carried across rods to keep it straight and untangled.  Over time, the rods in the machine build up layers of silk dust and sericin.  When this happens, the build up is cut off and discarded.  That is the rods.  They are more formally called carrier rods.  When you peel apart the layers, you can stretch the silk out to a consistency similar to a run in a stocking or you can use them as is.  They are very easy to stitch through and make great texture in pretty much anything.

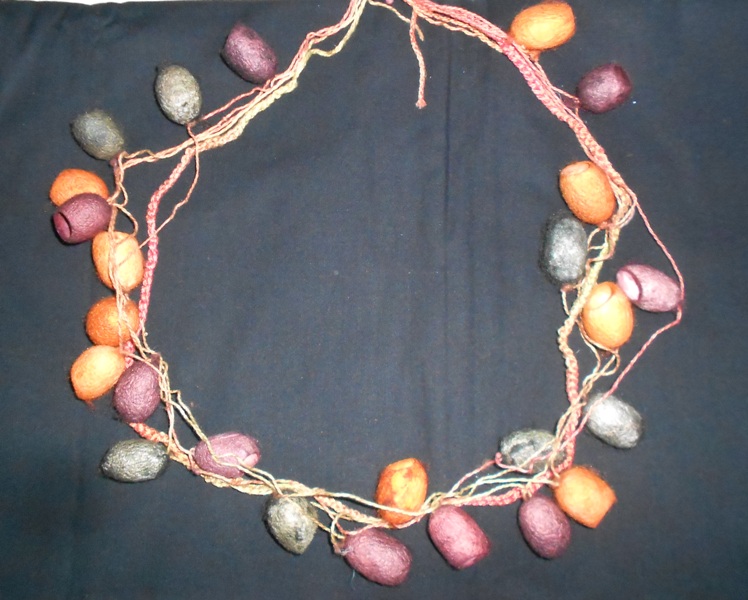
The last product I am showing you today is Sericin fibre or silk string.  It is basically the glue that holds the cocoon together.  When the cocoons are boiled off, the sericin seperates from the silk.  It is like a string of glue which, when air comes in contact with it, it resets.  It is coarse and rough and undisciplined.  I love it but it takes the most creativity to incorporate into your work.  I like it for dimension and body and generally couch over it with a zigzag stitch to attach it to art quilts or mixed media work.  It can be pulled apart which softens it, but it is also great in sculptural pieces or anything that you are shaping.

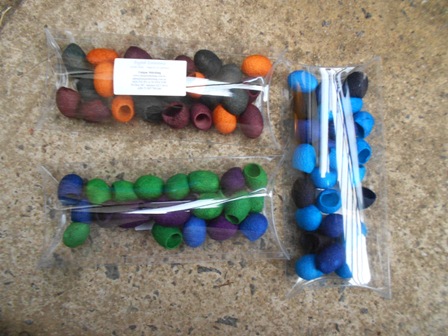
So they are the main silk products I dye and use.  There are others which I will make the subject of a further blog post at a later date.  I dye these in 30 colourways.


“Unique Textile Art” Classes at Rosehill Craft and Sewing Show.

26 01 2012

Following on from my previous post, I have now locked down the timing for my classes in a studio as part of my stand in Rosehill.  The Rosehill Craft and Sewing Show runs from 10.00 to 4.30 each day from 8th to 11th of March 2012.  It is at the Rosehill Race Course.  It is NOT the Stitches and Craft Show, which no longer exists.  The website for the show is here: http://www.craftandsew.com.au/.  All the workshops and events will be published there in the next few weeks.

So, three classes: one using Procion Dyes and two exploring some of the newer mediums such as TAP, Lutradur, Angelina, Foils, Bonding Powder, Inktense Pencils and other surface colouring products.  All three classes cross over a range of experience, from absolute beginners to people who have started playing with these media but are not sure where to go next.  There will be plenty of ideas and information shared but most importantly you will get hands on and try things for yourself and I guarantee you will have fun.  Each class will run for about an hour, with a bit of slippage.  Numbers will be strictly limited.

You can book at the stand on the day or prebook on www.uniquestitching.com.au.  I will hold places in each class every day for bookings on the stand but if you know you and/or your friends definitely want to do the class it would pay to prebook.

The first class starts at 11.00 each day and will be focused on the Angelina and Lutradur.  You can make Artist Trading Cards (ATCs), fabric postcards, or bookmarks.  Here are a couple of examples

The second class will be a dying class using Procion Dyes on cotton Fat eighths. It will run from13.15 each day.  You can choose three colours to blend to make 6 different colours.  Traditional colourways will be blue, red, yellow like this:

or a less traditional combination such as red, orange, purple like this:

other alternatives will be three blues or three greens, or three purple/pinks.

The third class is brand new, so much so that I only finished the sample in time to send the photo for inclusion.  It will run from 14.30 each afternoon.  This one explores Transfer Artist Paper (TAP), foils and a couple of colour products, predominantly the inktense blocks.  You will create a piece of embellished fabric that you can use as a small wall hanging, a cushion centre, a feature fabric or pretty much anything.  Here is my sample.  You can add more colours or more depth of colour with a couple of different products.

this sample is a bit crocked.  You will be given rulers so you don’t rush it like I did.  I am calling this Adelaide River because some of the images came from there and it is a place that has impacted on me.  I have tried to capture the poignancy of the location in the piece, but we will talk about using colour to add emotion to a project.

In the middle of all of this, somewhere between 12.00 and 13.00 I will do a traditional workshop in the workshop rooms on using different fabrics in your patchwork and quilting projects.

I hope that there is something here to tempt all of you living in the Sydney/NSW area and that you will join me.  Of course we will also have our full range of colour, fibre, fabric products; magazines and books; and so much more.

I will run similar classes (though not necessarily the same) in Perth, Sydney, Melbourne and Brisbane also this year.  See you there.


Classes at Rosehill March 8 to 11 2012 – join me!

22 01 2012

We will be trading at Rosehill Craft and Sewing Show this year.  And, following my new format, I will be running a studio on the stand.  The Studio is a bit like the Craft Circles or Make and Takes except because I run them at the stand, I have much more flexibility and time to do a more thorough workshop.  I am still working through the exact timings and kit costs, but here is a taster.  I will do three classes.  The cost is to cover the materials only, no tutorial cost.

One will be a Dye class – 6 degrees of seperation.  In this class, you will choose three dyes and dye 6 fat eighths of cotton fabric, creating a palette of colour.  There will be plenty of information such as dye theory so that in the end you will be able to take the ideas and make your own dyed fabric.  You can use one of several options of yellow, red and blue or step out on the wild side a little and use other colours.  In the sample below, I used orange, red and purple.

The second class is one I ran in Brisbane and everyone had a ball.  It is using Lutradur and Angelina to make a laminated fabric which you can then turn into ATCs or Bookmarks.  These photos may be familiar to regular blog followers but here are two examples:

The third class will use TAP (Transfer Artist Paper), Foils, Inktense and some other colour products.  You will learn how to use all of these and see how TAP behaves on different surfaces.  The finished piece can be a small wall hanging; a feature print for a quilt, cushion, jacket ;a bag panel or anything you like.  You could just mount it on a canvas and hang it on the wall.

Here is the sample.

It is not the best photo as I only finished it about twenty minutes ago and I am running out of daylight.  I will take a better picture in the morning.

What do you think?  Will you join me?


Dyeing and Mixed media classes in Brisbane 19-23 October 11

20 09 2011

I am using a new format at the shows which allows me to run classes at the stand.  I did this for the first time in Melbourne and we had a ball.  Now it is Brisbane’s turn.  The Craft Fair Friend can be down loaded from www.craftfair.com.au if you like.  My classes are outlined on pages 32-33 or you can go to my website at www.uniquestitching to see the details and book.  The class fee includes all your materials plus the use of class tools and materials.  You just have to show up and have fun.

However, here are some photos of what I am doing each day:

10am daily   By the Sea Lutradur, TAP and Angelina Sampler

11.30 daily  Quick and Easy Dyeing


12.30 each day  Indigo Shibori on a large Silk Wrap


1.45 daily  Mixed Media Artist Trading Cards with Lutradur and Angelina

2.45 daily – Floral Fantasy TAP and Encaustic Wax sampler

If you can’t make it to the Brisbane Show but would like to play with these techniques with a group or your guild let me know because I have extended versions that I teach.