Working with Prismacolor Premier Pencils

11 01 2015

Pencils vary dramatically in quality and consequentially price.  In loose terms, pencil quality is determined by three key components:  the quality and intensity of the pigment; the nature of the binder the pigment is mixed into; and the quality of the wood that encases it all.  How often have you had a packet of pencils where the wood splits and breaks everytime you try and sharpen them, or the inside is so brittle that once knocked or dropped the colour is broken into tiny pieces and you can’t use them.  These and other problems are a product of the materials used to make the pencil.

Often when we talk about Prismacolor pencils, it is the Premier pencils that we mean.  Prismacolor make many different colour products, but the best, artist quality, wax based pencils are the Premiers.  These pencils now come in 150 colours, including 36 grey shades.  There is no colour you can’t create with these pencils.  Here is a colour chart.

150colorchart

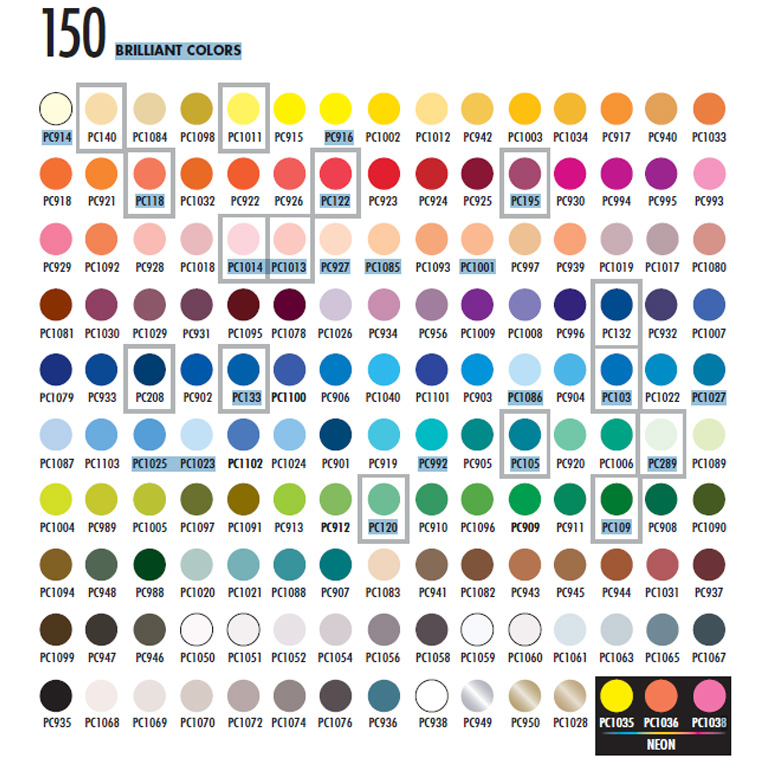
You can get these all as individual pencils, in packs of 12 through to all 150.  I personally always want them all, but I might just be greedy.  The ones in the boxes plus the three Neons are the newest colours.

Prismacolor pencils are fantastic artist quality pencils.  They are rich, vibrant colours as they are strongly pigmented.  They are a waxed based pencil, not watercolour, so they will not shift easily with water and can be blended with a brush, sponge or your finger.  When using them, I tend to start with a light layer of colour and build the layers up.   Although designed for artists drawing on paper, many textile artists are using these with stitcheries, quilts and garments.

This video is a joint activity between Dick Blick and the Prismacolour educators.  This video only considers their use on paper.  It is a good explanation of the pencils.   https://www.youtube.com/watch?v=P5VIfFETIe8

Although not designed for fabric the pencils have been used by doll makers and embroiderers for decades. Fabric always has ‘tooth’ and working the same area over again does not take that away.  As the carrier of the pigment is wax based, the colour can be ‘melted’ into the fabric for permanency.  To heat set these, place the fabric between some absorbent paper and iron.  Please test this on your fabric as different fabrics will behave differently.   If you are concerned about washability, pretreat your fabric with a diluted textile medium.  To do this, mix one part textile medium in three to five parts water and paint this solution onto your fabric.  Allow to dry and then colour over the surface.  This will act as a binding agent for your pencil.

An alternative approach can be found here:  http://sandraleichner.com/wordpress/colored-pencil-applique-tutorial/.  I found Sandra’s use of flowable extender interesting and I really like how she adds life to her applique with the pencils.

An Australian textile artist who has used the Prismacolor pencils in many of her award winning quilts is Jocelyne Leath.  You can see her website here:   http://www.jocelyneleath.com/index.html

These pencils will go on pretty much any surface.  I have an artist who draws on wood using Prismacolor.  They are great on Kraft tex, tyvek and Lutradur too.  With the addition of some fixatives, the pencils can be used on non absorbent, smooth surfaces too.  Here is a post about someone using them on metal.  http://blog.prismacolor.com/2011/09/heavy-metal/  Just amazing.

You can find the pencil sets on my website here:  http://www.uniquestitching.com.au/c/196496/1/prismacolor-pencils.html


looking for a team

2 06 2013

Otherwise known as I want more friends.  LOL.

I am seeking people to join participate in one of two groups or options.  First I am looking for a group of people who want to use different materials in a monthly challenge.  If you nominate for this, you don’t have to participate every month and the participants can change, but I would like to develop a core group to ‘test drive’ products in your own style.  Each month will have a themed product which I will send to you.  You will then have a month to put it into something: a small quilt, art quilt, mixed media, papercraft, felt, embroidery, you name it I am open to seeing what you do with it.  On a set date each month, probably the first or thereabouts, I need images of your challenge piece.  These will all be published on Facebook and the most popular will result in a prize.  Some of these projects may flow through to the second thing I am looking for which are Guest Bloggers.

Guest Bloggers will be a paid gig.  I want a monthly guest artist to talk a bit about what they do and share a project in your own style.  Fees will be discussed privately.  Guest bloggers can use the platform to promote online classes, workshops or new release products, but the project must be original.  It does not however have to be a one off idea.  I would expect that guest bloggers would incorporate versions of their signature techniques so the development of the project should not be enormous or cumbersome.  It can also be something you have already made, but have not published.  Good quality images plus a tutorial on the project and/or associated techniques will be required.

If you are interested in either role or both, please email me on cecile@uniquestitching.com.au


Quilting Arts is on the web and I have added my Jan/Feb news

28 01 2012

I got the new Quilting Arts a couple of days ago, but it has taken me a bit to get it on the web and the subscriptions out.  I love this edition.  Some of my favourite people are in it: Jane DaVila, Judy Coates Perez, Jane LaFazio, Susan Brubaker Knapp, and Kathy York.  Not to mention a fabulous article on the 12 by 12 quilts with Brenda Gail Smith.  Love it.

And this is the news that will be going in mail orders for the rest of this month and February.  I thought you might like to have a look.  I will start loading these on the blog as I prepare them.  News from Unique Stitching January


Nuno Felted Scarf

1 11 2011

Hi there I made this yesterday (and a little bit today ’cause I needed to pace the felting – how bad is that).

this was made with one of my new Nuno Felting kits in Purple Passion.

Here is a quick tutorial on how.

The kit has hand dyed silk georgette and some Ashford Silk/Merino blend.  You need to add some bubble wrap, hot water and soap and a lot of energy.

Lay your bubble wrap down on the table and spread the fabric over the top.

Spread your fibre out in a pattern or an even coverage.  The fibre will lock into the fabric so you don’t need to create layers like you would with conventional wet felting.

Mix soap into a bucket of hot water.  I just use dishwashing liquid but you might choose to use something nicer.  Wet the whole area thoroughly ensuring that the wool fibre is wet through.

Roll the whole wet bundle up into the bubble wrap.  I also wrap the bundle with an old towel to get some friction.  Rub the bundle backwards and forwards, placing pressure on different places as you go.  Rub like crazy checking the felting process as you go.

Unroll and then re-roll the bundle a couple of times to change the point of pressure.

When you are close to finished, you will see that all of the wool is bonded and the fabric will be gathering as the wool shrinks.  Once finished, rinse in warm water with a dash of vinegar to clean and freshen the fibre.

Here is some detail of my finished piece.  See how the fabric has puffed and gathered between the grid of wool.

The Nuno Felting packs have more comprehensive instructions and some layout options for you to play with.


Dye your own ribbon, yarn or threads – Here is how

18 09 2011

This weekend I have been dyeing ric rac and I thought that I would share how.  It is really very easy.

I bought a large amount of Ric Rac in different sizes and have dyed it in 20 different colorways (more on that later).  You don’t need to want to dye much to follow the instructions below.  Just adjust your process to match the volume you are dying.

You can use these instructions for any cellulose fibre (fibres which come from plants like cotton, rayon, linen, hemp, bark etc) and silk or blends of these fibres.

If you are dying threads or other items which are likely to get into a big knot, you should skein them up first.  Create a skein – size will vary depending on how much you are dyeing and how thick it is – and tie the skein loosely in about four places to hold it in shape and prevent knotting.  Don’t tie this tightly or the dye wont penetrate where the ties are.

I always, or nearly always, presoak my fabric in soda ash solution when I dye with Procion Dyes.  Mix about a tablespoon (Aus measure – 25mls) of soda ash in two to four litres of tap water and dissolve.  Then submerge your fabric etc and leave it to soak.

While the soda ash is soaking in prepare your dyes.  As a general rule, my starting point for colour is about a teaspoon (5mls) per litre of water.  More dye for dark colour, less for pastels.  Adjust your measurements to the volume of dye you need.  You might only need a quarter of a teaspoon in a cup if you are dying small amounts.

Generally, I will coordinate three colours into everything I dye.  This example has chocolate, olive and rust orange and I want it to be light, so I have used less than a teaspoon of each colour.

I am doing variegated or space dyeing on this, so lay out the ribbon, yarn or thread like I have with the ric rac.  I want it in an even spread so that the dye is evenly distributed.

The enemy of this type of dyeing is to have surplus dye in or around the fibre being dyed.  To avoid this, I use a rack and tray system.  The alternative is to put something down to absorb the excess dye such as fabric.  I often make what are known as mud fabrics by using them to absorb the excess dye.  In a mud fabric you let it take all the dyes and because they have some soda ash in them, they take in the fabric differently and you never quite know what you are going to get.

Pour the first colour across your fibre.  You need to go slow and have control.  If you prefer, you can use bottles with nozzles.  I just use plastic cups and go slowly.  Prod the fibre to make sure the colour is all the way through.  You can space your variegations as widely as you want, but try to be a bit even (or not if you prefer).  Keep a little bit of each dye aside to fill gaps and touch up.

Add the second colour next to and slightly overlapping the first.  The overlap creates some blending and ensures that there is no undyed areas.  Of course, you might want some white left in there and that is fine too.

Add your last colour and again overlap, prod and massage to fill gaps.

I then flip it all over.  You may not need to do this, but I always dye large quantities so flip it all over to double check.  Use the extra dye that you have held back to reinforce your colour and fill gaps.  Set aside and allow to batch for a few hours.  I find it useful to wrap this in cling wrap so that the dyes don’t dry out while I batch.  That way if you don’t get back to it for a while the dye remains moist.  It also means that the colours don’t cross infect each other by accidental contact while reacting.

Once you are happy with the colours and have left them for a few hours, rinse out the excess dye and soak in hot water until the colour stops running and your water runs clear.  Hang to dry.

Here is my finished sample.  I will have photos of other colourways on facebook and they will all be loaded on the web in good time.  What do you think?


Free Art Quilt workshop now available

19 07 2011

Want to make this?  Some of you already have.  For the rest of you I have made this free for you to play with.  Simply go to http://artquiltclass.wordpress.com and there are six simple steps to making this.

Enjoy, share, have fun with it.


New Austalian Craft Blog you don’t want to miss.

16 07 2011

Are you into craft? Aren’t we all?

http://intocraft.com.au/

This is a new blog with a monthly email newsletter brought to you by Judy Newman
and Expertise Events. It is brand new and the first posts are up. There will be
projects, information, events, you name it – all sorts of craft related info.
Book mark it, save it in your favourites, register for email or rely on me to
remind you to go there each month, but don’t miss out


Indigo Dyeing that anyone can master!

2 07 2011
Indigo dyeing is an ancient and traditional art but it has not been for the faint hearted. In the past, Indigo dyeing was a difficult and time consuming process. Indigo in its natural form is non soluble, so involved a significant process to get it into liquid form. Originally sourced from plants, somewhere in the late 1700s, a synthetic version was created, yet the process was still difficult to liquify and ‘reduce’ the dye. These days, a pre reduced version is available and this is easily dissolved without turning to caustic chemicals and weeks of preparation. I have been playing with the pre reduced Indigo and it is not only very very easy, but a blast to use.

Linen Shirt with Indigo Shibori

The process is very easy.  You use about 20 grams of Pre Reduced Indigo, 100 grams of Soda Ash and 150 grams of Thiox in about 20 litres of water.  Mix the dye and then the chemicals in stirring gently.  You then leave the dye bath to sit.
Once it has sat for a while, the indigo dye becomes light green and transparent.  A slimy looking skim appears on the surface.  When this occurs, as surprising as it seems, you are ready to go.

Indigo vat is greenish and transparent

The skim on the top - otherwise known as the "flower"

To use, you skim off the flower and save it.

save the flower for later.

You then submerge your fabric, yarns, garments etc.  Today I dyed a pair of cotton socks and a linen shirt.  The shirt I tied with rubber bands.  The socks I just threw in.  They were “cotton rich” – in other words, not 100% cotton.  I wanted to see how the nylon and elastic took the dye.

White cotton socks in the Indigo bath. See how green they are!

Leave your items in the bath for a while.  If you want to intensify the colour, you are better to bring them out for a while and putting them back in rather than leaving for a longer period as the oxidisation is what creates the colour.  More on that shortly.
When you think you have had enough, take the items out of the indigo vat and squeeze the excess dye out.

Remove the items from the dye vat. They will be green.

Hang the dyed items out, take any ties or bands off, unfold any pleating etc.  As the air hits the indigo dye, it oxydises, turning it blue and locking the dye molecules into the fibre.  This is WAY COOL to watch.  Rotate the items if you need to.  Thicker layers such as hems or facings will take longer to go blue than others.

Partially oxydised socks

Once you have taken everything out of the dye vat, replace the flower and stir gently.  The indigo vat will last several weeks before burning out.
Here are the finished socks.  The nylon and elastin has taken the indigo beautifully.  Who knew?


Three fabulous ways to use Foils on Fabric

9 01 2011

I have just loaded another tutorial page on the Blog. This page looks at three different ways you can use foils on your fabrics. 

To do this, I have had to rearrange the site a bit, so you can now find the information pages on a menu on the right hand column under the “About Me” segment.  This allows me to increase the number of pages easily and allows you to access them all without having to use complicated searches.  Every day I learn more about social media. 

I have also activated the sharing buttons.  I meant to do this a year ago.  What this means is that when you click into an article or open a page, you have the option to share the material quickly and easily.  I encourage you to share as long as a link back to the blog is included in some way or some other form of acknowledgement that I am the author of the material. 

I hope you enjoy the information on the Foils and have a play.


How much pink is too much? I think I am there now

31 12 2010

Over the Christmas period I have been mixing the traditional with the art quilting and surface design.  It has been an interesting mix moving from one to the other and back again.  The traditional quilts are gifts for family members, the non traditional are class samples or samples for the stand amongst other things. 

If you have been following me on Facebook, you will have seen the enormous piles of pink I have been working with.  I started out planning a pink quilt for a little girl in my life and then got nudged towards making a second.  After being surrounded by boys for the last 20 years, pink has been an experience.  I think I may have overdone it slightly, but never mind.  So I made two quilts at the same time and just doubled everything.  Both are 66 inches square.  I have finished one top and am in the process of finishing the second.  Then, I will quilt them both.  In the mean time, I thought I would share the finished top.  The photo is not great, but you get the drift.  Here it is:

I love stars, particularly this one.  This block is a variation of the friendship star, but adds a bit more complexity to the piece.

To see the blocks in more detail, here they are:

Basic Friendship Star


friendship star with more detail - my favourite

This is a great block for scrap quilts.  Just seperate the lights, mediums and darks and make sure that the mediums are the stars.

Here is another version of this block.  I have reversed the dark and light on this one compared to the pink one.   
If you would like to make this, here is the pattern
Finally today, I have sent out an email with some special promotions and give aways.  If you don’t subscribe to my email newsletters and would like to, email me directly on cecile@uniquestitching.com.au to get a copy of what I sent today and/or go to the website www.uniquestitching.com.au and subscribe for future news.  Also, I am giving away postcards on Facebook randomly to some who follow me there.  You got to be in it to win it, so come over, search for Unique Stitching, select like and you might win.