Class planning for 2020
28 11 2019For many people November and December are times for winding down, preparing for holidays and Christmas, spending time with family and relaxing. But this is not the case for travelling textile teachers. This time of year is when class proposals are due for both Houston Quilt Festival and Birmingham Festival of Quilts. So I, like many of my peers are busily putting together new classes, making samples and preparing step-outs and handouts. I have just gone through this process for a London show I am teaching at in March, so thought I would share one of the projects I have made for that program.
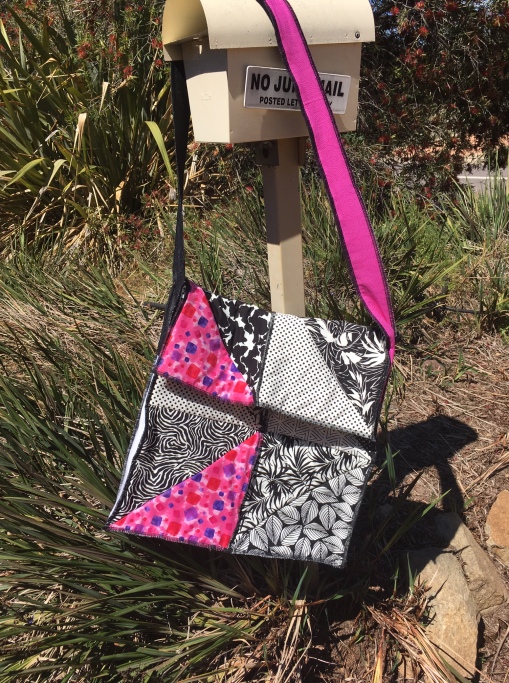
This project is made entirely on an overlocker (serger) and the technique is very adaptable to lots of different looks. I made a quilt as you go messanger bag from charm squares and six strips from a jelly roll.
Here is the project photo
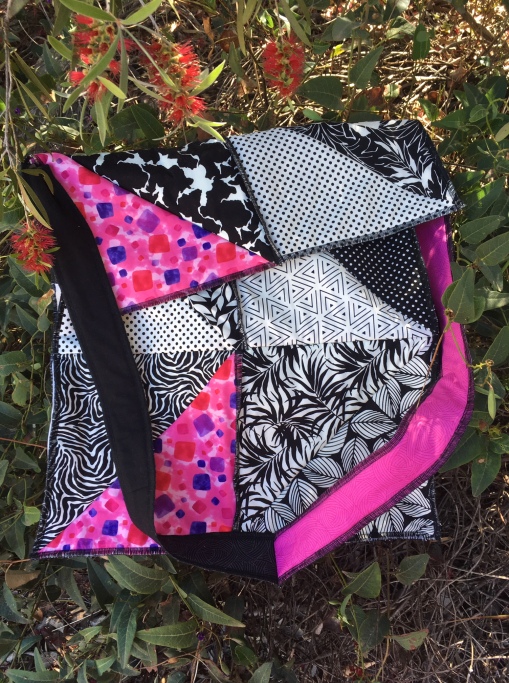
I used black and white fabrics from Byndees Precuts. These are from the 10 inch charm squares which I cut into half square triangles. I then found a heap of offcuts of wadding and cut them into ten inch squares and then half square triangles. I tried to keep a mix of light and dark and through in two squares of the hot pink for some lift.
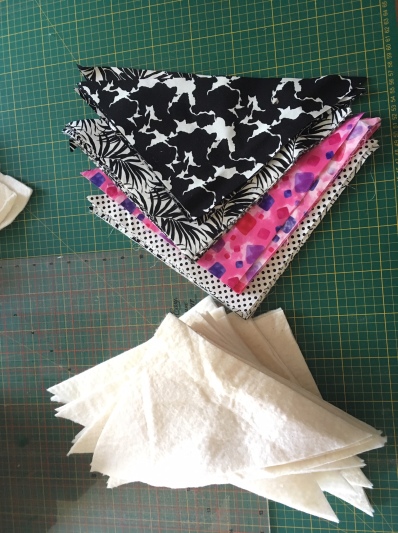
Then I made sandwiches of the wadding and two fabric triangles.
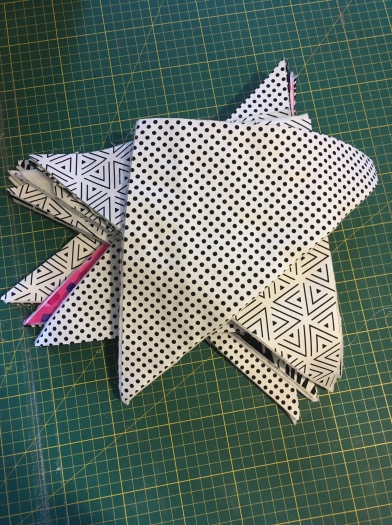
Then it was off to the overlocker. I took two triangle sandwiches, one light and one dark and stitched them together along the long side. Repeat this until all the triangles are back to squares.
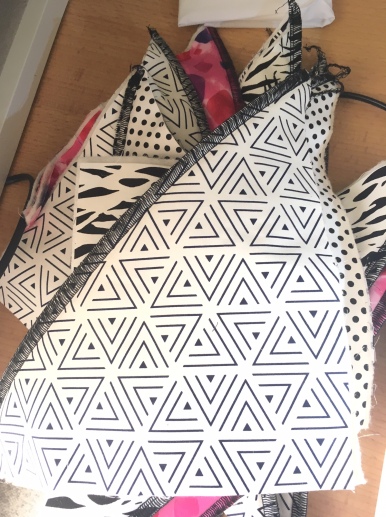
These squares are then joined up to sets of two and formed into the front, back and lip of the bag. I then joined two sets of three strips from the jelly roll to make two long, long strips. Next, I used the two fabric strips on either side of wadding cut to the same size and stitched the sides of the bag together.
All quilt as you go and made in a couple of hours.
If you would like to make this in a class, you can see me in London or organise for the class to be run with your group or guild.
Comments : Leave a Comment »
Categories : bags, Teaching, website
International Quilt Association Silent Auction
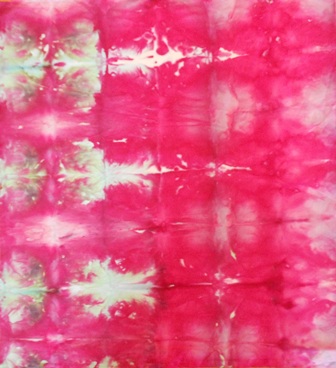
27 09 2019It has been a long time since I used this blog but I have something to talk about so here we are again. I am teaching at Festival of Quilts in Houston again this year. It is always an honour to be included in the Houston faculty. This year I got an email from the coordinator of the IQA silent auction asking for a small quilt to be included in the auction. After the initial shock of being asked, I got a bit of an idea of what I was going to do. Of course, I then went to Birmingham, got busy and have left it until the very last minute to put this quilt together. As it is now on its way to the US, I am able to share my process with you.
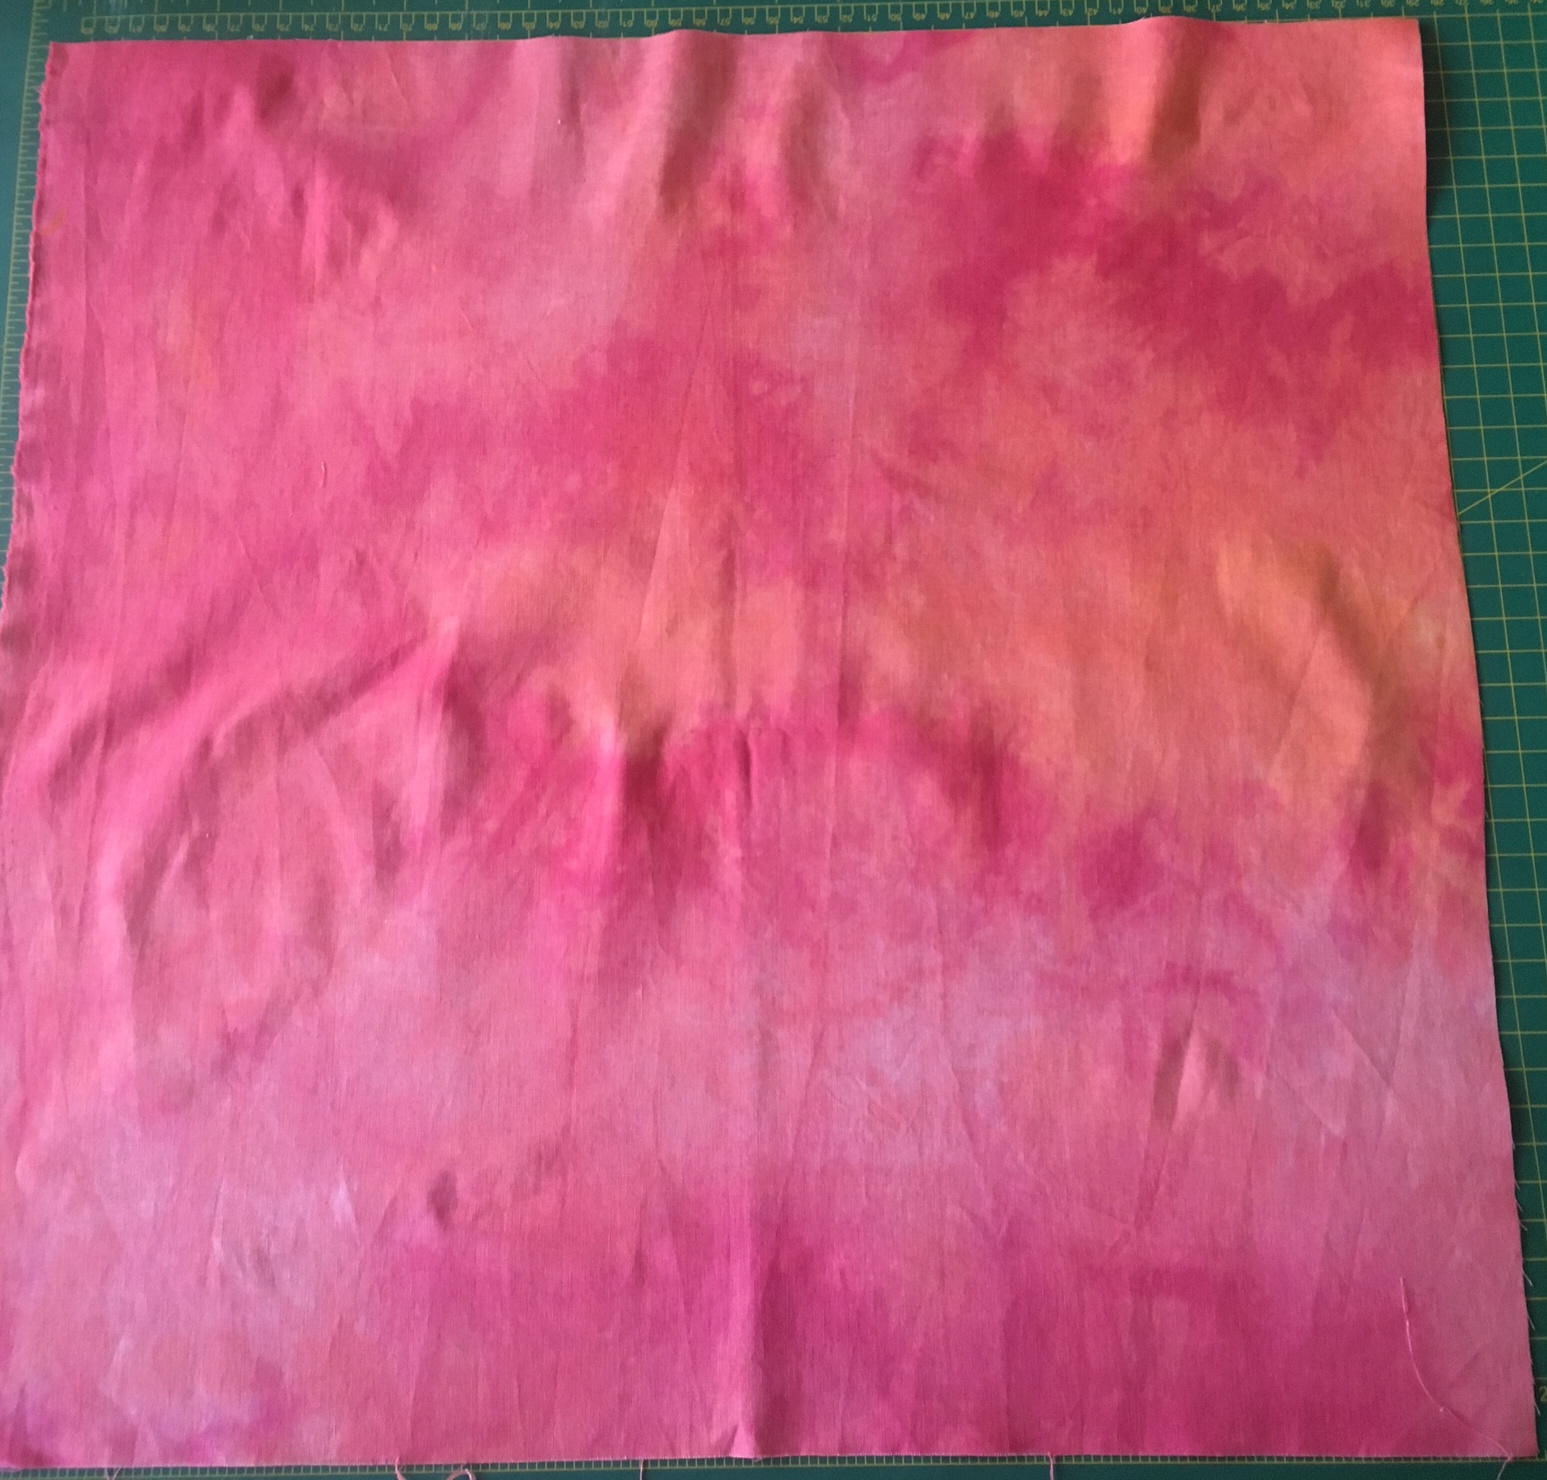
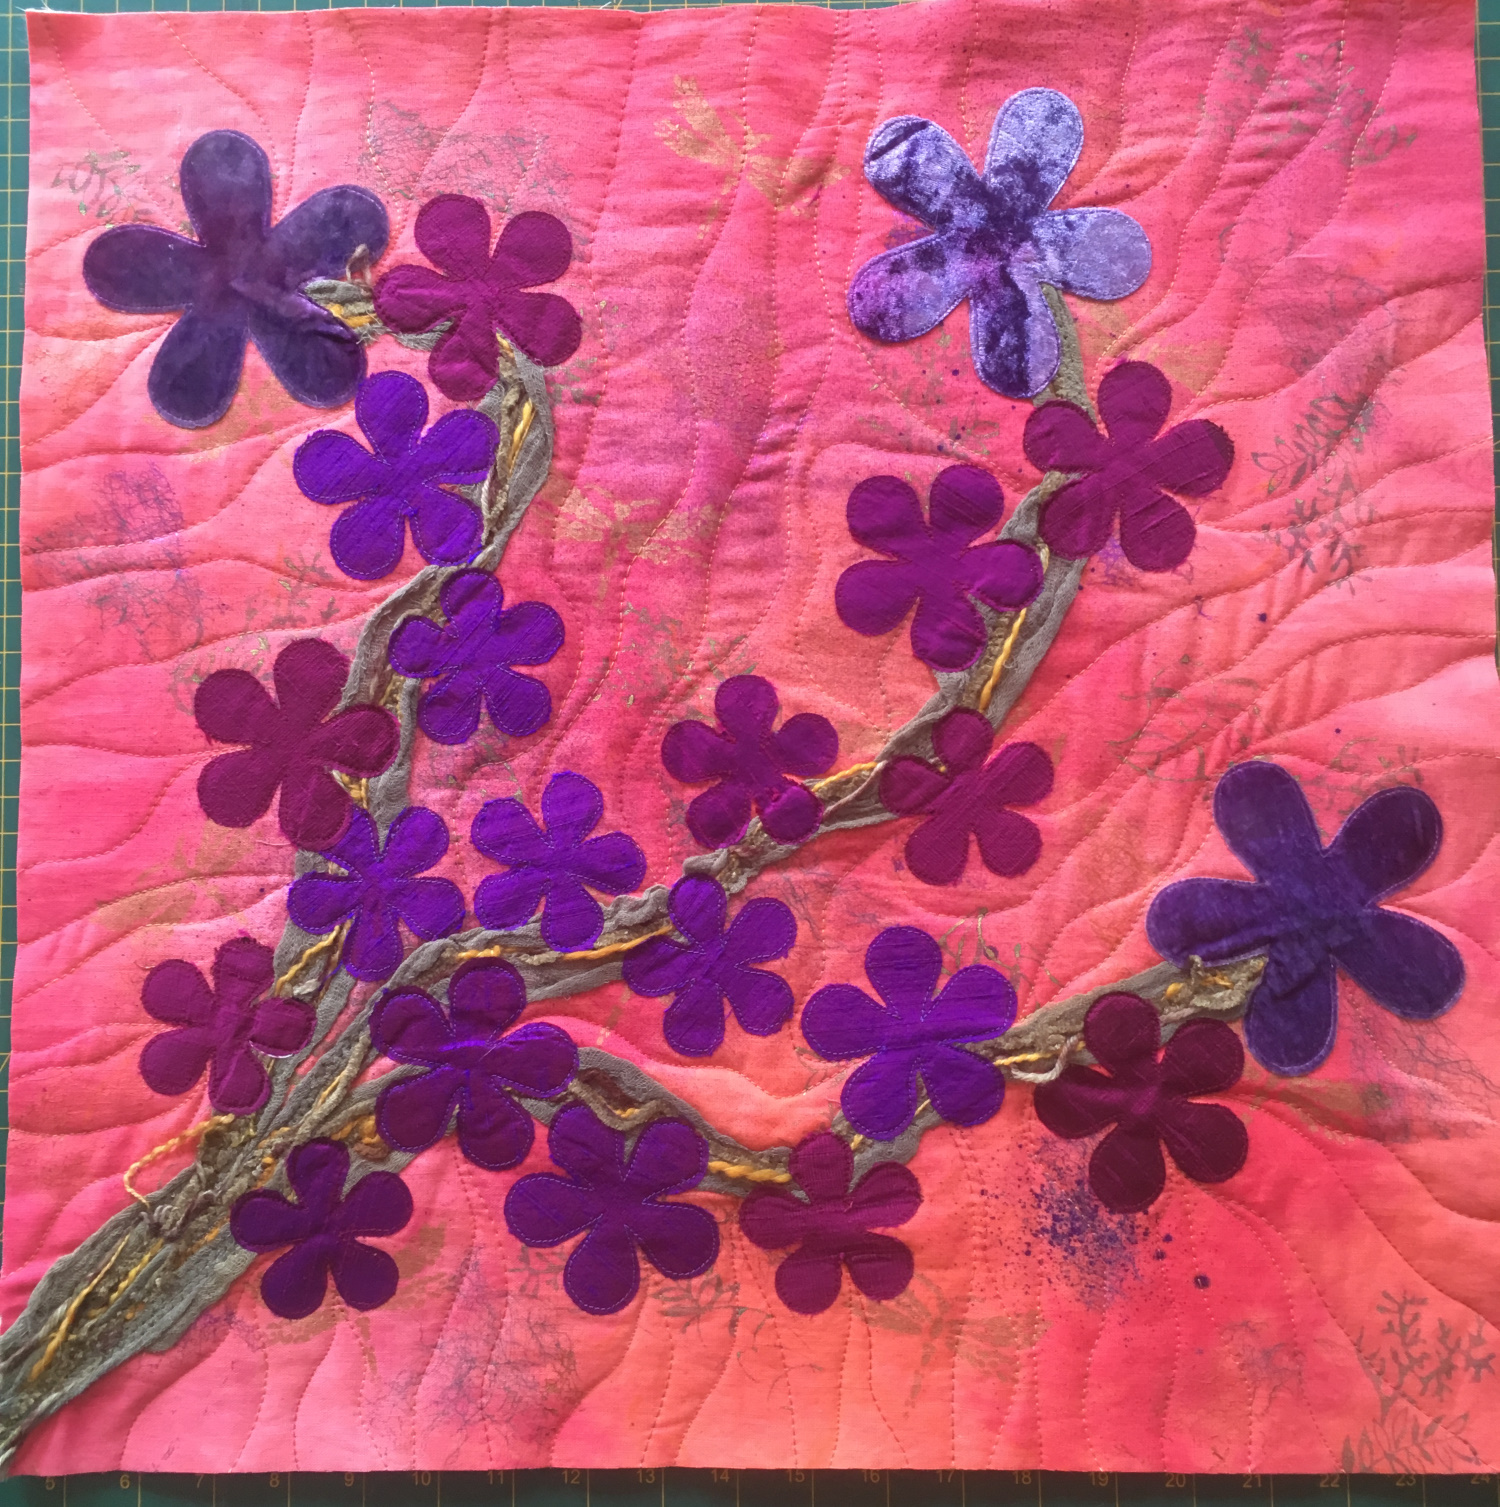
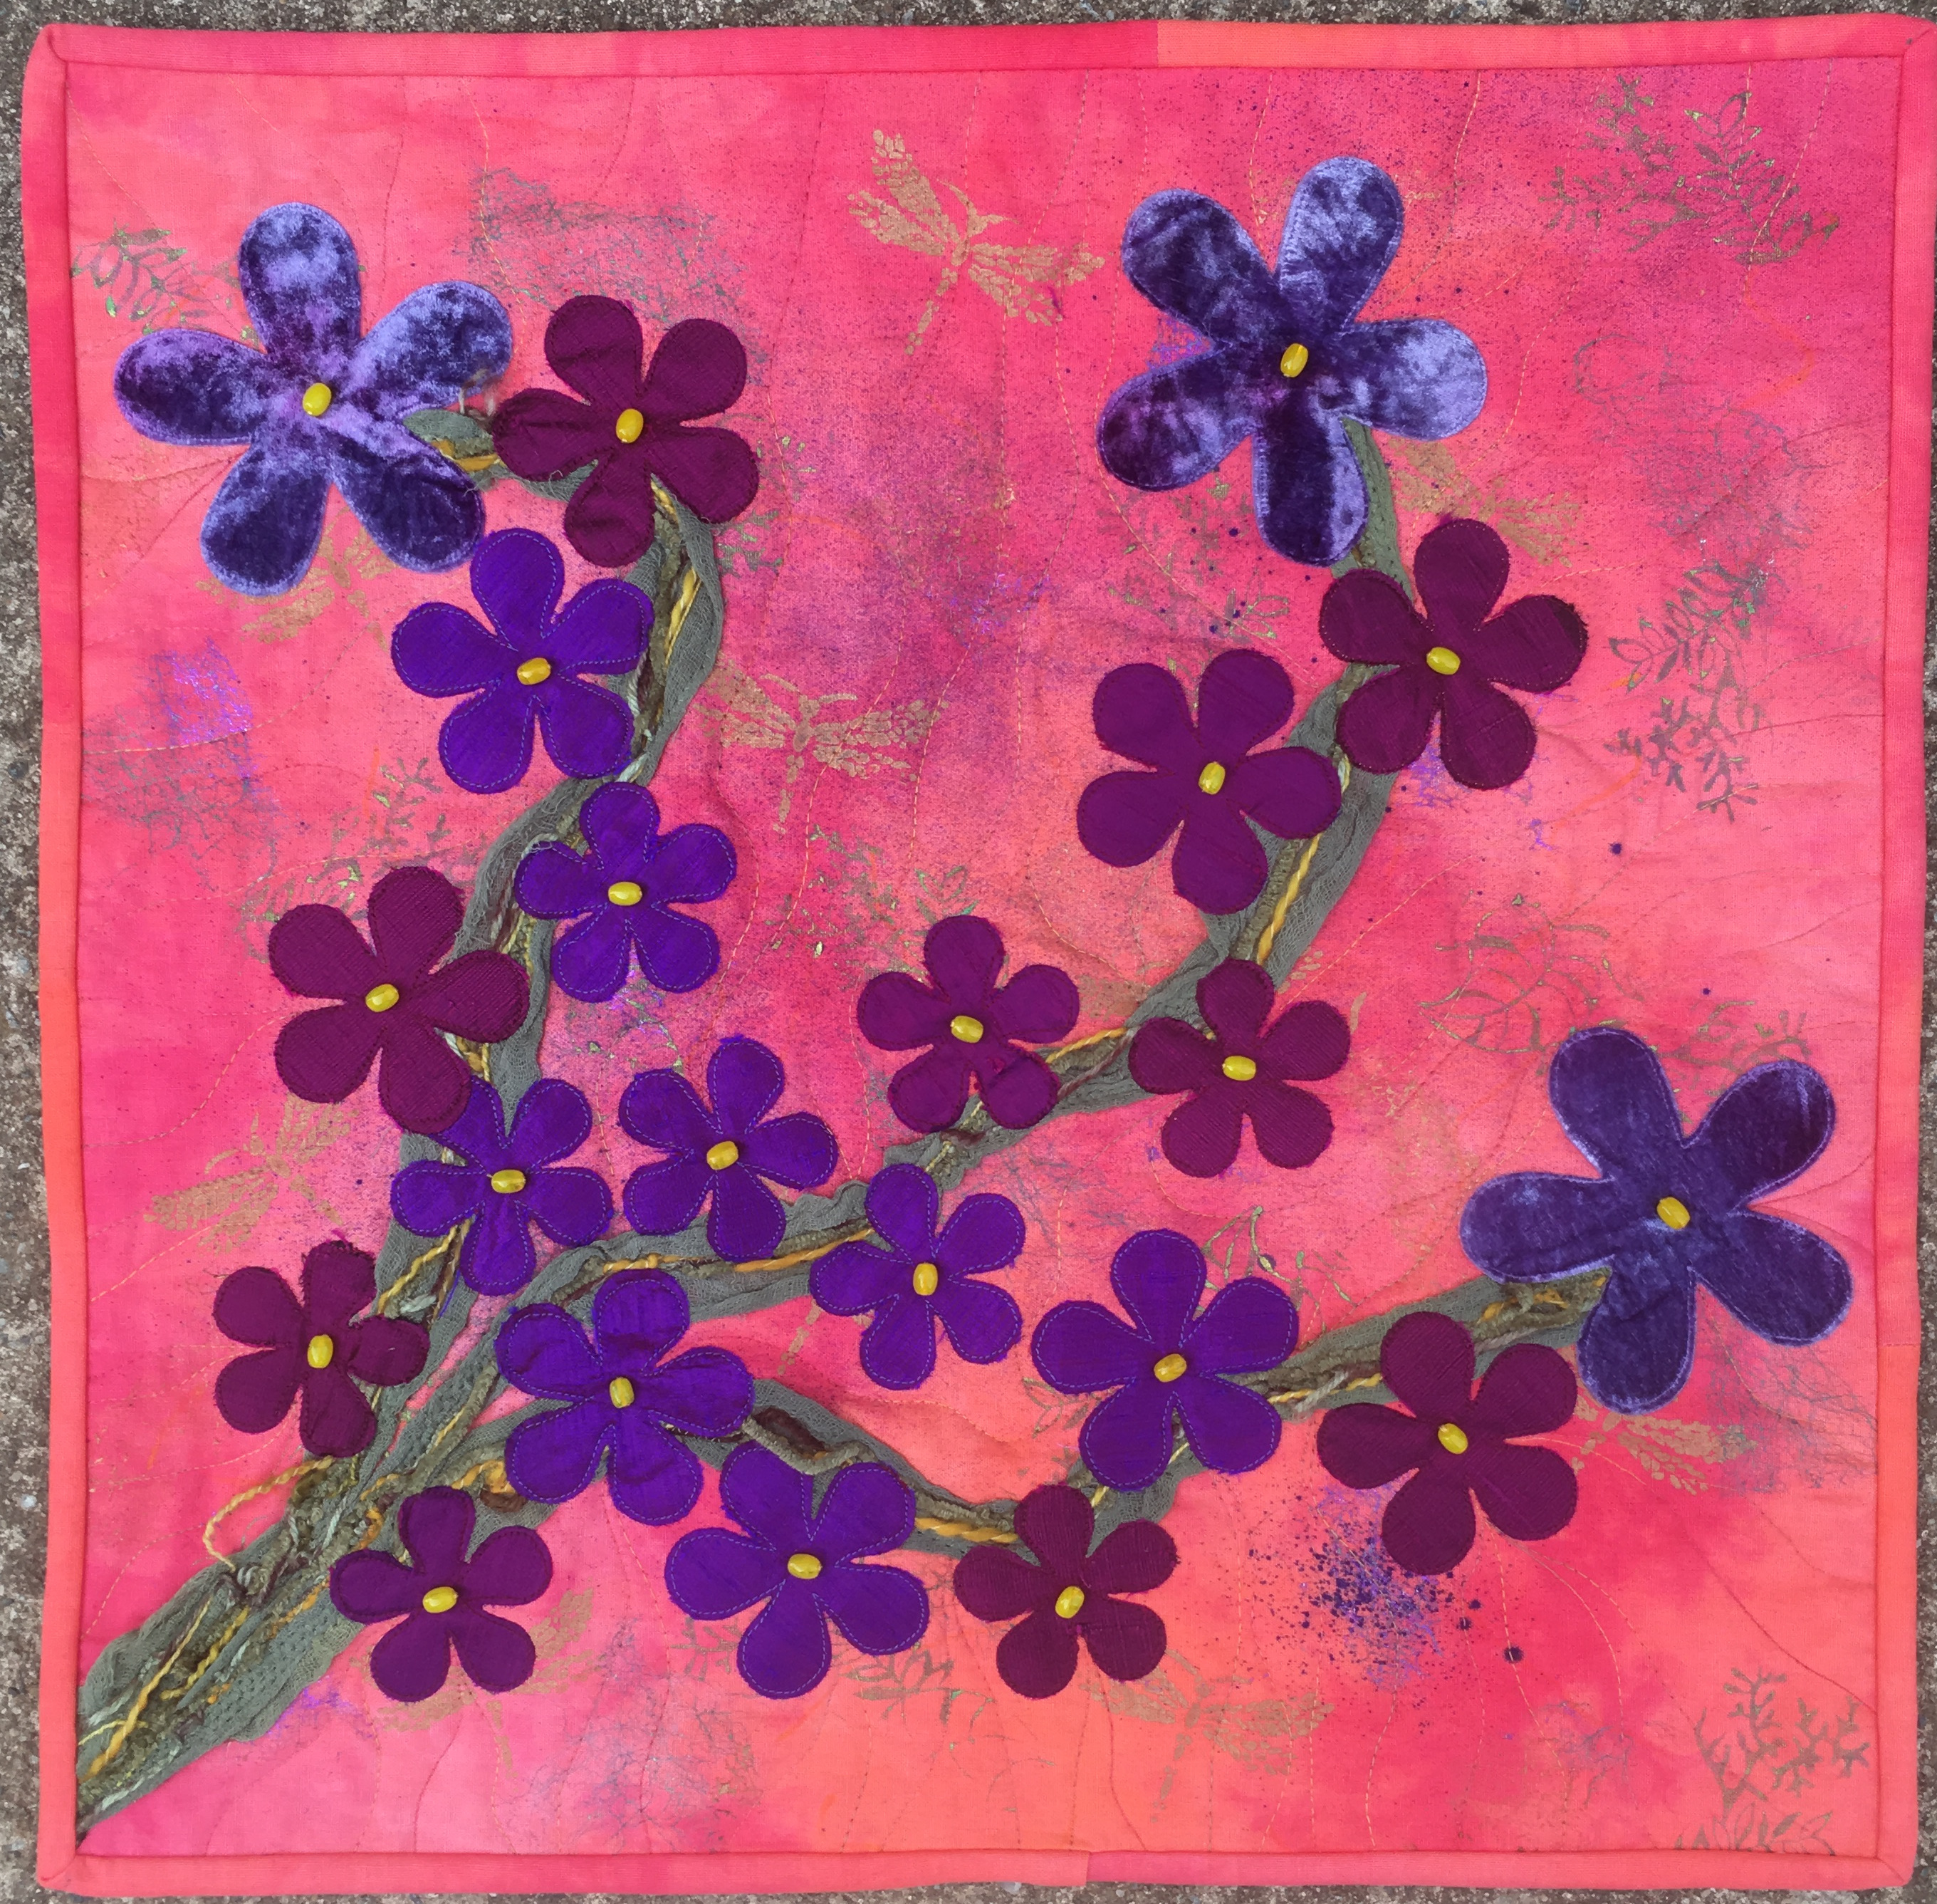
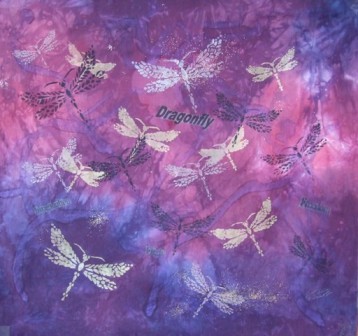
I knew immediately the colourway I wanted to work with and it all started with a metre piece of handdyed linen. This one to be precise:
I then followed my general process for many of the quilts I make.
I selected some hand dyed velvet, silk dupioni, cotton scrim and some wool and acrylic yarn for highlights.
Then I set about to create texture in the background with paint and a few other bits and pieces.
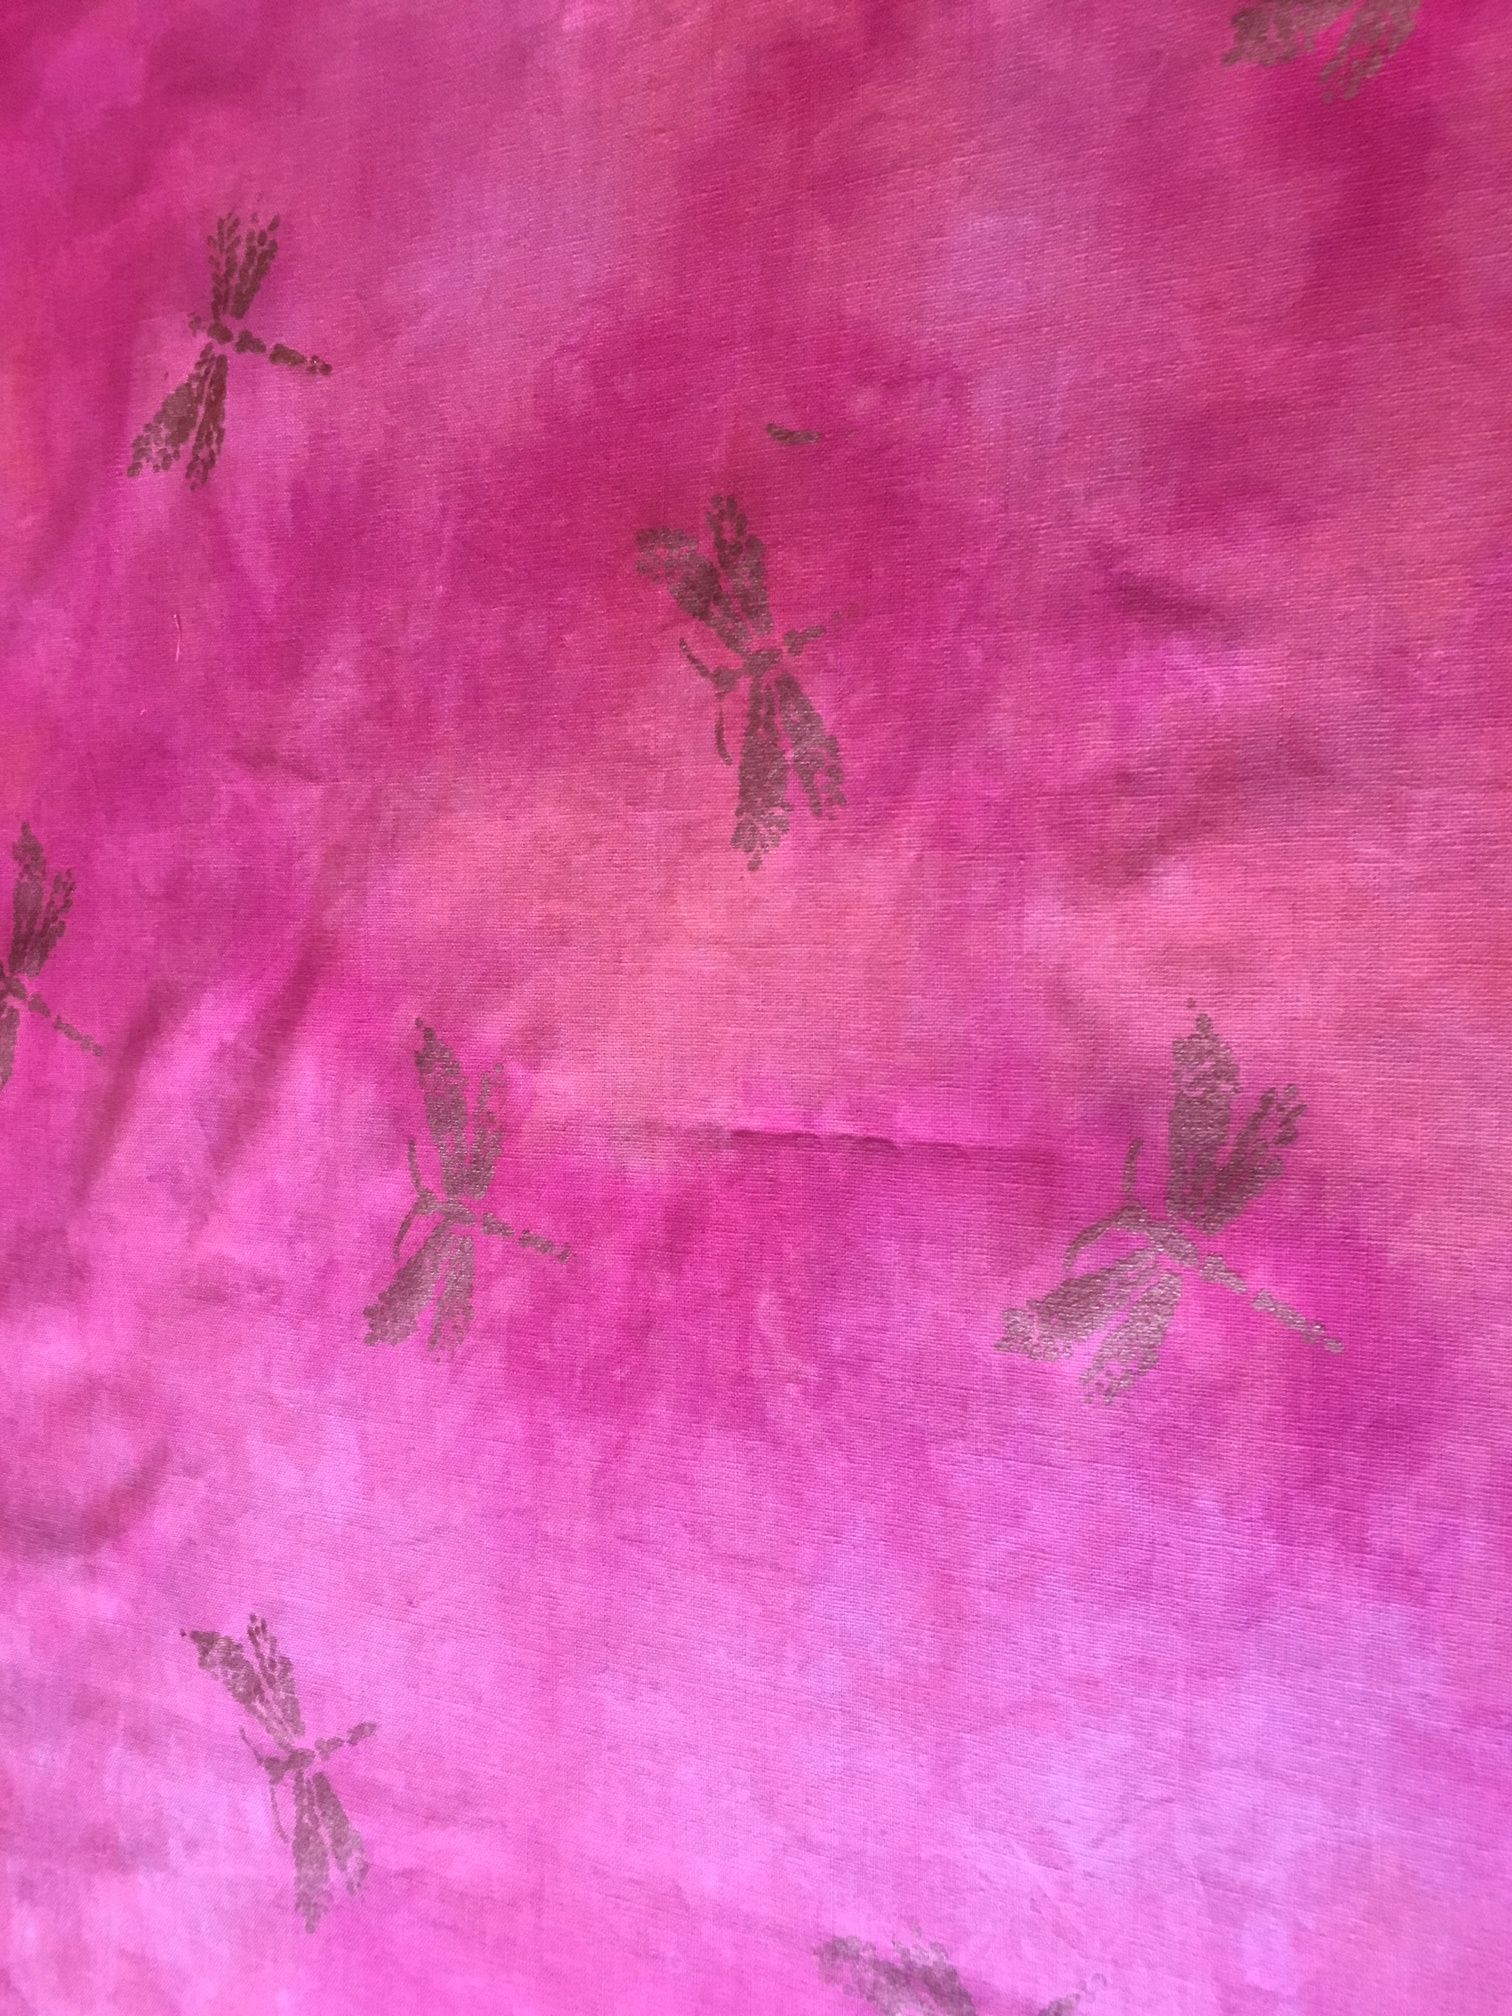
I used Lumiere paints because they are the best. First I used a stencil to add the dragonflies. This stencil is one of my absolute favourites and I reach for it often, or pretty much all the time. I then used a block print to add some ‘greenery’.
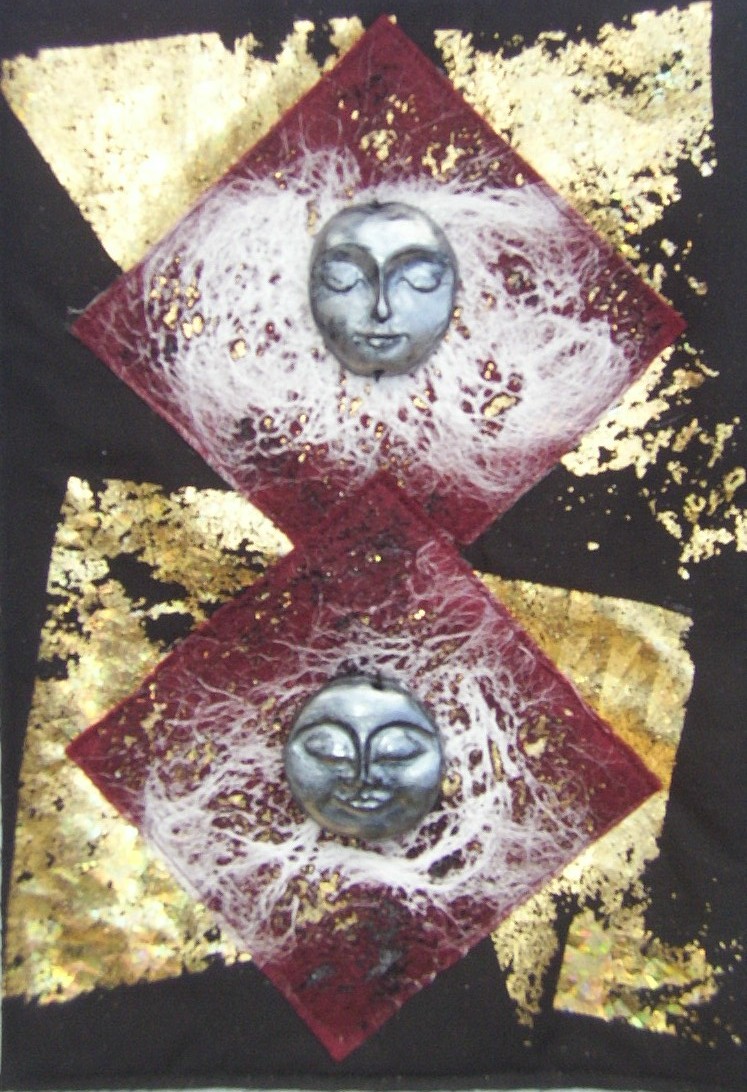
When I auditioned my fabrics on the painted surface, I needed more depth and a bridging colour.
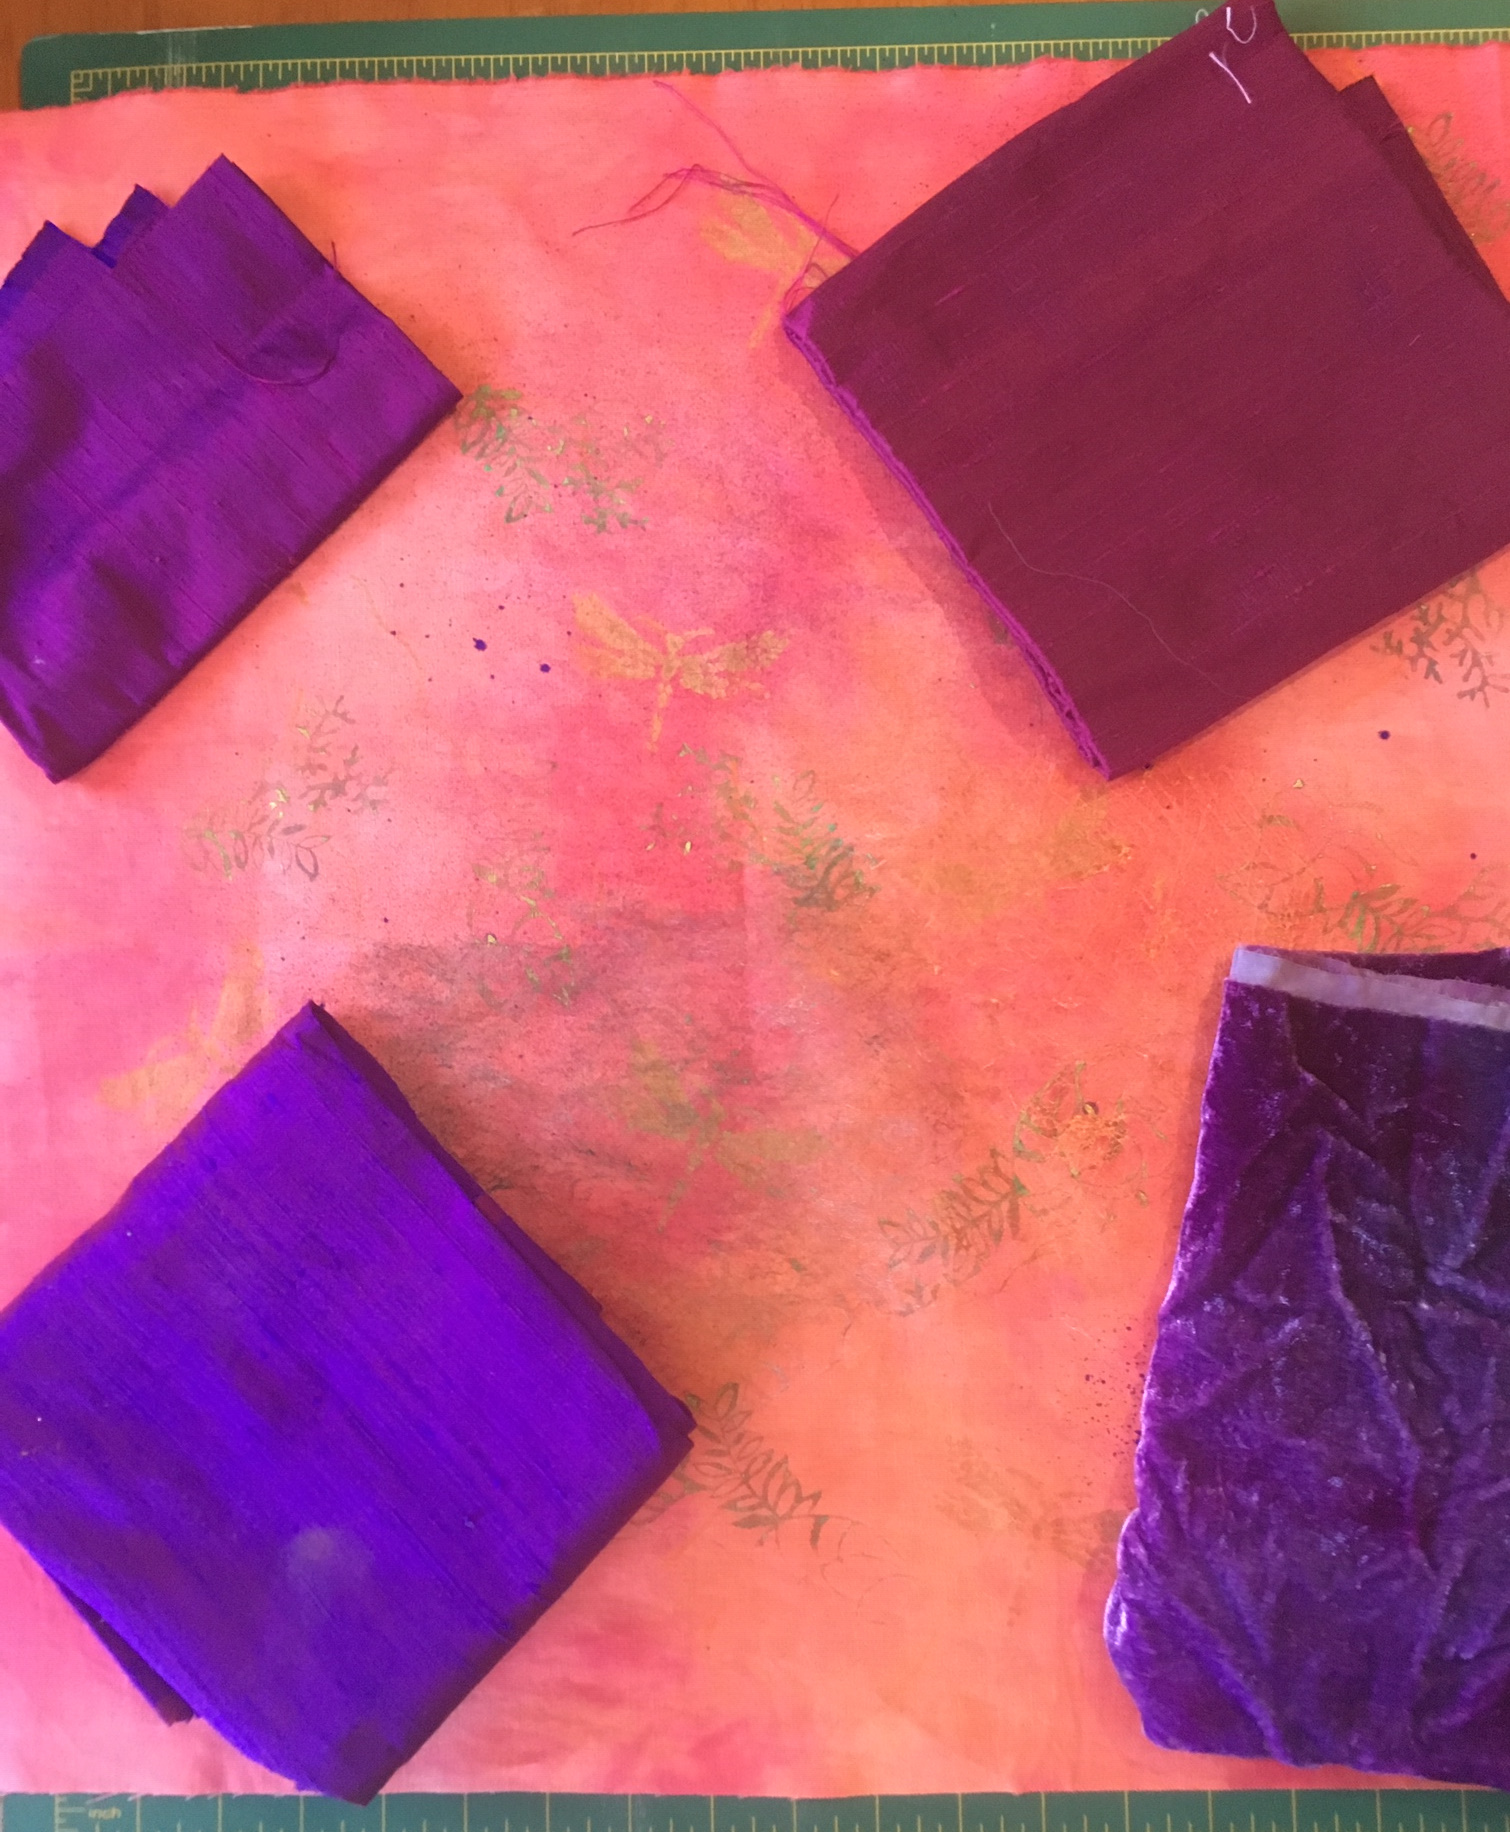
So, I added some depth by misting diluted purple Dye Na Flow in the centre of the piece. Next came some painted Mistyfuse and off course, some foils.
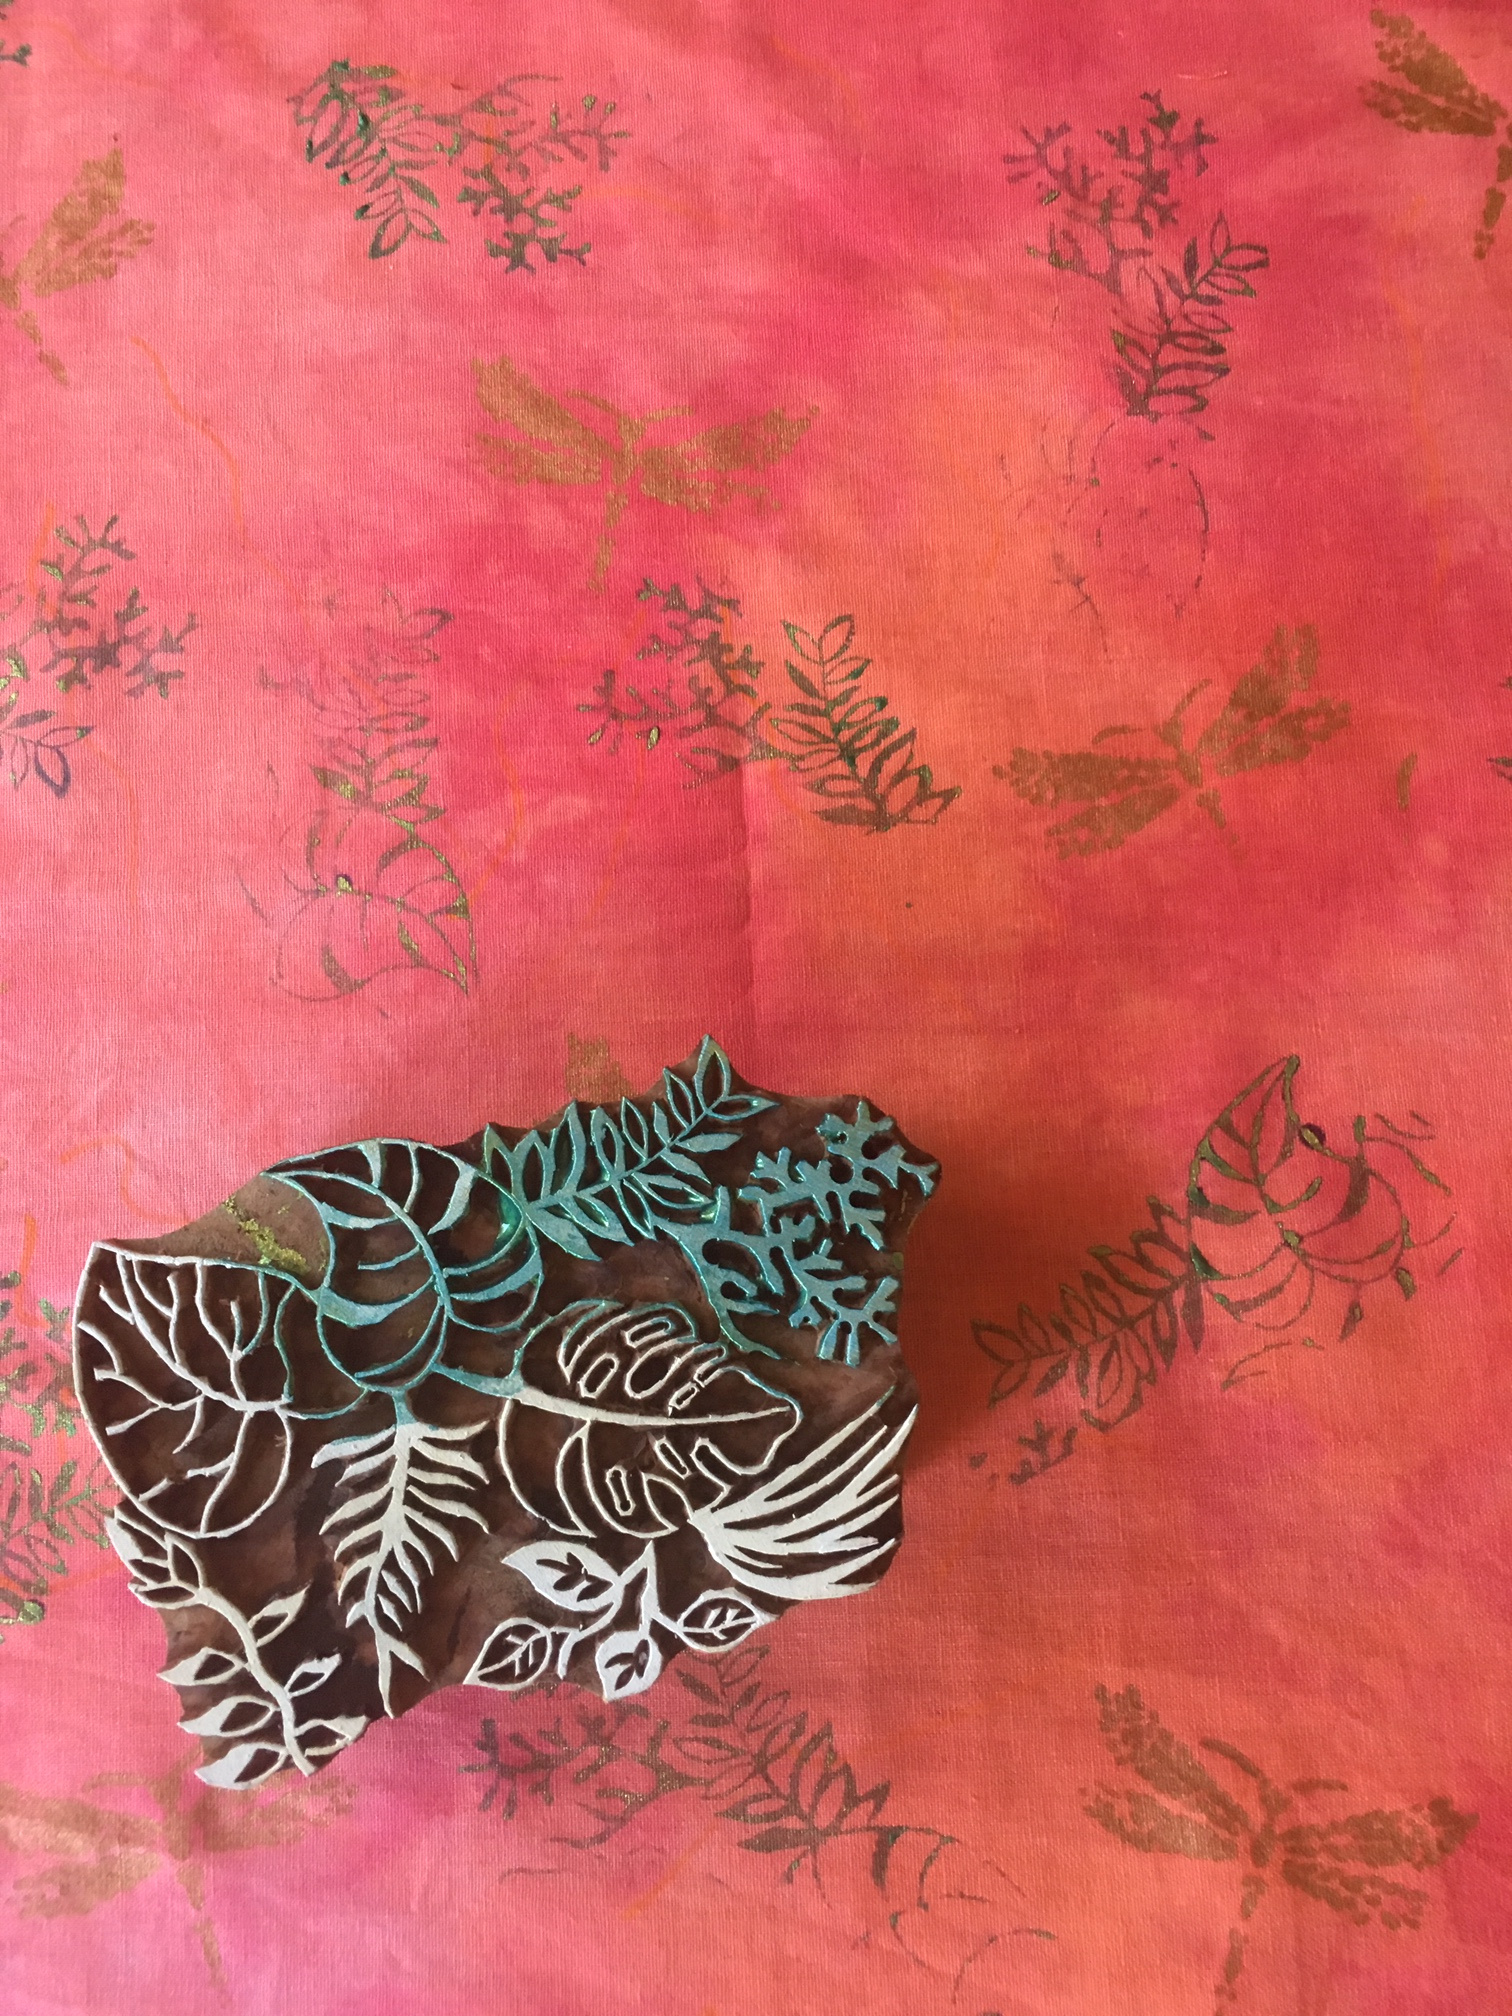
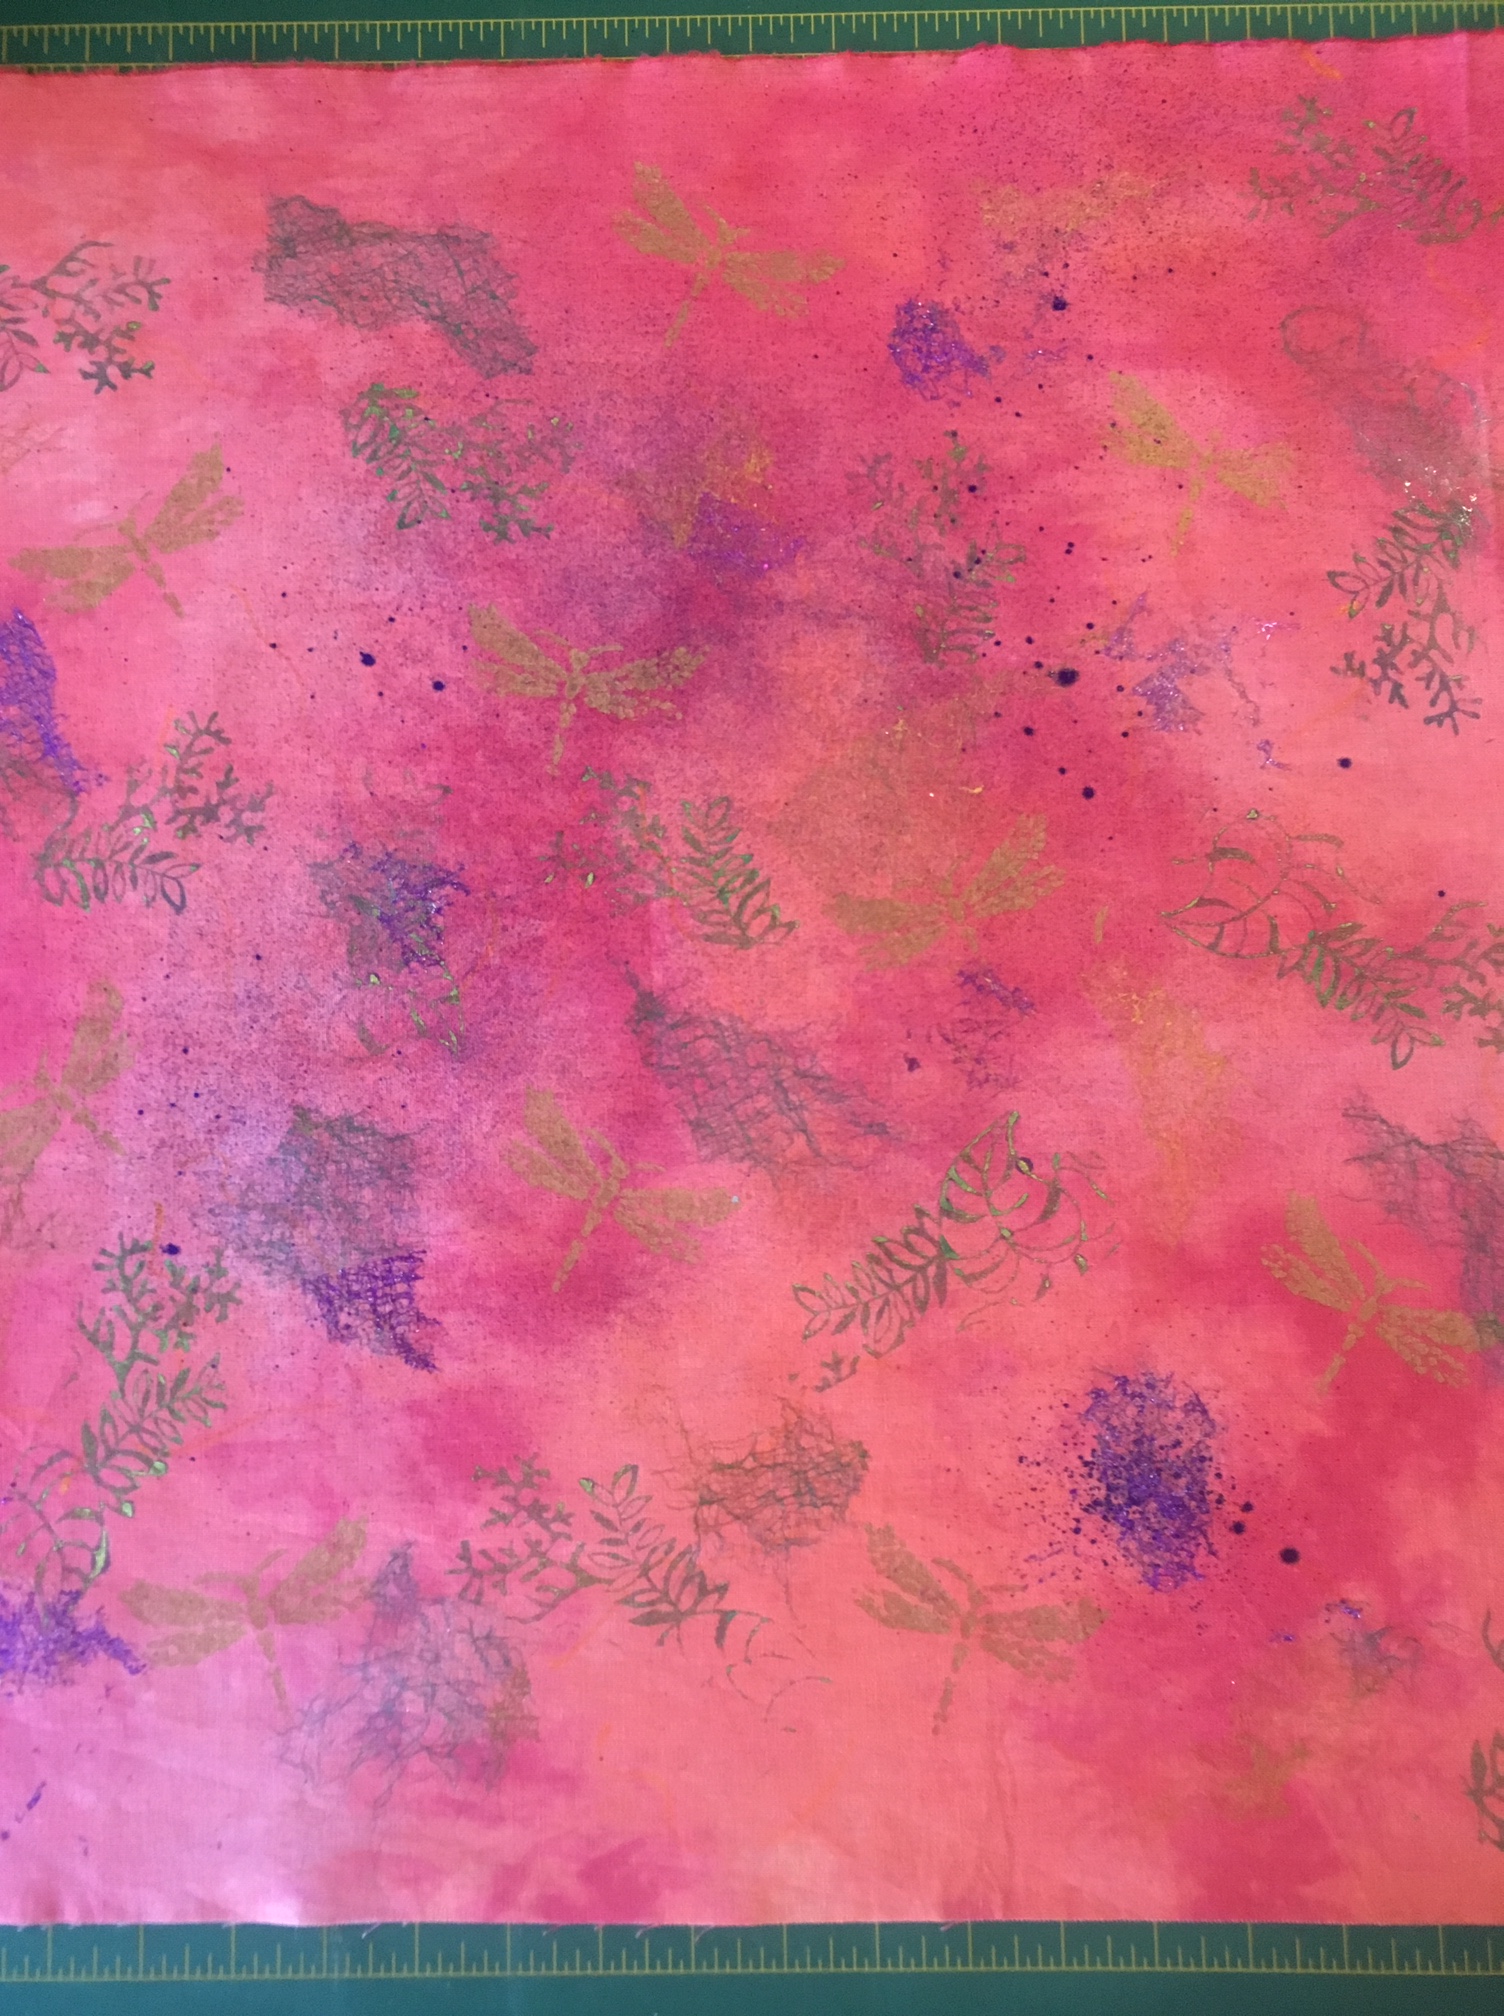
Here is the finished painted surface
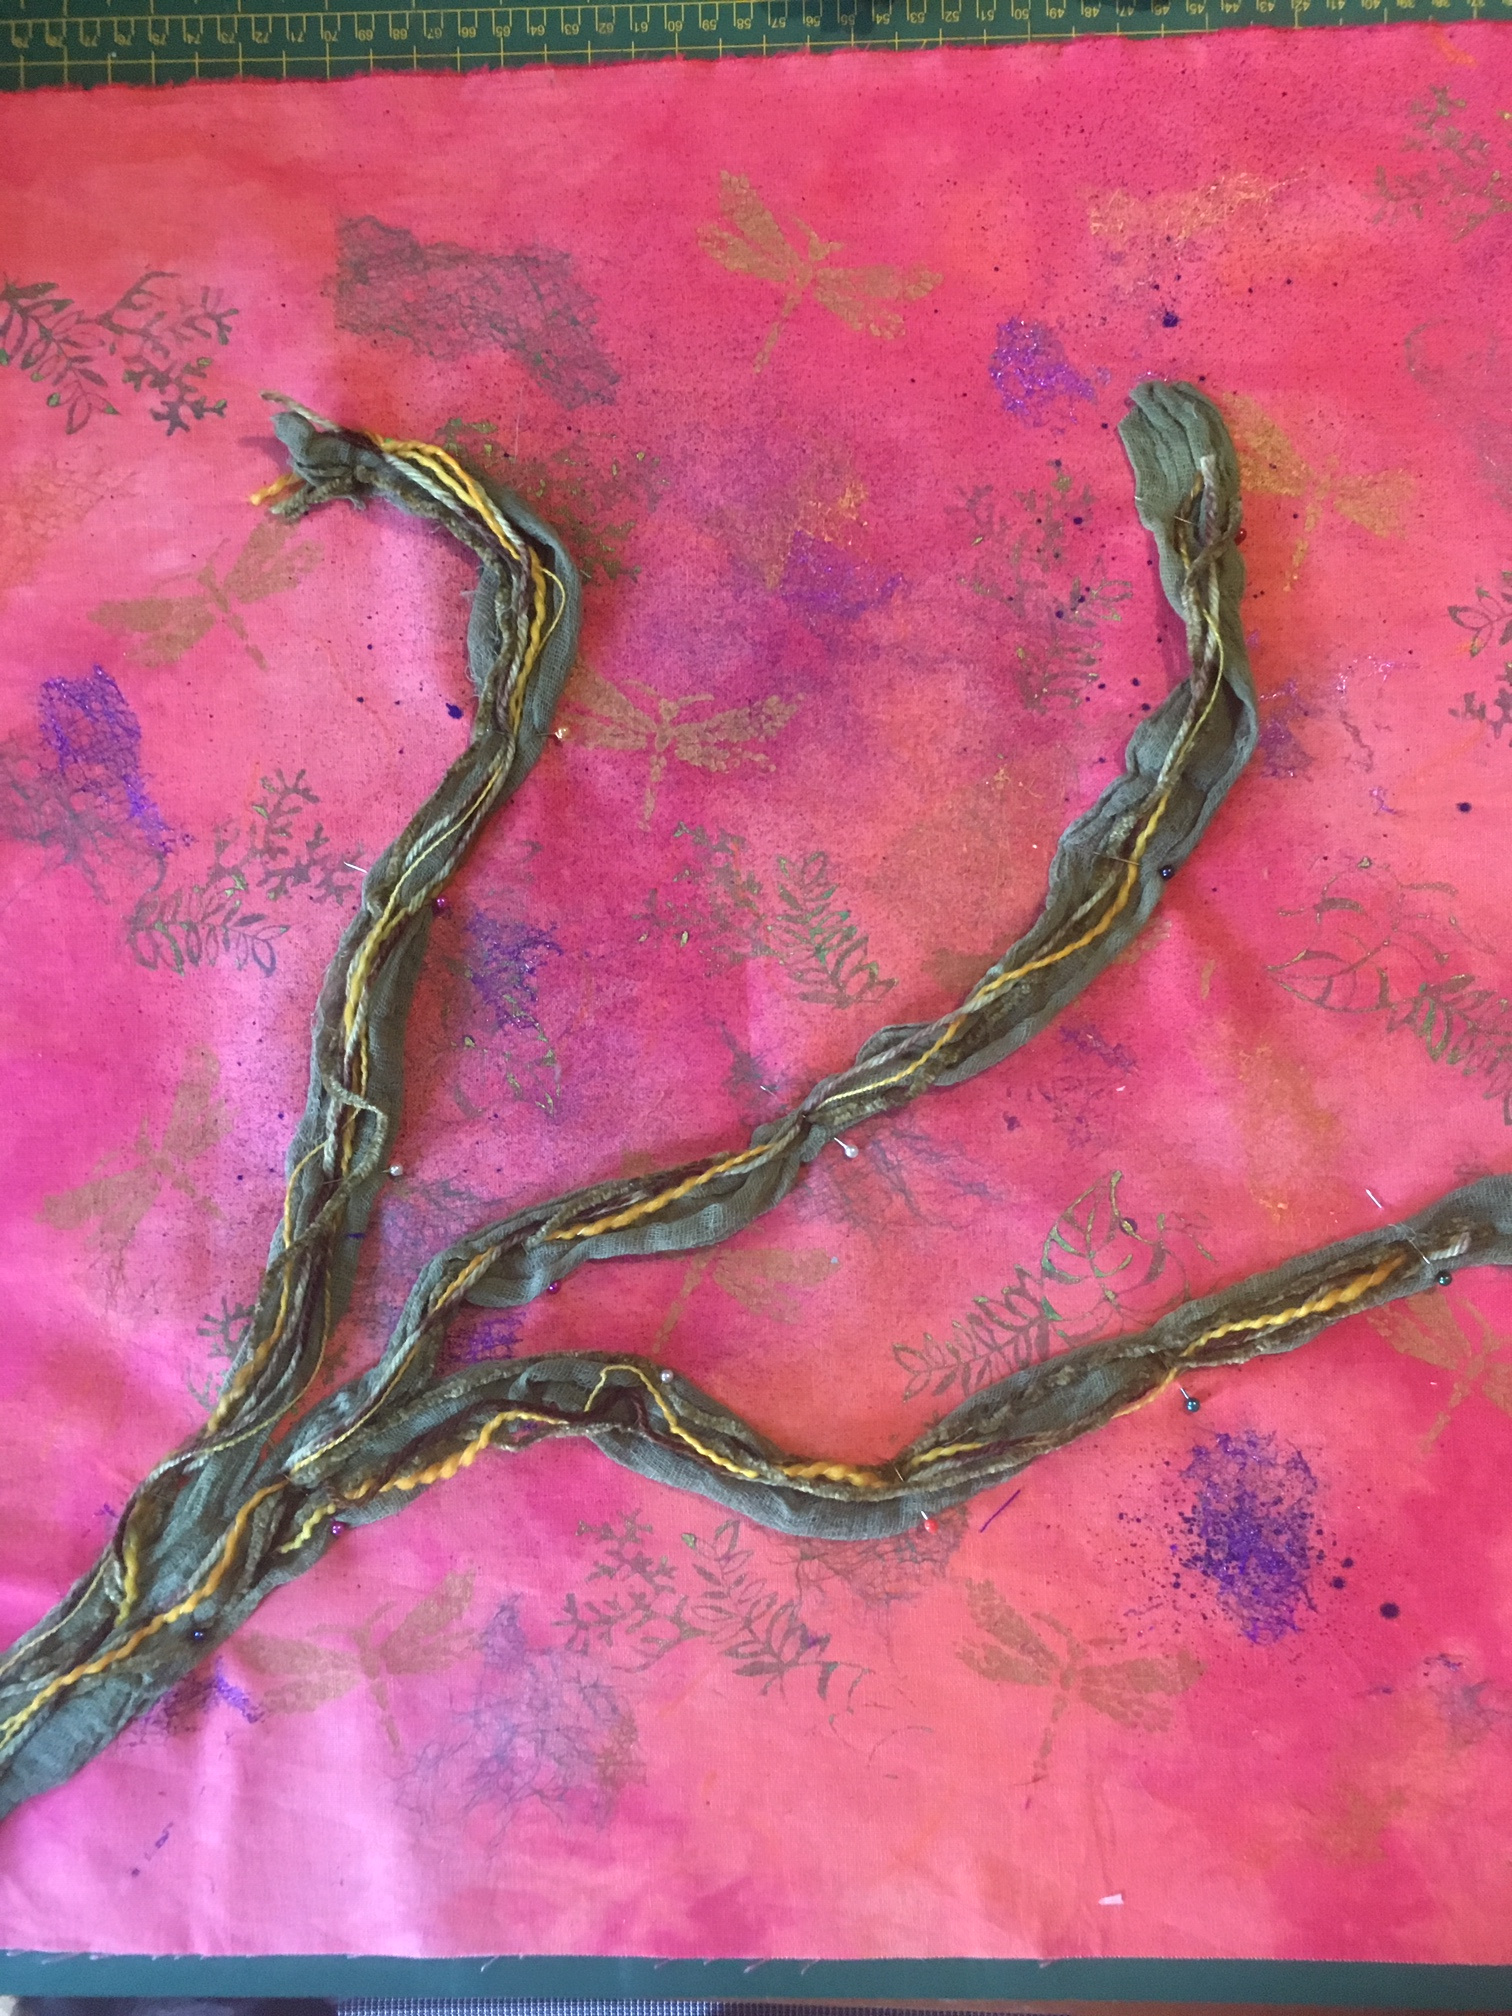
Next I used the cotton scrim and yarns to create the framework of the piece; the stems of my plants.
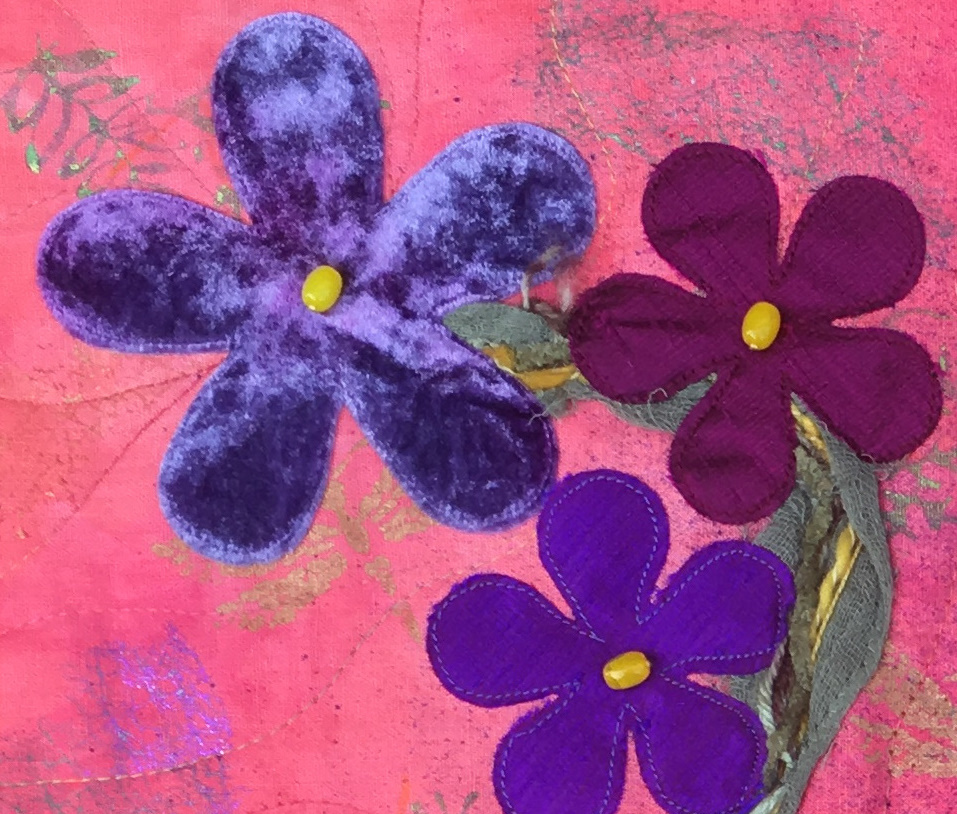
I cut my flowers on a Sizzex. This shape is a regular of mine as I really like both the range of sizes I have but the rounded symmetry this shape creates. I have flowers in three different sizes. The largest are in my hand dyed velvet. Then I cut three different silk dupioni fabrics in the two smaller sizes. I always cut more than I need as I select them randomly. Nature is very arbitrary and random, so by letting chance select my flowers, I have a better chance of it looking organic.
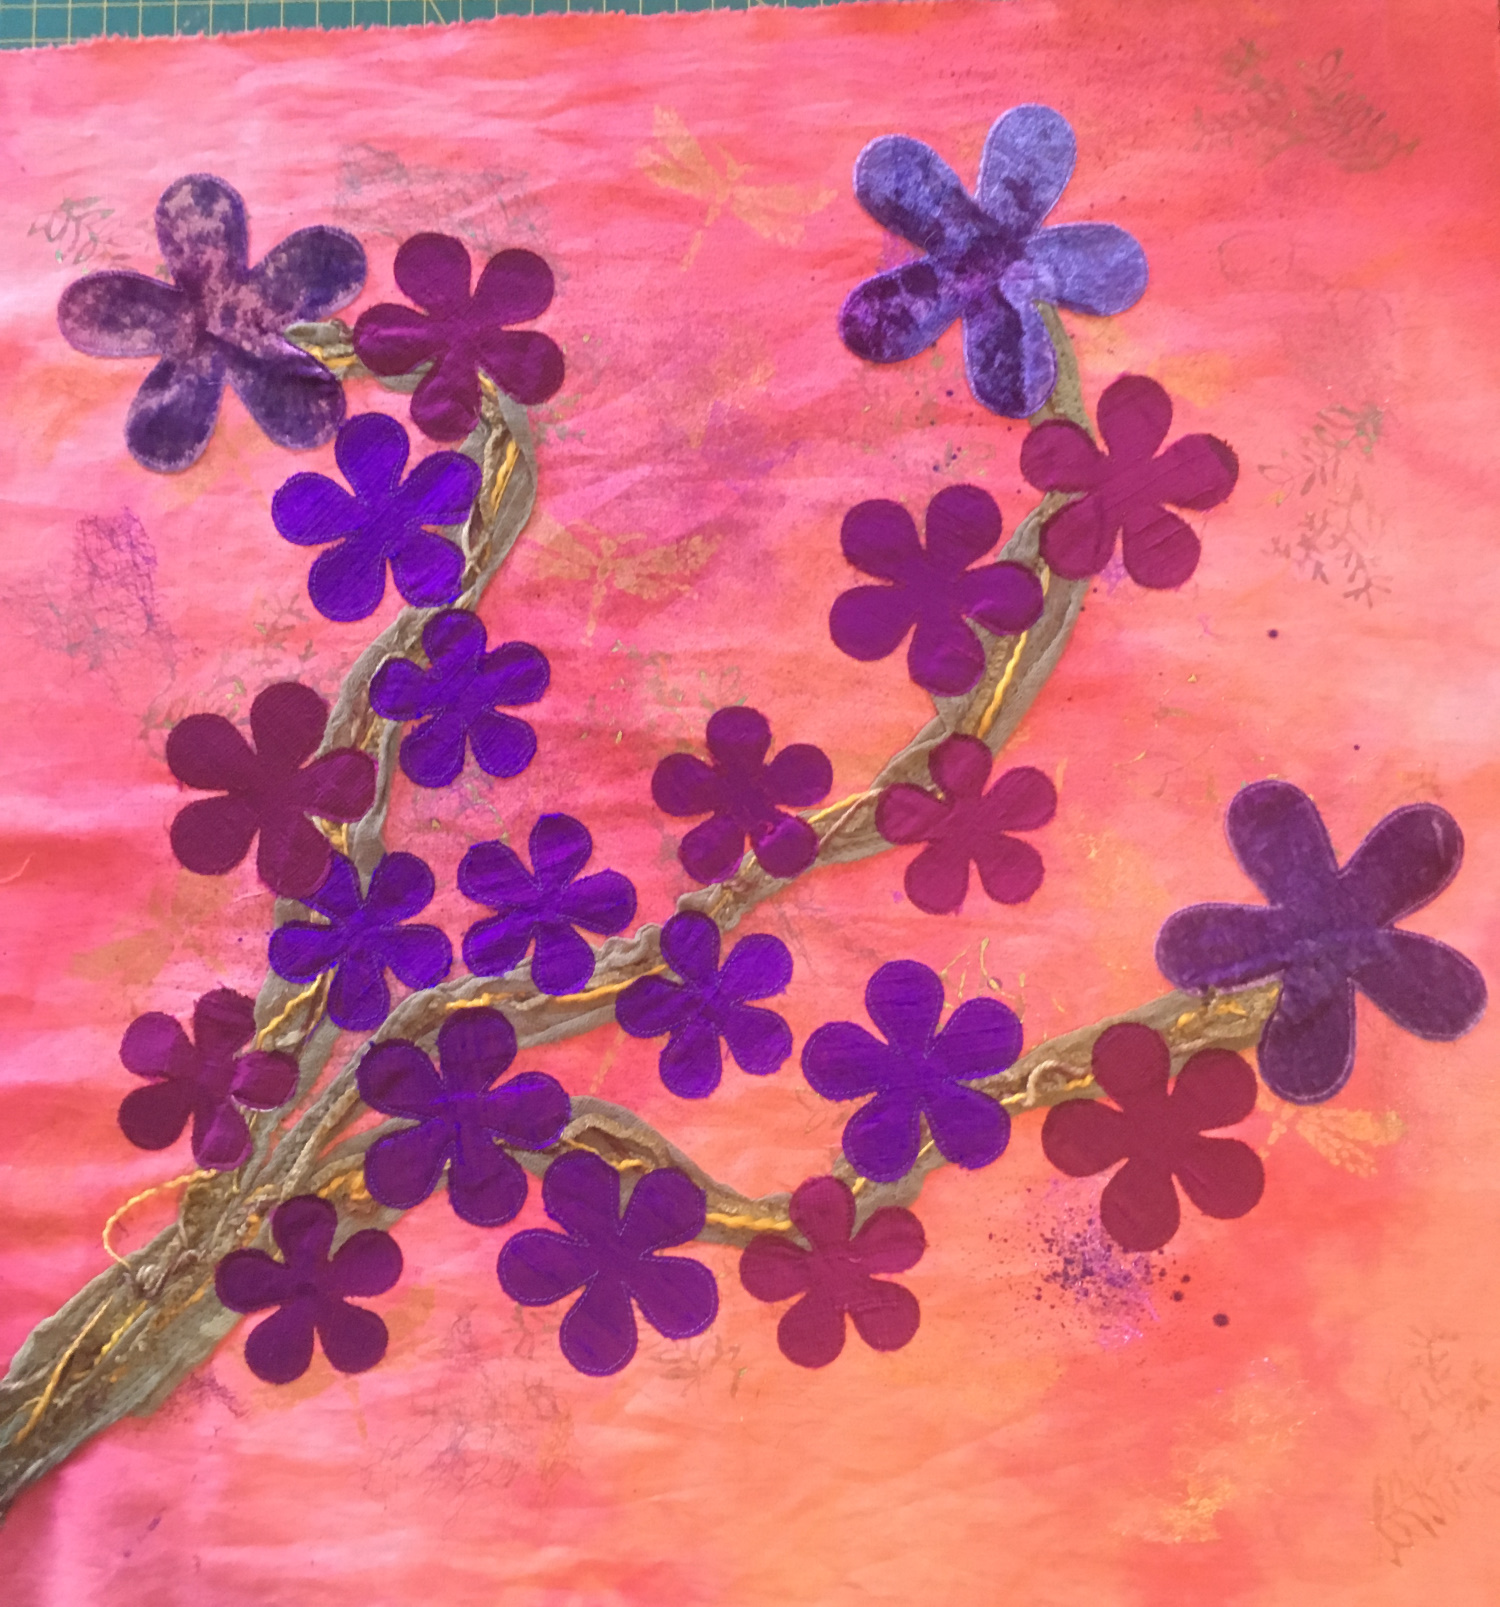
I stitch around the edges of all my applique with a simple straight stitch. A more traditional blanket stitch would not suit the aesthetic of most of my work. And I don’t want the stitching to dominate. If I want a stronger line, I will do a machine satin stitch, but I don’t do that often.
My label was printed on cotton and adhered to the backing and I was on the home stretch. Then came the quilting.
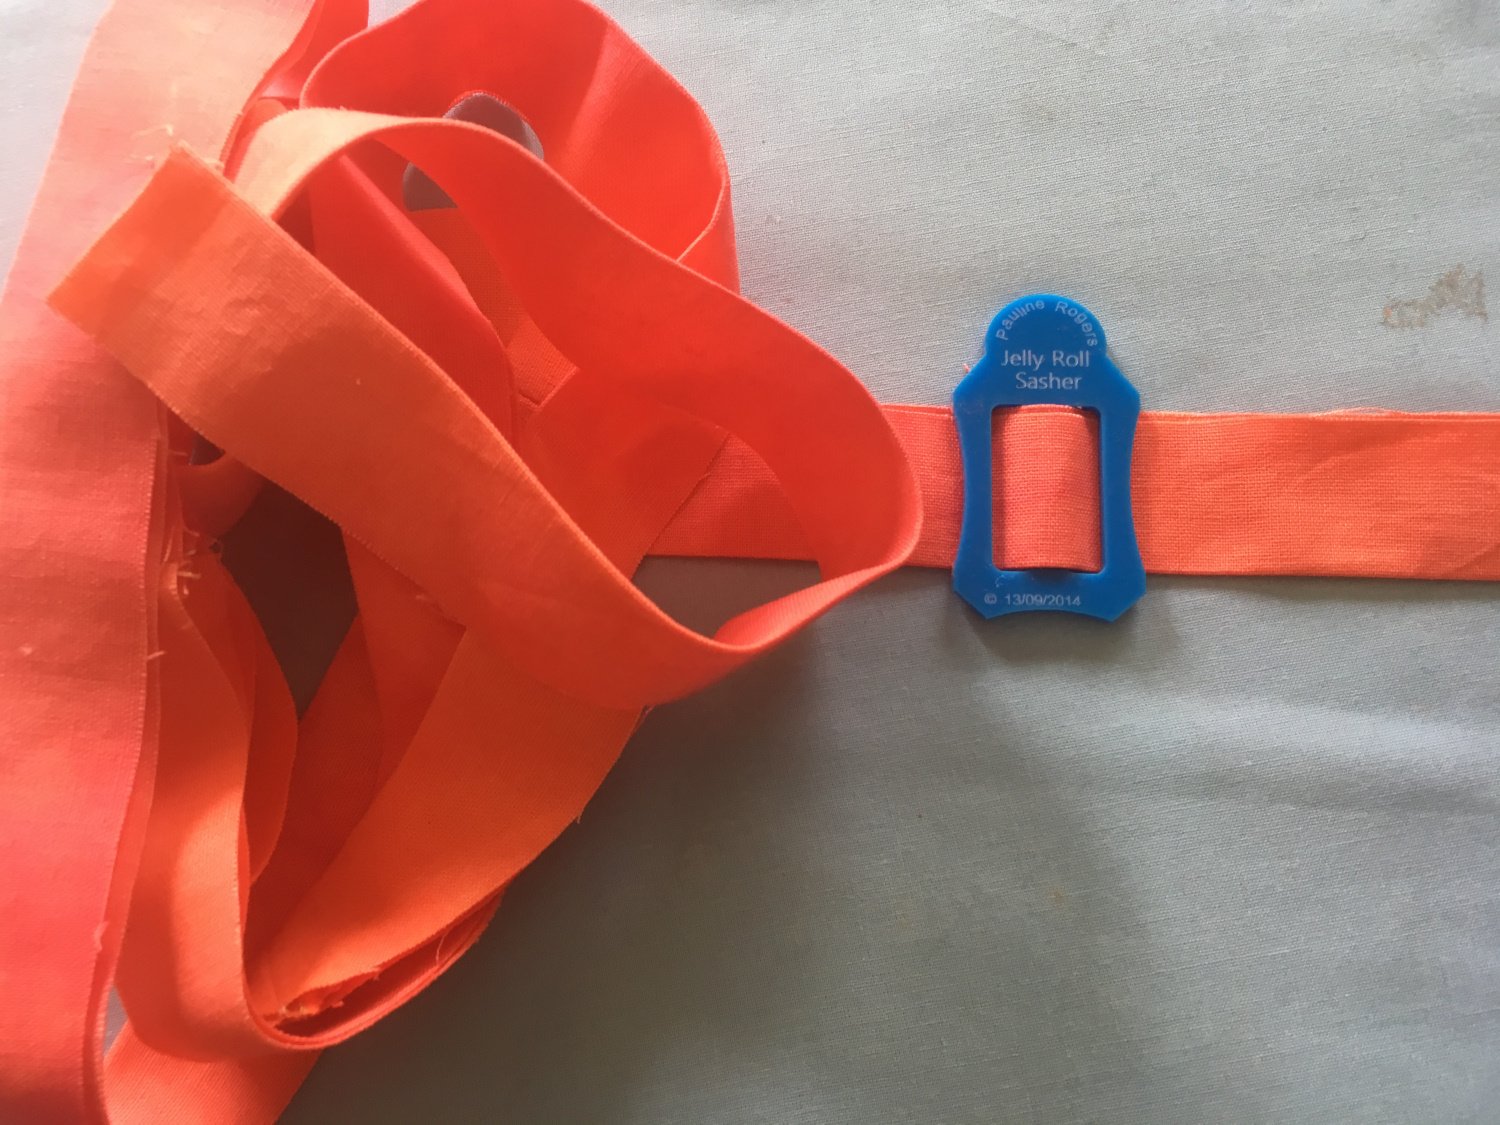
I used the 2.5 inch Jelly Roll sasher from Paulines Quilters World for my binding. The linen has more stretch than a standard patchwork cotton so it was a bit more temperamental to run through the sasher than cotton would have been, but this process is quick and easy and fool proof.
With the binding and hanging sleeve stitched down. I finished off by adding bright yellow, opaque beads. I use a LOT of complementary colourways for the pop and this quilt was no exception. Over all the piece is bright, warm and spring-like. I hope it raises some money for the IQA in the silent auction.
Comments : Leave a Comment »
Categories : Art Quilts, donation quilt, Houston Quilt Festival, International Quilt Association, Travelling Teacher
International Teaching for 2017
5 02 2017One of the reasons, I cut back on and then gave away the major Craft and Quilt shows was that I wanted to be available for opportunities to teach and maybe trade overseas. When I was committed to 10 to 15 large shows in a year, I had no time to do anything else. I also wanted to increase my teaching in Australia and New Zealand. Teaching in prestige venues such as Festival of Quilts in Birmingham and Quilt Festival in Houston is a tremendous honour. It is also incredibly good fun and you get to meet amazing people, both your fellow faculty and the fabulous students.
In 2017 I have again been invited back to teach at both venues.
I am also going to be part of an international online collaboration for the second year: The Fiber Art Connection. Fiber Art Connection was created by Desiree Habicht as a collegiate way to provide diverse textile art classes online. It is a unique format and one that is very supportive for students. As a participant you get access to ten weeks of material; five teachers spreading the material over two weeks each plus a bonus week. All of the teachers are experienced highly regarded textile artists who share a lot of material with you. This year there will be Desiree Habicht, Leonore Crawford, Libby Williams, Lisa Chin and me! The material is diverse and will broaden your textile art skills. And you can do it all from your own home, in your pyjamas if you like at your own time and pace.
The 2017 classes kick off on 1st March and you can book in now. To find out more about this, check it out online here: http://www.fiberartconnection.com/the-artistsclasses-session-2.html
Festival of Quilts Birmingham
Returning for the fourth year in a row, I have an incredibly full schedule again this year. Last year I taught nine classes/workshops and all bar one was full to overflowing. Hopefully this will be the case again this year. The show runs from Thursday 10th August until Sunday 13th August. My schedule is:
- Wednesday 9th – Old Man Time – an all time favourite and all day class;
- Thursday 10th – I Dream of the Sea – this class sold out last year before it was open to the public and this year I have made it a full day class so we can pack more in;
- Friday 11th – 9.30 to 12.30 – Stamp making – this is a new class and we will explore loads of ways to make stamps and then try them out;
- Friday 11th – 1 hour Quick and Easy Workshop – 2.15 pm – Monoprinting and Stamping with the Gelli Plate, another very popular and tried and tested class;
- Friday 11th – 1 hour Quick and Easy Workshop -3.30 pm – Silk hankie bowl – this is a foundation class I have been teaching for over 10 years – explore how to turn fibre into fabric and make 3D objects too;
- Saturday 12th – 1 hour lecture – Adding paper elements to Art Quilts – come, sit down listen to me explain how and why I work with paper and see loads of examples;
- Saturday 12th – 1.30 to 4.30 – Dye a Rainbow – another class that sells out everywhere I run it. Learn three techniques to create dyed fabric to use in your textile projects;
- Saturday 12th – 5.00 to 8.00 – Sticks and Stones – or Just Sticks – this is a new class that will explore some less commonly used media to make patterns, texture and movement on fabric;
- Sunday 13th – Indigo and Shibori – another new, or at least renewed, class in which we will discuss Indigo dye and spend the day creating a range of shibori fabrics using multiple techniques.
It is going to be a full on program, but I live to teach and I go to Birmingham to work. The classes will be open for booking soon. This is the website for more information: http://www.thefestivalofquilts.co.uk/
Quilt Festival Houston
In 2017, I will be returning to teach in Houston for the third time. I am very excited to be invited back again, though I am hoping all the political turmoil will have settled down by November. The Festival opens for trading on the evening of Wednesday 1st November (preview night) and for formal trading from Thursday November 2nd until Sunday November 5th. I am teaching some of the classes above at Houston. I chose the most popular classes to offer, so I hope everyone can get excited about them. Classes run at the venue from Monday 30th October through until lunch time on the Sunday. This is my schedule:
- Monday 30th October – I Dream of the Sea, all day;
- Tuesday 31st October – 9.00 to 12.00 – Dye a Rainbow;
- Tuesday 31st October – 2.00 to 5.00 – Stamp Making;
- Thursday 2nd November – Indigo and Shibori, all day;
- Friday 3rd November – Old Man Time, all day;
- Saturday 4th November – Saturday Sampler – Printed Fabrics, Stunning Quilts.
This is a perfect schedule as it will give me time to see the quilts, check out the trading floor and catch up with my US teacher friends. I can’t wait. Class bookings won’t be open for a while yet, but you can order a catalogue or keep an eye out for the online ordering on this web page: http://www.quilts.com/quilt-festival-houston.html
Teaching in Australia
In between that and a few other international commitments, I have capacity to run any or all of these classes locally for your group or guild. I will be travelling to a number of regional shows this year and can extend my stay or visit on the way to or from these events. This keeps the travel costs down; or I could just come to you when it suits you. If you want any details on the classes, please email me at cecile@uniquestitching.com.au.
Of course, if you can not get to a face to face class, you can join the Fiber Art Connection (above) or one of my online classes or clubs.
Online classes: http://www.uniquestitching.com.au/c/4555014/1/online-classes.html
Clubs: http://www.uniquestitching.com.au/c/195258/1/clubs-subs-and-boms.html
I hope to see you somewhere this year.
Cecile
Comments : Leave a Comment »
Categories : shows, Teaching
Adding metals to your work
30 01 2017I love adding different sorts of media to a collage or art quilt. Different materials bring the characteristics of that material to the piece and extend the impact. One of my favourites is metal. Metal can be added in a lot of different ways. In this post, I will show you how simple it is to stitch metal to fabric. This blog post is an extract from one segment of my Tremendous Textiles online class. Information on joining that class can be found here: http://www.uniquestitching.com.au/p/9144486/online-class—tremendous-textile-art-techniques-2017.html
Working with metal can be a bit intimidating to some people, but there are lots of different metallic elements that can be added to a fibre art project that can be extremely effective. At their most basic, metal charms, buttons and old jewellery can really focus a project. Sometimes you just need something small to be an offset to a focal point or to add a bit of light or interest to the project and sewing a charm or other small metal element might be the perfect thing.
At other times, adding metal can be a significant part of the project. In this segment of the course, I am going to focus on adding metal as a focal point or a major media in the form of metal shim.
Metal shim is very fine metal cut into sheets. Most of the shim is aluminium that has been coated with colour. However, some is 100% copper (which I love). You can get different weights, but generally the craft quality shim does not publish the weight. This can be a little challenging if you are looking for something specific, but most of the brands produce a light weight, flexible shim that is easy to handle and work with. You can buy the commercially available metals, or you can use aluminium soft drink cans; just cut off the top and bottom and slice the cylinder into one sheet. I don’t drink any form of soft drink, so see the $8 to $10 per packet of shim far better value, but if you wanted to explore this technique broadly, you could raid the local recycling depot.
The Art Emboss brand has a light and a medium weight. The light weight is equivalent to most other craft brand metal sheets or shim.
These are the brand that I use and have on my website at the moment.
When using shim, you can cut it with scissors, a rotary cutter or die cutting machine. You can emboss it manually or in embossing sleeves and you can hand or machine stitch through it.
Most of the coloured aluminium is plain silver on one side and coloured on the other. You can mix up using both sides for variation or you can sand back some of the colour to expose silver. This is particularly effective if you emboss the shim and sand back the colour from the raised areas. You can also add colour to the shim. Colour products designed for non porous surfaces are the most effective. For example, alcohol inks and StayzOn ink pads are great for colouring metal. Embossing powder is very effect too.
The very bright piece above has blue coated aluminium shim. The shim has been embossed in embossing sleeves and then alcohol ink has been splattered. The metal is sewn to lutradur and felt.
Another very effective combination of materials is shim that has photo transfers. Transfer Artist Paper works well for this or sheer fabric like the organza can be stitched over the metal shim. The shim continues to catch light through the photos and can look quite stunning.
In its simplest form, we can stitch it, as is onto a fabric background or applique onto the shim and then stitch it down. This is what I am showing you on the video and the finished piece is shown below.
To emboss your metal by hand, you can use line drawings or stencils for the basic shape. There is a really good tutorial on using stencils to emboss metal by Magdalena Muldoon for Stencil girl. You can find it here: http://www.stencilgirltalk.com/2014/03/stencils-meet-metal-with-magdalena.html
Comments : Leave a Comment »
Categories : Art Quilts, online classes, Textile Art
2017 is pretty much locked in
15 01 2017Each year, December and January is our theoretical slower time. A time to review, organise, plan and recharge. This is the period each year where the craft shows are not on and generally the teaching program winds down. In truth, it is often a busier time as I generally plan to do a lot in this available time. New classes are organised, proposals submitted, stock is counted and organised, the dyeing and manufacturing schedule is set up and all the day to day admin that slips through the cracks gets caught up. This year has been even busier as there have been some big things to work through and sort out.
By mid January each year, the year is usually fully booked and locked down. This year is no exception with the show schedule finalised for the year. I will still slot other events into the spaces and have availability for teaching in and around these events, but here is where you can expect to see me this year. I first is less than four weeks away, oh my.
Toowoomba Craft Alive – 10th to 12th February
Knitting and Stitching Show Olympia, London – 2nd to 5th March
Dubbo Craft Alive – 9th to 12th March
Rockhampton Craft Alive – 17th to 19th March
Canberra Craft Alive – 5th to 7th May
Bendigo Craft Alive – 16th to 18th June
Wodonga Craft Alive – 7th to 9th July
Sewing Stitching and Needlecraft Show Adelaide – 14th to 16th July (to be confirmed)
Festival of Quilts Birmingham – 10th to the 13th August
Tamworth Craft Alive – 8th to 11th September
Knitting and Stitching Show Alexandra Palace, London – 11th to 15th October
Quilt Festival Houston – 1st to 5th November
Craft Alive Logan – 10th to 12th November
In addition to the places you can see us face to face, we have our online classes. Enrollments are open now and introductory exercises are currently live in all three classes. I have three starting in the next few weeks.
Stunning Surfaces – a comprehensive surface design class – starts February 4th
http://www.uniquestitching.com.au/p/9109063/online-class—stunning-surfaces-art-cloth-2017.html
Tremendous Textiles – an Art Quilt workshop – starts Ffebruary 18th
http://www.uniquestitching.com.au/p/9144486/online-class—tremendous-textile-art-techniques-2017.html
and
Almost Alchemy – a very comprehensive fabric dyeing class – starts 4th March
In addition to this, I have the great honor of being part of a second international collaboration. I am part of the second Fiber Art Connection with four other amazing textile artists: Desiree Habicht, Lenore Crawford, Lisa Chin, and Libby Williamson. I will share more of this as we get closer, but check out the details here: http://www.fiberartconnection.com/
If you are part of a group or guild that would like me to come and run workshops or a talk, please contact me, particularly if I am already going to be somewhere near you. All of my face to face classes can be tailored to the individual group needs.
See you somewhere soon.
Cecile
Comments : 2 Comments »
Categories : craft shows, online classes, Teaching
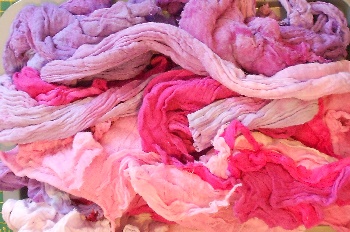
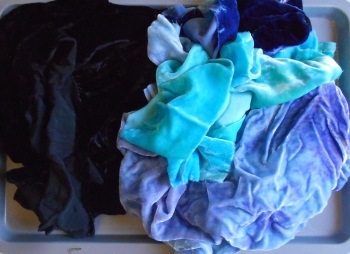
The great destash – step one of finally getting the ‘studio’ sorted.
8 01 2017It is easy to get distracted. It is easy to let the urgent overtake the important and be driven by deadlines rather than setting up the foundations that will make meeting the urgent and the deadlines easier. Too easy to find excuses and to procrastinate. I have been very guilty of this on a number of levels, but my own personal work space has been ignored and it has made life challenging at times. This is not the first time I have written about this and I am sure it will not be the last. In March 2015, I posted this blog post: https://uniquestitching.wordpress.com/2015/03/10/okay-i-am-outing-myself/. I brought it up again early last year and still have done nothing about making this space work.
In fact, a couple of days ago this area was a far worse mess than even the 2015 photos can show. Despite numerous visits to websites about organisation, I remained very unmotivated. One of the issues holding me back was an unwillingness to part with ‘precious’ fabrics. As you all know, I dye a lot of fabulous fabrics. Every time I dye a full batch of any one fabric, I have left overs and scraps and I have always kept these for me. Over the years, that has added up to a lot of fabric, most of which I can not even find. Everything I read about organisation indicated that you ‘can’t sort clutter, you have to get rid of it’. EEK. I DON’T WANT TO. It is mine. So for the last few years, I have been avoiding the inevitable; much of the fabrics must go and then I have a hope of organising the space. And I still don’t want to. Anyway, long story short, 2017 is going to be about doing a lot of what has been put off so the obvious place to start was here.
One box at a time, I started sorting. The first task was to get all the like types of material into one spot. Despite trying to keep all the bits in some sort of sensible order, things did not always go where they should have. We opened over twenty boxes, bags and baskets and do you know what I found. There was at least one piece of velvet in every single on of them. I was a little horrified at the volume of fabric we unearthed.
Here is what some of the boxes looked like:
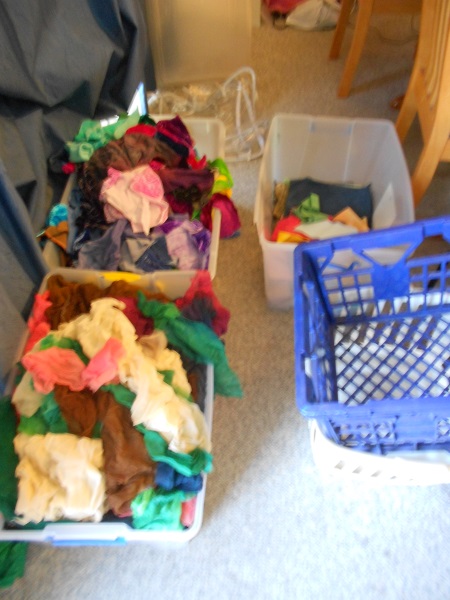
The first one is just Silk Georgette and Velvets. The second is silks, cotton scrim, hessian and other ‘bits’ while the third is wool felt and woven wools. Not shown in these photos are all the hand dyed fibres: silks and wool in particular. Each of those categories covered the table by themselves.
This does not even begin to look at the hand dyed cottons and linens. Oh my.
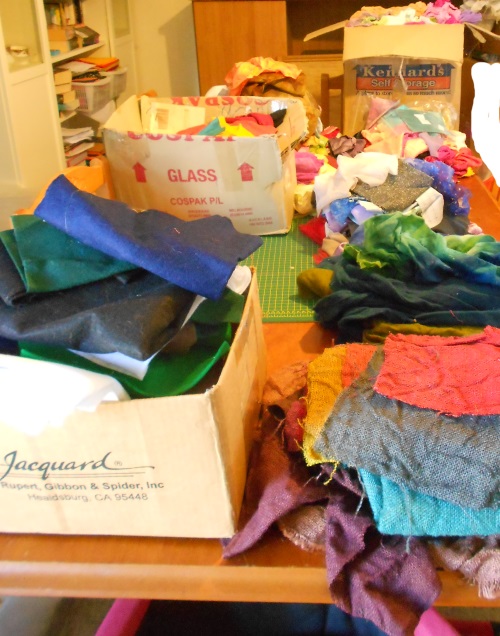
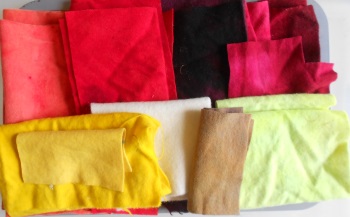
It took a few days, but I eventually sorted all of this into colourways and filled up over 100 different scrap bags.

These photos show the cotton scrim and the velvet as I sorted them.
In the end, I have them all on the website, selling them out cheaply. The best news is that I now can walk all the way around my cutting bench and machine table; clear carpet is visible though it still needs vacuuming. I have a long way to go, but I am so very happy to have started. I have discovered, much to my shock, that parting with this fabric did not, in fact, cause me any lasting harm and I know that those who have bought the packs I have sold already are getting great joy from them.
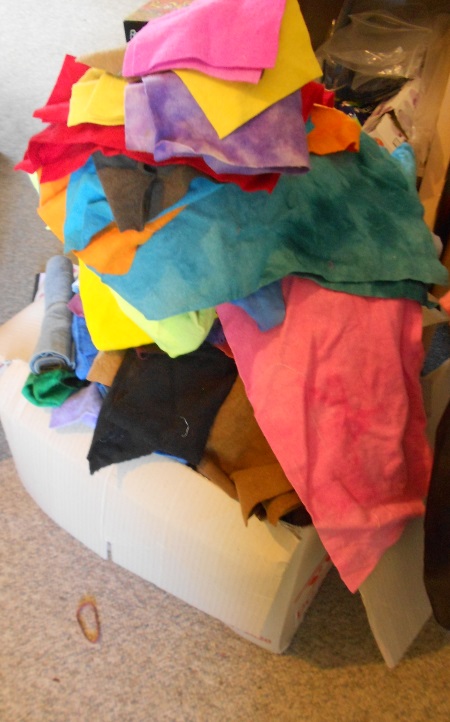
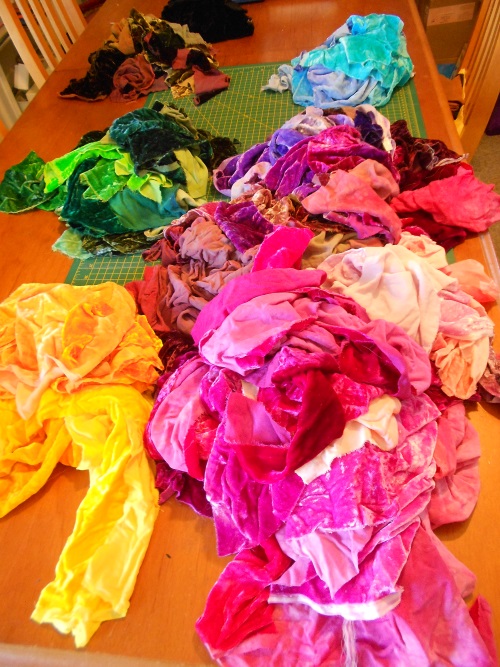
Here are some examples of what the packs ended up looking like.

A lot of the packs have been snapped up very quickly, but if you would like to help me in the great de-stash, you can see what remains here:
http://www.uniquestitching.com.au/c/4560390/1/clearance.html
I will continue to share my progress on this space.
Comments : 6 Comments »
Categories : Hand dyed fabrics, Studio
The lull before the storm – ice dyeing in preparation
1 01 20172016 has not been my favourite year. Don’t get me wrong, there have been some amazing highlights and I cherish those, but the negative has far outweighed the positive and in true Murphy’s style: if it could go wrong, it did; if it could break, it did; if someone had the power to let you down or worse, they did; but I am not going to dwell on what is past and what can not be changed.
I have never chosen a word for the year before, but for 2017, I am focussing on consolidation. I want to bed down all the half finished from 2016 and build the platform for the next few years. As such I have spent the time between Christmas and New Year building a plan. I have even taken the unprecedented step of getting some help. I don’t generally do New Years resolutions and this year is no different, but I am going to work with the resources of The Business Bakery and work in three lots of 100 day goals for this year. I am telling you this because it is supposed to help keep me accountable if I tell people what I am doing. So, here I go. If you want to find out more about the structure, go here:
I have a lot of work to do to get everything back on an even keel, but I am nothing if not resilient. I am not going to share the content of the goals until they are close to realised, but I can share the steps along the way. To keep me sane this week amongst all the admin and as one of the micro actions I need to take, I have ice dyed some fabric.
Ice dyeing in Australia in 30+ degree heat produces very different results to when it is done in the middle of winter or in snow. This is because of the chemistry of the dyes and mordants. So, the traditional outputs of ice or snow dyeing is usually soft, gentle colours. In this heat, despite the dye being carried through the fabric by the melting ice, the dye has high temperatures to ‘batch’ in, so the colour is still strong and vibrant. (If you want to understand this and learn how to dye, check out my Almost Alchemy dyeing class: http://www.uniquestitching.com.au/p/9122334/online-class—almost-alchemy—dyeing-for-the-traditional-and-art-quilter—2017.html).
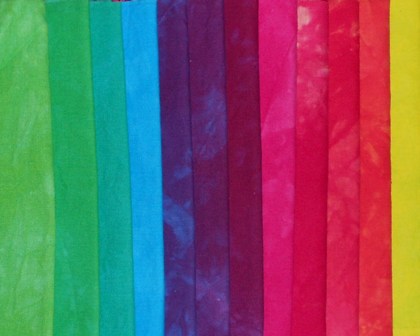
So, in some ways ice dyeing in heat does not give you very different results to other dyeing techniques due to the hot batching. What you do get though is unpredictable randomness and I am a big fan of unpredictable randomness. I have folded some of these pieces, shibori style, and others I have just scrunched, but the random effect is perfect as the first layer of fabric for a couple of projects I will work on this month. Here are the six fabrics. They are all fat quarter cotton homespun (muslin in US terms).


I will try to share what I do with these as I go.
Comments : 4 Comments »
Categories : dyeing, Surface Design
Cocoons – they are multiplying – I am sure
14 09 2016I have been dyeing various silk products for over ten years now and never cease to be amazed at how well the colour is absorbed by the silk fibre. Each different silk ‘bit’ has different dye absorption – more or less dye sites for the dye to lock onto and each, therefore, is a little bit different, even when dyed in the same dye bath.
Silk fibre is an animal or protein fibre, so generally would be dyed most effectively with acid dyes. These dyes need to be boiled or steamed to create the reaction and to set the dye. That does not work with the cocoons very well as a cocoon still contains the sericin – the protein that makes the cocoon hard and strong. When cocoons are processed into silk fibre, they are boiled or at least softened in very hot water to break down the sericin and release the fibre, ready to be spun. If the hard cocoons are boiled or heated extensively in the dyeing process, there is a strong likelihood that the cocoon will loose the sericin and thereby damaged. For this reason, I use Procion dyes which are generally optimal for cellulose or plant based fibres, but work well on silk too. Procion dyes are a cold water process so the risk of breaking down the sericin is almost non existent. You may often read that you need to use an acidic mordant with the Procion dyes on silk, but I still use soda ash – an alkaline and it works fabulously. Here are some photos and a brief description of my process.
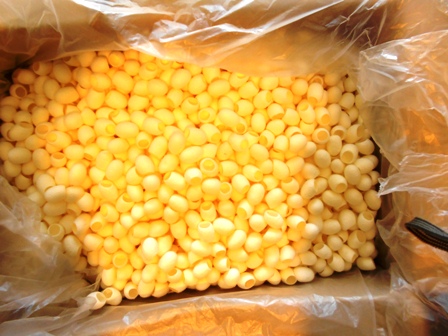
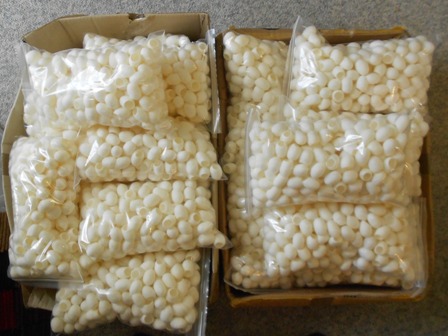
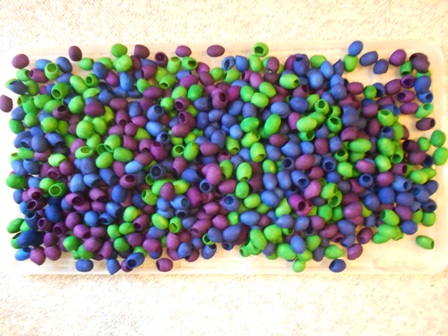
I get these in big boxes, by the kilogram. They are not yellow, this was a product of the flash on the camera. The cocoons come cut. This means that the original occupant is no longer in situ, which is a good thing. Cut cocoons clear customs much faster than uncut ones and are generally cleaner, though you pay more for them due to the processing. Once I have these, I work out how many colourways I need to dye and how much, weight wise, required to dye each colourway. I then take the cocoons and weigh them into bags: one bag per colour needed. My cocoons are sold in mixed packs of three colours, so what ever I do needs to be divisible by 3. In the case of this dye run, I needed to do ten colour ways, so 30 different colours in total, so 30 different bags of cocoons.
I mix my dyes and pour them into each bag, sealing the bags as I go. Each bag gets about a litre of dye and I move it around to try to give all the cocoons a fairly even coverage. Consistency in colour and coverage is not essential to me in this process, but I do like them all to be well coloured and the colour saturated.
After the dyeing and batching is completed, I rinse them in warm water until the water runs clear. When the rinse water is clear, it indicates that all of the dye molecules are either permanently locked into the silk fibre cells or flushed out in the rinse water. Here are some of my colours soaking.
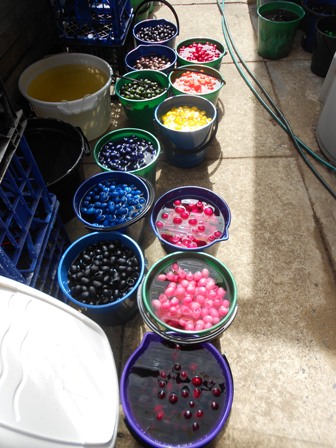
If you look closely, you can see that they are in sets of three as I try to keep my colourways together.
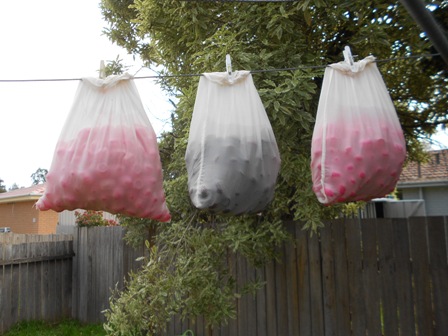
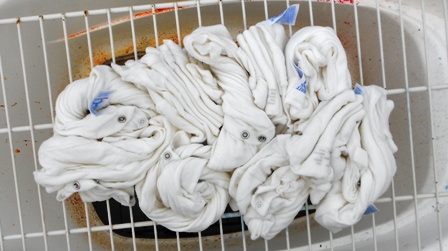
I dry these one of two ways, sometimes in a combination of both. Firstly, if the weather is good, I put them in fabric bags and hang them on the line, again keeping the sets of three together as best I can.
If weather and space allows, depending on how much I have dyed, I spread the cocoons out in baskets, on netting and even on old screen doors to dry. This takes up a lot of space if I do all the colourways and will only work on warm, dry days. It is not uncommon for every horizontal space in the house to be covered with trays of drying cocoons when the weather won’t play nicely with me.
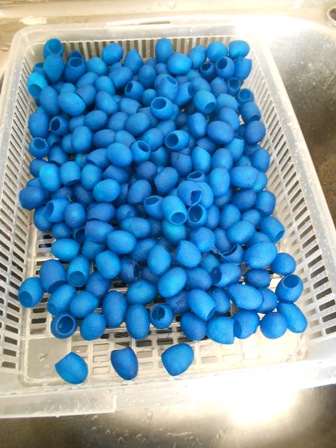
Once completely dry, I combine the three colourways in a big tub, remove knotted or loose silk fibre and give them a big mix.

This is the “Cools” colourway. From there, they are weighed very carefully into 10 gram lots and packaged into either cellophane bags or clear pillow packs. Every pack is a little bit different. They are not easy to photograph in the pillow packs, but they look terrific like this.
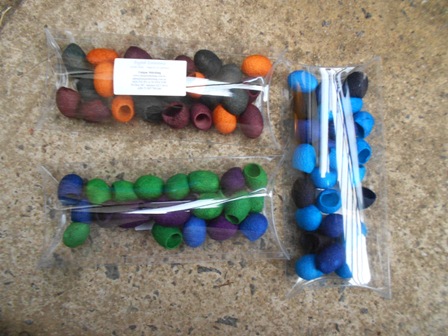
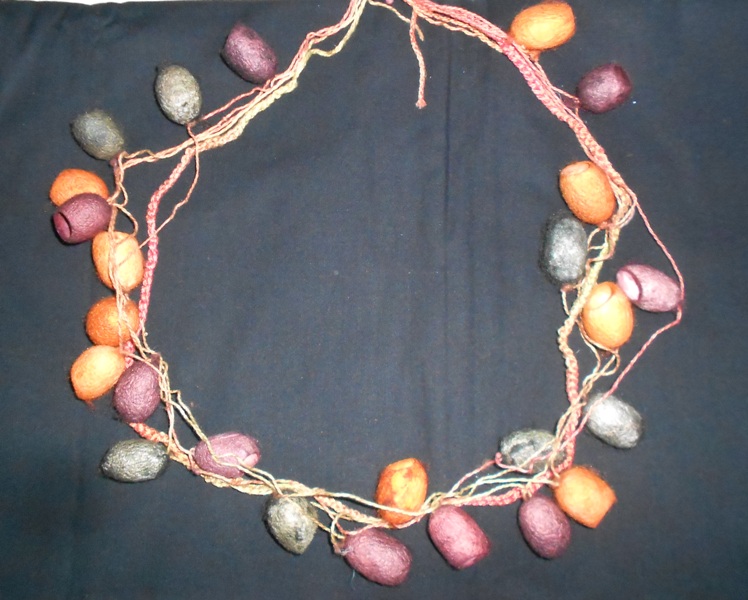
I get asked constantly what to do with them. Well, the short answer is anything your feel like. You can stitch onto and through them, so they can be embellished and sewn to anything, strung up or added to pretty much any project that you think would benefit from three dimensional elements. Try embroidering or beading into them, adding them to embroidery or felt projects, turning them into flower buds, snails, fairy skirts, and so much more. Add them to collage or sculptures, or like the example below, make jewellery. There is no limit to how you can use them; only a lack of ideas. Here is a very simple necklace I made.
I have fifteen different colourways, all of which are on my website – http://www.uniquestitching.com.au. Search for cocoons if you want to have a look.
Comments : 2 Comments »
Categories : dyeing, silks
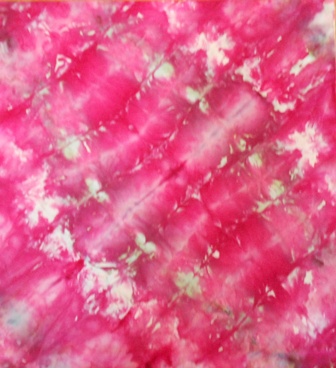
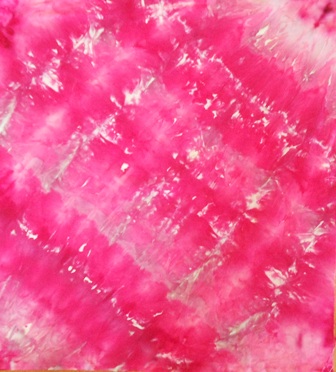
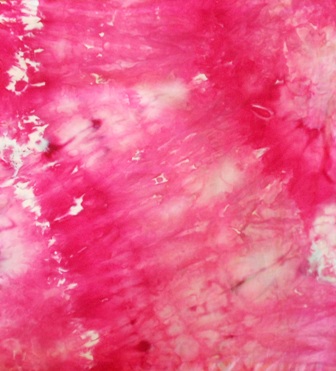
Ice Dyeing with Procion Dyes
14 03 2016I love dyeing fabric. I do, I just love it. I could easily spend all my waking time making things colourful with dye and yet, I have resisted the growing trend of ice dyeing until quite recently. Why have I avoided it? Why have I ice dyed lately? Let me explain.
What is it?
My observation is that ice dyeing morphed out of snow dyeing. Snow dyeing became a thing when the dyers in the Northern hemisphere started experimenting on how they could feed their dyeing addiction in the middle of great drifts of snow. Snow or ice dyeing gives a very different effect than the traditional Procion dyeing techniques. The chemistry is a bit ‘wrong’ and on one level, does not make a huge amount of sense. As a result, ice dyeing gives softer, more drifty colours. Also, the dye powder is dispersed by the melting ice, the colour distribution can be very loose and ad hoc; organic almost. It is an interesting technique to play with.
Why I avoided it.
There are a number of reasons for this:
- it does not feel safe – measuring out large amounts of dry dye powder and leaving it on top of the ice until it melts means that lots of loose dye particles can become airborne;
- it is not very efficient – you use more dye to get a less vibrant effect than all the more common techniques;
- it can be costly – both in dye and ice. Unless you have a large ice making capacity and don’t have access to lots of snow, you will go through a lot of ice and it can add up.
Why I gave it a go.
I have seen the results others were getting and they can be very beautiful. Ice dyeing has become very popular in the tie dyeing community. I am not a fan of the full on, 1970s tie dyed mandalas, etc, but I do like a slightly modified, less planed version of ‘tie dyeing’. (And I don’t actually tie unless I am doing shibori as this creates work)
This post is not going to be a comprehensive tutorial on the technique, but I do want to show you the results I got.
Fold, scrunch, pleat or bundle your fabric or items to be dyed. Place on a rack of some sort with a vessel underneath to catch melting dye.
If you want to, create a cuff either with your bucket/vessel or with foil.
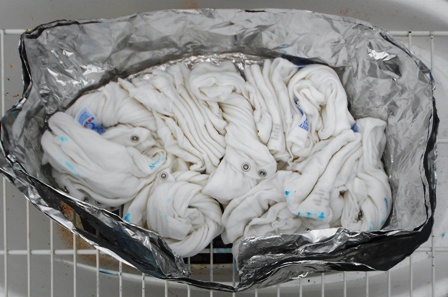
Cover in ice.
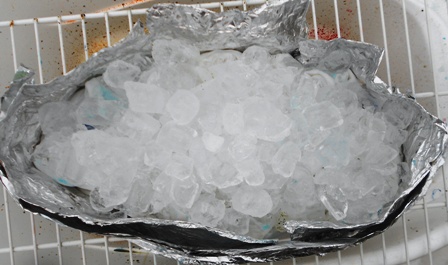
Cover with dye.
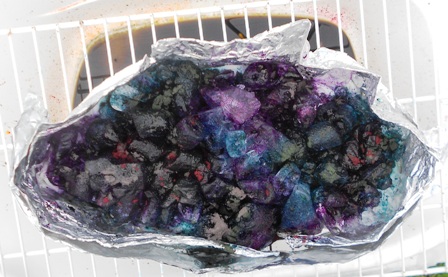
Walk away and leave it alone until all the ice has melted and the dye distributed. I left each batch over night and rinsed out the next morning.
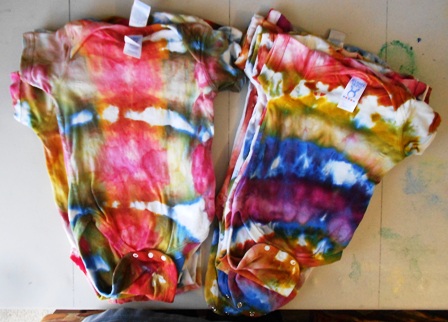
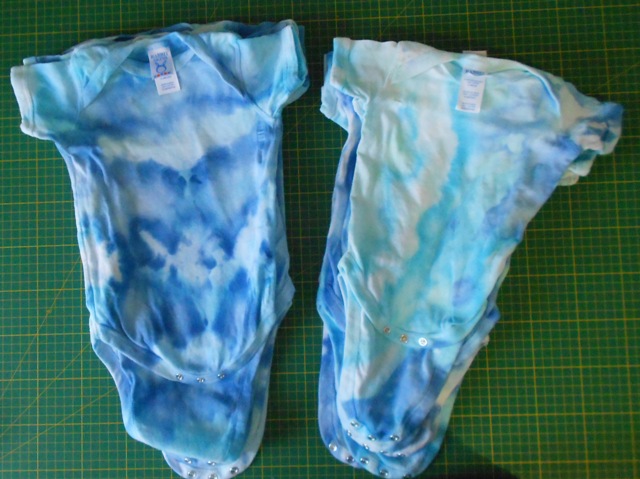
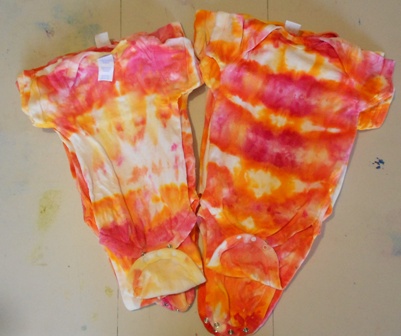
Here are some of my results.
If you would like to learn a lot more about dyeing fabric, check out my very comprehensive Almost Alchemy online dyeing class. We start with Ice Dyeing. Details can be found here:
Comments : Leave a Comment »
Categories : dyeing, Instructions, online classes


